Sunday, February 26, 2017

Household Hacks: 7 easy household hacks for the bathroom

Brian and I have a disagreement about the word "hack"—specifically, its use to mean a handy shortcut for everyday life. Brian objects to it on the ground that it's overused, sometimes even in contexts where it really doesn't apply at all (such as these kitchen tips from XKCD.) But personally, I like it. To me, it conjures up images of Alexander cutting through the Gordian knot—a quick, direct solution to a complicated problem. Even the shortness of the word feels appropriate for a short, simple workaround.

Over the past few months, I've noticed that we seem to have come up with a lot of household hacks specifically for use in the bathroom. Some are for cleaning, some for grooming, and some for repairs, but all of them are specifically bath-related. So I thought I'd sum them all up in one post, as a sort of tribute to the Spirit of Hacking.

Hack #1: Clean hair from the sink drain with a plastic bag tie
Every so often, the drain in our sink gets a little sluggish. That's a sure sign that it's clogged up with hair (and usually bits of nasty grime that are clinging to the hair), and it won't run smoothly again until it's cleaned. We have a special tool for this purpose, known as a Zip-It: a long, flexible plastic shaft with little barbs on both sides. You feed this thing carefully down into the drain, and the barbs catch on the hairs so you can pull them back out. The Zip-It emerges from the drain trailing long strands of hair and associated gunk like seaweed off a lobster trap, which is disgusting, but effective.

The Zip-It is only $2.50 at Home Depot, and it's both easier and safer than those vile chemical drain cleaners, which eat through the hair with caustic chemicals that can damage your plumbing (and possibly you, if you splash any on yourself). But if you don't happen to have one on hand when a clog pops up, you can achieve similar results with a plastic garbage bag tie (the kind with rows of little jagged teeth on it, like this). Feed it down into the drain, and you can pull up the hairs from the top few inches of the pipe. It won't penetrate the pipe as deeply as the Zip-It, but it's easy to do, and it should clear away enough of the clog to get the drain running again.

Hack #2: Clean the tub with a dish wand
I used to drive myself crazy trying to get our bathtub clean. My go-to ecofrugal cleaners, vinegar and baking soda, seemed to have no impact at all on the film that clung to the base of the tub. I moved on to various commercial cleaners, including sprays, liquids, and powders; I experimented with different tools, going at the scum with a rag, a sponge, a scrubby pad, a brush, and even a special "shower scrubber" tool with an extendable handle and pivoting head, designed specifically for cleaning the tub from a standing position. (This was worse than useless, as every time I put any real pressure behind it, the head would just flip over.) No matter what I used or how vigorously I scrubbed, I could never get the tub completely clean. All I had to do was scrape my fingernails along the edge, and they'd come away with that whitish film under them.

I turned for help to my pals at the Dollar Stretcher forums. One of them enthusiastically recommended "Ajax grapefruit scented dish soap," applied with a long-handled brush while the tub and tiles are wet, and another suggested a mixture of Palmolive and sudsy ammonia in a spray bottle. Not having either of those brands on hand, I decided to try grabbing an old dish-scrubbing wand filled with generic dish soap and applying that to the wet tub right after my shower. This worked much better than anything else I'd tried. At first, I followed up with a vinegar-and-water spray to rinse all the soap residue off, but eventually I got the idea to add equal parts dish soap and vinegar to the scrubbing brush and apply everything all in one go, then rinse it off.

This is now my regular weekly routine for cleaning the tub. I keep the dishwand hanging at the ready on the towel bar, so once a week, I can just grab it right after I turn off the shower and give everything a quick scrub before rinsing it. That way I don't have to mess around getting into grubby clothes specially for cleaning. I have since seen blog posts saying this vinegar-and-dish-soap concoction works in spray form as well, which might be even easier...but since it took me so long to find a method that worked, I'm not inclined to mess with it.

Hack #3: Remove stains from porcelain with oxygen laundry booster
A few years ago, we switched to a walnut-based cat litter from Blue Buffalo. In most ways, we love it: it clumps firmly, doesn't track as much as the wheat stuff, and controls odor so well that we have never had to change the litter once since we started using it. We just keep scooping out the clumps and adding more litter, and the box keeps not stinking. This makes it a much better value than any other brand we've tried, despite its high cost per pound, because none of it goes to waste.

There's only one problem with it: the walnut fragments tend to leave a darkish stain on the inside of the toilet bowl. My usual cleaning method—vinegar-water spray and a quick scrub with the brush—had no effect. Once again, I tried upgrading to stronger cleaners, including some with chlorine bleach, but to no avail. Brian tried going at the stains with steel wool and was able to get them out temporarily—but that just ended up scratching the porcelain, so fresh stains soaked in faster than ever.

So when I got a coupon for a free carton of OxiClean, I figured it couldn't hurt to try that too. Cleaning bathrooms wasn't one of the listed uses for this product, so my hopes weren't high. But to my amazement, after I'd sprinkled it on and let it sit for a while before brushing and flushing, the stains had faded to near-invisibility. I now repeat this routine once a week, and the porcelain remains in a state of near-pristine whiteness. And I've discovered, after some experimentation, that cheaper brands of oxygen-based laundry booster, such as All, do the job just as well.

Hack #4: Strop your razor on your forearm to maintain its edge
I've mentioned this hack before in my Saving on Shaving post. As this post at Tools for Woodworking explains, stropping a blade isn't quite the same thing as sharpening it on a stone; it's more like smoothing a surface with sandpaper, gently abrading away nicks and scratches. I've seen tips on how to prolong the life of your razor blade by stropping it on a leather belt, a leather-soled shoe, or even an old pair of blue jeans—but the simplest method of all is this one, which I discovered on LifeHacker. You simply give the blade several backwards strokes against the bottom of your own forearm, which you can do right in the shower before you shave.

This method, combined with regular drying and lubrication of the blade, worked well enough for me to keep the cartridges on my old Rite Aid razor going for months on end. Sadly, that razor gave up the ghost last year, and I've yet to find a really satisfactory replacement. I tried samples from both Dollar Shave Club and Harry's, and their fancy four-or-five-blade razors just didn't give me as smooth a shave as my old, obsolete three-blade razor (not to mention that the one from Harry's literally fell apart on its third use). So for now, I'm using an el cheapo MicroTouch razor, which claims to be able to go a month on a single blade without any special interventions. I'm continuing to dry and hone the blade regularly, and while I can't exactly claim to be impressed with the results it's giving me, it is at least holding up pretty well.

Hack #5: Fix a running toilet with a drinking straw
I discovered this trick back in 2013, when we had a problem with our toilet. Basically, the flapper kept getting stuck open because the chain would either get stuck underneath it or snag on it so it couldn't close. Shortening the chain didn't work (it ended up too short, so the flapper couldn't close at all), so I adopted a trick from Wikihow: I detached the chain, fed it through a soda straw, and reattached it. This worked only partially; the rigid chain-and-straw unit was now forcing the flapper closed too quickly, before the bowl had fully filled. So Brian adapted the hack by cutting the straw in half at the middle, allowing the chain to bend. This fix worked so well that even after we eventually replaced the flapper, we reinstated the straw on the chain to keep it from snagging again.

Hack #6: Adapt your toothbrush holder with coat hanger wire 
Brian devised this toothbrush hack back in 2014, when I was trying a new brand of toothbrush that wouldn't fit in our old-fashioned toothbrush holder. This toothbrush holder dates from a simpler time when all toothbrushes had straight, smooth handles, and today's chunky, molded hand-grips just won't fit through the holes. And since it's built into the wall, replacing it isn't really an option, and leaving it unused seems like a waste.

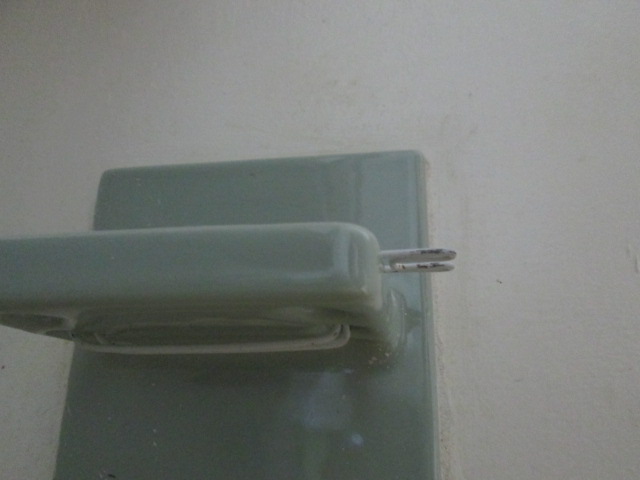
So I hit on the idea that the way to make the toothbrush fit in the holder would be to add on some kind of construct that would allow it to slide in from the side. After a little trial and error, Brian managed to achieve this by bending a piece of coat-hander wire to make a loop that would fit around the handle, then threading the ends of it through the hole in the front, under the bottom, and out on the other side. As built, this dingus can only accommodate one bulky toothbrush, but you could modify it to add a second loop on the other side if you wanted to hold two at once. Or you could just run a second set of wires through a different hole.

Hack #7: Fix a trash can that won't close with a felt pad
Ever since we adopted our two mischievous kitties back in 2015, we've kept finding new things around the house that need to be cat-proofed. Our cat-safe vase is the most notable example, but we've also had to replace a couple of wastebaskets because the cats would either chew on the wicker basket itself or fish things out of it. The worst culprit was the bathroom wastebasket, which contained enticing strands of dental floss that the cats viewed as wonderful toys. We, on the other hand, viewed them as potential garottes for unsuspecting feline throats, and we were determined to keep them out of the kitties' paws. So we bought a small covered waste bin, the kind with a lid that you can open by stepping on a pedal.

This sort of worked, but there was a problem: sometimes the lid would get stuck in the open position, allowing the kitties to go Dumpster diving for dental floss. We tried shimming the can up in the back so it would naturally tilt forward and force the lid closed when you weren't actively stepping on the pedal, but that didn't seem to be enough. So Brian tackled the problem from the other direction; instead of forcing the lid down, he decided to force the foot pedal up.

His repair is simplicity itself. He cut a couple of strips from a felt pad, the kind you put on the bottoms of chair legs to keep them from scratching the floor, and stuck them to the lip of the trash can underneath the pedal. Now, when you step on the pedal, it lowers enough to open the lid, but it doesn't go all the way to the floor, and as soon as you remove your foot, it pops back up again, closing the lid.

This hack went through a couple of iterations before he got it to work. First he tried one layer of felt, but that wasn't enough to push the pedal back up, so he had to add a second layer on top. And he initially tried sticking the felt pads on with just their own adhesive, but they didn't stay put, so he ended up pulling out the big guns and sticking them on with epoxy. Now those pads aren't going anywhere, and those kitties aren't getting their paws on any more dental floss.


So there you are: seven simple hacks for the smallest room in the house. If you know of any more ecofrugal hacks for the bathroom that you think deserve a wider audience, please feel free to share them below; I'm always looking for more ideas.

Tuesday, February 21, 2017

Money Crashers: Resources for Emergency Financial Assistance

Last summer, when I wrote my Money Crashers article on the evils of payday loans, one alternative I mentioned is to use various forms of emergency aid to get you through a financial crisis. I listed several programs that could help with housing, health care, utilities, and food, but I kept thinking that there was an awful lot of information I was leaving out. I knew there were lots more programs out there, run not just by the government but also by private charities, but there just wasn't room in the article to list them all.

So, my latest Money Crashers article is an attempt to fill in the gaps. It's a complete, one-stop guide to getting financial help in an emergency, covering everything from unemployment insurance to local food pantries. I list a wide variety of programs, grouped into broad categories such as housing, food, and child care, briefly outlining what each program does, who can use it, and how to apply. If you or anyone you know is facing a financial crisis of any kind, this article should tell you everything you need to know about getting help—or at least where to find everything you need to know.

12+ Free Government & Charity Resources for Emergency Financial Assistance

Sunday, February 19, 2017

Best budget weddings

Since my budget decor blog posts have been fairly popular, I thought I'd try doing one on budget weddings. I first got this idea when I discovered an article at The Billfold about a woman's experience helping a friend shop for her wedding gown. Her friend starts out by trying on a simple, elegant gown by Austin Scarlett, priced at a mere $4,000, but then ends up falling head over heels for a $10,000 Vera Wang. It was at this point in the story that I had to pause to re-hinge my jaw. Ten thousand dollars for just the dress? That's nearly four times what I spent on my entire wedding! True, the whole point of the article is that the author was trying to help her friend feel better about not buying that dress, since it was way beyond her budget, but the fact that anyone ever does it is mind-boggling to me.

Now, I realize there are those who would argue, "But it's not just a dress; it's your wedding dress! This is a day you're going to remember for the rest of your life! Surely those precious memories are worth spending any amount of money on!" And I might actually be willing to consider that argument—not necessarily to buy into it, mind you, but at least to consider it—if there were any evidence that costlier weddings actually lead to happier marriages. But in fact, studies seem to suggest that the opposite is true. For instance, a 2014 study by two economists at Emory University found that:
  • Men who spent between $2,000 and $4,000 on an engagement ring were 30 percent more likely to end up divorced than those who spend between $500 and $2,000. (Rings cheaper than $500 were also associated with a higher divorce rate, but that could be because people with much cheaper rings were more likely to have low incomes, which are also linked to higher divorce rates. The study doesn't look at people like us, who didn't get a ring at all, so we have no way to know whether my refusal to wear a ring during our engagement made our chances of a successful marriage better or worse.)
  • Couples who spent $20,000 or more on their nuptials were 46 percent more likely to end up divorced than those who spent between $5,000 and $10,000. In this case, the benefits of frugality apply all along the scale; couples whose weddings cost under $1,000 reduced their risk of divorce by 53 percent. (A recent story at NJ.com shows what happens when you take this case to extremes: a couple who had already spent $325,000 on their wedding never even made it to the vows, calling off the wedding after a fistfight broke out at the rehearsal dinner. The bride's brother is now suing the groom's brother for throwing the first punch, and the groom is suing the bride for the return of the $125,800 engagement ring.)
  • Although spending more money increases the risk of divorce, inviting more guests actually lowers it. For instance, those who had between 50 and 100 people present to witness their vows were 69 percent less likely to divorce than those who stood in front of the altar (or the justice of the peace) all by themselves. Those who invited 200 people or more lowered their risk of divorce by 92 percent. Most likely, this is because couples who invite more guests have bigger social networks to support them when times get tough.
So, if a pricey wedding is a precursor to a rocky marriage, then it stands to reason that a strong marriage starts off with a frugal wedding. Thus, the case histories below should provide plenty of good ideas for anyone who's planning to get married in the near future—and plenty of voyeuristic interest for anyone who just likes peeking into other people's lives. And, to make it more interesting, I'll start with the most expensive wedding—around $7,000, or about one-fourth of the $26,645 that The Wedding Report gives as the average cost of a wedding in 2017—and work my way down to the truly bare-bones wedding that was held on a three-figure budget.

The Penny-Pinching Hedonist Wedding
I'll start off with the 1983 wedding of Shel Horowitz, the "penny-pinching hedonist," who blogs at FrugalFun.com. In a lot of ways, his wedding was very similar to mine. He and his wife married in a local park—just like me and Brian—and had all their floral arrangements provided by Mother Nature. They then adjourned to a synagogue social hall and served their 130 guests a catered dinner—"hors d'oeuvres before the ceremony, table decorations, three vegetarian main dishes, salads, and a great tasting chocolate-orange wedding cake"—for $11 a head. (Coincidentally, this is roughly the same amount we paid our caterer in 2004, but that was for lunch, not dinner.) Again, just like me and Brian, he had a friend take professional-quality pictures for a token fee ($50 plus the cost of the film) and another friend record the ceremony on audio tape (video being still in the future). And, like us, they splurged on a calligrapher for the wedding certificate, which was signed by all their guests. The only major expense they had that we didn't was $250 for a Klezmer band. The total for the wedding came to roughly $3,000—which works out to $7,314 in today's dollars. That's on the high-end for a frugal wedding, but on the other hand, they hosted 130 people for that amount—which, if the Emory study is to be believed, was probably a good omen for their future happiness.

The $4000 Backyard Wedding
Next up is my favorite blogger couple, John and Sherry Petersik of Young House Love, who have featured in so many of my budget decor posts. Their wedding, like their remodels, was a fun, casual affair that managed to be elegant and quirky at the same time. They hosted it themselves in their backyard, investing some of the money that would otherwise have gone toward a wedding venue to repave their "old jagged patio" and "treacherous gravel driveway" to create a nice, even surface for entertaining. Their 75 guests sat on folding chairs for the ceremony, then enjoyed a home-cooked backyard picnic complete with DIY decor. They decked the backyard with long strings of Christmas lights and dressed the tables with white muslin and yellow fabric runners, picked up cheap utensils and glassware from IKEA and Sam's Club, and accessorized with bowls of lemons and limes (much cheaper than flowers) and lots of votive candles. Place cards, favors, serving ware, invitations, and the bridal bouquet were all DIYed. Their one big splurge was a $1,200 photo booth to provide entertainment and souvenirs for the guests. All told, they spent $3,995 in 2007, which adjusts to $4,679 in today's dollars. (Oh, and the bride wore a $190 number from Arden B, which she later dyed so she could wear it to other people's weddings, rather than a $4,000 bridal-salon jobbie that would have doubled the cost of the wedding.)

The At-Home Christmas Wedding
Wendi and Jason Simpson received a "Wedding of the Week" award for their 1996 wedding, which they planned in just eight weeks. They got engaged on Halloween, and since they were already planning a Disneyland vacation at the end of December, they decided to get married right beforehand and make the trip their honeymoon. Naturally, with this accelerated schedule, they had to keep things as simple as possible. They married at Wendi's house, which was already decorated for Christmas, so they didn't need to do any extra decorating. She bought her dress and shoes off the rack and did her own floral arrangements with silk flowers. The groom, after threatening to marry in a T-shirt and shorts, bought a new suit—the single biggest expense, at $500—and the attendants picked out their own clothes. After some dithering, the bride hired a professional photographer, but she was able to barter her services as a website designer for his to keep the cost down. The reception was a dessert-only affair, originally planned for 41 guests but reduced to around 25 by a severe snowstorm; the guests who couldn't make it got a play-by-play of the 5-minute ceremony via IRC. The whole thing, including their silver knot rings, cost $1600, or $2476 in 2017 dollars.

The Renaissance Fantasy Wedding
Vicki Collins married the same year I did, 2004, and her Dollar Stretcher articles about her wedding plans helped convince me that a wedding for under $2,000 was possible. She wanted "an elaborate Renaissance style wedding" with 50 guests, but she aimed to do it on a $1,500 budget. To accomplish this, she sewed her own dress and the clothes for her two daughters, using sale-priced fabric and made-over yard-sale finds, spending about $320 on clothes for the whole family (including a sword for the groom) that could be reused for visits to the Renaissance Faire. She also did her own floral arrangements, using mostly dried flowers and home-grown ivy to save on fresh flowers, and made banners and crests for wall decorations. At the time she wrote the articles, she was choosing among several sites for the ceremony, including a real castle ($325 for the day), a public park with a large pavilion and an outdoor fireplace ($100), and a botanical garden. She hired a pro for photos, but had the music provided by a CD player concealed in a curtained "minstrels' gallery." She planned a period-appropriate menu of roast chicken, turkey legs, roast beef in chunks, bread, cheese, stewed veggies, whole fruit, individual cakes, fruit "grog," and ale; after some initial sticker shock dealing with a regular caterer, she ended up sourcing the meats from a BBQ place, petit fours from a local baker, and the rest of the menu from Sam's Club. I don't know whether she actually kept to her $1,500 budget (which would be $1,928 in today's dollars), but even if she ended up spending as much as $2,500, she still got a lot for her money.

The Community Potluck Wedding
Shel Horowitz, after describing his own relatively inexpensive wedding, goes on to describe an equally memorable wedding on an even smaller budget—probably under $500, or $1,219 in today's dollars. The couple was able to wed on this tight budget by calling on their friends for help with just about everything. They held the wedding in the hall where their dance collective met, donated by the manager for the occasion, and used their dance tapes for music. The food was all potluck, with all the local guests signing up to bring a specific dish for 10 people. The menu included sesame noodles, salads, hummus, and "a wide array of outrageous desserts," and Horowitz confesses it was "the only wedding I've ever been to where the food was even better than at my own wedding." The flowers were all hand-picked wildflowers, the officiant was a family friend, and even the photos were supplied by friends. This bare-bones wedding proved to be "a memorable event that captured the spirit of who they were" as no catering-hall event ever could.

The No-Frills Wedding
The barest-bones budget on the list is the 2011 wedding of Kerry L. Taylor, who blogs as Squawkfox. She spent just $591 total on the event—about $638 in today's money—but she achieved this low, low price by "ruthlessly" cutting the guest list. Because they wanted a "simple, afternoon wedding on the family farm," they refused to invite more people than they could seat at their kitchen table—so they invited only local friends and family members who had invited them over for dinner at least once in the past year. They ended up with a total of eight guests. Taylor tries to make this sound like they were doing all the people they didn't invite a favor, since "out-of-towners will likely have to take time off work and spend some cash to get to your nuptials," but I suspect Miss Manners would see it rather differently. And based on the findings of the Emory economists, whatever benefit the couple gained by spending so little on their wedding is largely offset by having so few people they cared about enough to invite them to attend.

So to be honest, I wouldn't actually recommend this means of cutting wedding costs. With the amount this couple spent on food—less than $5 a head—they could easily have set up a few extra tables in the back yard and invited all the people they care about while still keeping the cost under $1,000. (Unless there really are only eight other people in the world they care about, in which case, well, I wish them good luck, because they'll need it.) I heartily endorse all the other cost-cutting measures they adopted—secondhand wedding attire, digital invites, backyard setting, flowers from Costco, potluck meal, homemade cupcakes, dollar-store accessories, and photos supplied by friends—but I can't get behind the idea that the way to start a happy marriage is to be "ruthless" about excluding friends and family from your happy day. I know what made our wedding day so special was having all our friends and family gathered around, and if we had to spend a whopping $2,700 to achieve that, I think it was well worth it.

These are just a few of the many budget weddings I've seen described online. While researching my own wedding, I came across websites for several others, including a $1,600 wedding put together with the help of friends and family, a $1,400 DIY wedding in Vermont, and a full-out white wedding complete with catered meal, five bridesmaids, champagne toast, the works, for around $2,500. And since then, I've seen many more, which I've filed away for my own amusement and as a store of ideas for any friends and family members who have weddings to plan in the future. So there's lots more where these came from.

If I had to sum up what all of them have in common, I'd say it mostly comes down to three points:
  1. Think outside the box. Don't assume your wedding needs to include something—whether that's a limo, a bunch of attendants, or even a photographer—just because it's what everyone else has. And likewise, don't assume that if you do want these things, there's only one way to get them. Maybe you can borrow something, or buy secondhand, or make it yourself, or barter for it. Keep your mind open, and leave no option unexplored.
  2. Do it yourself—or with a little help from your friends. Relying on the wedding industry to arrange your special day is a sure route to big bills, and a good way to end up with a wedding that doesn't reflect your personality at all. Always look first for ways to make or do things yourself, from flowers to invites to food. And don't be afraid to turn to family and friends for help. Don't demand that your photographer uncle take the photos or your baker aunt supply the cake, but don't hesitate to let them know that you would love any help they can offer.
  3. Most of all, don't lose sight of what the day is really about. The clothes, the flowers, and the food are all just window dressing; the real point is that two people who love each other are committing to make a life together. Keeping the focus firmly on that can help you avoid getting bogged down in all the details.

Saturday, February 11, 2017

Recipe of the Month: Warm Red Cabbage & Barley Salad

For January's Recipe of the Month, I picked a red cabbage salad out of the Stop & Shop magazine, which turned out to be rather uninspiring. However, while searching for that recipe on the Stop & Shop website so I could post it, I happened upon another red cabbage salad that looked a lot more promising. It was a much heartier dish, with apple, walnuts, and barley in addition to the cabbage, and it was served warm, which looked much more appropriate for a cold winter's night. So I printed out that recipe, which you can find here, and set it aside to make for February's Recipe of the Month.

This recipe calls for you to brown the onion first, then add the barley and broth to the same pan and cook it until the barley is tender, throwing in a half cup of raisins for the last ten minutes and stirring in some chopped parsley at the end. Brian made two small deviations from these instructions, one by accident and one on purpose. First, he inadvertently put the barley into the skillet with the onion and toasted them both together before adding the water. However, this didn't seem to hurt the texture or flavor of the barley at all; in fact, Mark Bittman's recipe for barley pilaf recommends toasting the barley for a minute this way, so it may actually have enhanced the flavor.

His second alteration was to leave out the parsley, since we didn't have any on hand (the stuff out in the garden actually seems to be still alive, but it was under a blanket of snow at the time). To us, the recipe tasted just fine without it; adding it might have enhanced the flavor still more, but we certainly de didn't feel the lack of it. So if you decide to make the recipe yourself, you can add these two modifications or not as you choose. I can't promise that they will improve the dish, but they certainly won't do any harm.

The rest of the recipe went according to plan. The shredded red cabbage and chopped apple got cooked together a mixture of melted butter, brown sugar, vinegar, and water, then seasoned with cloves and cinnamon. Then this was served up with the barley scooped on top, sprinkled lightly with chopped walnuts.

This rather unusual blend of seasonings caused the whole dish to take on a curious sort of tart-sweetness, vaguely reminiscent of pickled beets—only without the beetiness, which is the part I don't care for. At first, it tasted a bit odd to me; between the onion and cabbage, apples and raisins, and the spices that I associate with pumpkin pie, my tongue didn't know whether to interpret the dish as savory or sweet. The more I ate, though, the more it started to grow on me. The tension between sweet and savory became appealing, a delicate balance that added interest to the dish.

The textures, too, made a very agreeable contrast, combining tender-crisp cabbage, tender fruit, and chewy barley in every mouthful. It was a bit of a challenge getting just the right balance of barley and the cabbage in each forkful, and I ended up being left with a bit of unadorned cabbage in my bowl and having to get up and add another spoonful of barley to make it come out even. But that just means I'll know better next time.

This recipe has a lot going for it. First, it's tasty. Second, it doesn't call for anything that's out of season in the wintertime, as both apples and cabbages keep quite well from the fall harvest. Third, it's both warm and hearty, making for a comforting dish on a cold night. Fourth, it's quite healthy. The bulk of the dish is fresh veggies and whole grains, two things people are always telling you to eat more of, and aside from a little bit of butter and sugar, there isn't a single thing in it that's really bad for you. And finally, it's cheap. The main ingredients—cabbage, apple, onion, and barley—are all quite inexpensive, and the pricier raisins and walnuts are only used in small amounts. I just ran the recipe through this handy recipe cost calculator I found at Sense to Save, and it appears the whole dish only costs a little over three dollars, and it made enough for two generous dinner portions and at least three lunch portions.

So I would call our Recipe of the Month for February an unqualified success. We'll definitely be adding it to our repertoire of tasty, nutritious vegetable dishes—which is, after all, the whole point of the exercise.

Saturday, February 4, 2017

Gardeners' Holidays 2017: Renewal

The first Gardeners' Holiday of 2017 was a little unusual for us. Normally, we celebrate February 2 as the Festival of Seeds, planning out our garden for next spring and starting our first set of seedlings (the parsley, which takes a really long time to germinate).

Well, we have indeed received our seed order from Fedco, and Brian spent an hour this morning baking some dirt to start the seedlings in. (This is part of the most recent version of our seed-starting system, which uses a layer of seed-starting mix on top of a mixture of ordinary garden soil that's been baked to eliminate germs. So far, this is the only method we've ever tried that has produced really healthy seedlings. It works so well that we've even begun starting our pepper plants from seed, rather than buying seedlings at the yearly plant sale.) So we have made a start on our garden for 2017—but what made this year unusual is that we also harvested some crops from 2016.

It started when Brian came home from work on Thursday and I spotted him out in the garden, peering at the leggy remains of last year's Brussels sprout plants. These, as I noted last December, were a major disappointment for us. Even with a head start from the new seed-starting mix, combined with careful culling of their upper leaves to give the stalks more sunshine, the sprouts were still no larger than marbles by the time the snow flew. However, we left them in the bed, figuring there was still a chance they'd eventually get big enough to eat...and Brian decided, after looking them over, that the time had come. As you can see, the sprouts were still quite small, but Brian probably figured that they weren't likely to get much bigger, and since we'd need the garden space for other crops before two long, we might as well go ahead and pick them now.

So he cut down one entire stalk of the four we planted and pulled off the sprouts—now closer to the size of a marbles shooter, rather than a regular marble—to make our favorite Roasted Brussels Sprouts with potatoes. The sprouts were so tiny that he just roasted them whole, rather than halving them as he usually does, and they still came out crisp and nearly black by the time the potatoes were done. But they were tasty, all the same, and we can at least say now that the space we devoted to Brussels sprouts in our 2016 garden didn't go to waste. (But all the same, we're not planting any this year. It's just too much hassle for too little nourishment.)

Now, as it happens, while I was watching Brian out there in the garden, I happened to notice that our last crop of winter lettuce, which got planted a bit late last year, was starting to peep up through the dirt as well. (It's the bright green stuff in the middle of the photo; the darker green plants are various weeds, which we unfortunately can't suppress without also suppressing the lettuce.) So as I was fixing myself a tuna-and-avocado sandwich for lunch yesterday, I thought I might as well trot out to the garden and harvest a few leaves off those tender green lettuces to go with it.

When I got out there, though, I discovered that the plants were even smaller than I'd thought. There were only a few leaves that I could reasonably pick without uprooting the whole plant, and it didn't seem worth it. However, I happened to notice at the same time that there was another holdover from last year's garden still growing: a couple of arugula plants, snuggled into the corner of the right front bed, remained green and healthy even after being buried under a foot of snow last month. So I picked a few leaves off those instead and discovered that this makes a wonderful combination with tuna and avocado.

If you ever happen to have both some arugula and a ripe avocado sitting around the house, I urge you to try it. Just cut out a chunk of the ripe avocado and mash it into the tuna, in lieu of mayonnaise, along with whatever else you like to add to your tuna salad. Then spread it on whatever bread you have handy (I recommend rye or pumpernickel), and layer the arugula leaves on top. If you think it needs a little more substance, you can add a couple more slices of the avocado before topping the sandwich. The peppery bite of the arugula makes a fantastic contrast to the savory, slightly salty tuna, and the chewy leaves set off the silky mouthfeel of the avocado. I don't know if I'll ever want to make a plain old tuna sandwich with lettuce and mayo again.

So it looks like our 2017 garden season is off to an auspicious start. We haven't even officially started any of our crops yet, but we've already had our first harvest. Let's hope the next big project on this year's garden agenda—rebuilding our disintegrating bed frames from scratch—goes half so well.

Wednesday, February 1, 2017

Money Crashers: How to Save Money on Cheap Books

You may have noticed that I haven't posted any links to my Money Crashers articles for the past month or so. That's because the site was between editors for a while, so no new articles of mine were being posted. However, there's now a new editor on the job, and so there's a new story on the site at last.

This one's about books, with which I have a love-hate relationship. I love reading them, but I hate paying for new ones, especially at the prices they charge these days. Indeed, while I often go into Barnes & Noble to browse, I almost always come out empty-handed, simply because I can't find anything that looks worth the price.

Instead, I favor other sources of reading material. The local library is a good one, of course, but I also visit used bookstores whenever I get the chance, trade books with friends, paw through boxes at yard sales, and browse for cheap and free e-books online. This new article goes into detail about all these sources of cheap and free books and how to get the most out of them. (But please ignore the intro, which is not at all as I wrote it. Somehow in the editing process it got a bit garbled.)

How to Save Money on Cheap Books – Read More While Spending Less