Once again, we've been having some ups and downs in our ecofrugal life this week. Rather than recount these ecofrugal episodes in chronological order, I think I'll arrange them from most disappointing to most satisfying. That way I'll be able to end the post on a nice positive note.
Thus, we'll start at the bottom, with:
Ecofrugal Episode 1: The Earth Fair Washout
I spent most of this afternoon "tabling"—that is, setting up a table and talking to people—for Citizens' Climate Lobby at a street fair in town. Unfortunately, the event was a bit of a washout—literally. The weather was chilly and wet, progressing from clouds and drizzle in the morning to steady, soaking rain in the afternoon. Fortunately we had a canopy to keep us dry while we were actually at the table, but we got pretty wet whenever we ventured away from it. By the time we finished putting away all our gear at the end of the event—including the canopy itself—we were all pretty well soaked.
Furthermore, there were fewer people to talk to than there would usually be, since many people were sensibly staying home and keeping dry. All in all, we had about 30 conversations over the course of four hours—five if you count the time we spent setting up and putting away all our gear—and only a few of those could be considered enthusiastic. It's not a lot to show for the amount of effort we put in.
On top of that, we had to put up with a lot of other annoyances unrelated to the weather. The organizers of the Earth Fair put our booth into a slot right next to the music stage, so we couldn't converse at normal volumes. The parking lot they told us to use for unloading our gear was completely filled up five minutes before the time they told us to arrive, and we weren't allowed to use the nearby bank parking lot—not even for the few minutes required to unload—because it was reserved for an EV car show. (Fortunately, we'd already unloaded our car by the time they told us this; otherwise we would have had to find a parking spot on the street and then haul all our gear several blocks to the site.) Given how much hassle we went to for such a small benefit, I'm inclined to think it's not even worth signing up for this event next year.
Yesterday was our big spring planting day in the garden. We put in seeds for twelve squares of beans, four of cucumbers, six of basil, and two of herbs, and we transplanted eight tomato seedlings and four peppers. This proved to be a much harder job than I expected—literally. I'd expected to just poke some holes in the dirt and put the seeds in, but the soil was so dense and compacted that I could barely get the blade of a trowel into it, much less my fingers. I had to spend several minutes hacking at the soil in each square to break up the clods of clay before I could put the seeds into it.
This is both puzzling and frustrating, because we've had these raised garden beds for about fifteen years at this point, and we've spent that whole time following the advice in all our garden books about building healthy soil. We double-dug the beds when we first built them, turning over all the soil twice to break it up, and we haven't tilled it or walked on it since then. We add compost to it every year during spring planting and mulch the beds with leaves in the winter. And we've never once used any sort of harsh synthetic fertilizer or pesticide. By now, our soil ought to be so rich and soft we could plunge our hands right into it, not packed so hard we can barely dig in it.
Based on all the sources I've consulted, the best explanation I can find is that we're not adding enough organic matter to the beds. Our little home compost bin only provides enough compost to add a thin layer—less than one inch—to each of the beds each year, and we should be piling on at least a couple of inches. Bagged compost isn't an ideal solution either, since we would need to buy several bags and then test every one of them to make sure the contents weren't herbicide-laden "killer compost" that would kill our plants. If any of the bags failed the test, we'd have to buy new ones and test them too, repeating the process until we got only clean results. But that would seriously delay our planting schedule, so to avoid the problem, we'd have to buy a lot more compost than we thought we needed—at least twice as much—in the hope that at least one bag in two would be usable.
Probably the best solution is to go to the Belle Mead Co-Op every year and load up with half a yard of bulk leaf mold. We haven't been using this stuff regularly because we learned that it's not actually a great source of soil nutrients, but it should be effective as an amendment to loosen up the soil, hold moisture, and attract earthworms. The only problem with this plan is that we can't do this at the same time we buy mulch because there isn't room in our car, or our garden shed, for both at once. So probably we should either buy a load of mulch every spring and a load of leaf mold every fall or vice versa.
Ecofrugal Episode 3: The Case of the Disappearing Eggs
One of the things that made Lidl an instant hit with Brian and me was its prices on Certified Humane (CH) eggs. We used to buy these at H-Mart, where sale prices ranged from $2 to $4 per dozen. But at Lidl, we consistently found them for $2.40 a dozen. Even during the pandemic, when most food prices soared, this price held steady. We did encounter occasional shortages, during which we'd go in and find the CH-egg shelf empty, but we figured these were due to temporary blockages in the supply chain. The eggs were always back a week or so later, so we didn't worry too much about it.
But in the past month or two, Lidl's CH eggs seem to have disappeared entirely. The case where they live is still there, with the price on it marked at $2.40 a dozen, but every time we show up, it's empty. Brian guessed this could mean that the store's delivery cycle has changed, so that the eggs now arrive on Friday morning, and consequently they're always gone when we show up on Thursday evening. (We found a little support for this theory last week, when we showed up a little earlier on Thursday and found exactly one carton of eggs in the case, with one of them smashed. Clearly it hadn't been sitting there all week, so it was most likely the last one left, passed over on account of the damage.) But given how full our schedule is this spring, we haven't found an opportunity to go to Lidl at some other time and check.
For a while, this problem left us stranded without a good source of CH eggs. The $8 per dozen at the farmers' market was much too rich for our blood; we hunted around at other local food stores, but none of them—not even our once-trusty H-Mart—could do much better than $5 per dozen. (Trader Joe's, we discovered, didn't carry them at all; it had only "cage free" eggs, a much wimpier standard.) And then it occurred to us to check the refrigerated case at Rite Aid, which carries a small selection of dairy products. To our astonishment, not only did the store carry CH eggs, they were only $3.20 per dozen—about 35 percent less than their nearest competitor.
We don't know how a drugstore chain, of all places, manages to offer humanely farmed eggs at better prices than any local supermarket. But we're pleased to have a new source of eggs so close to home. We'll still keep checking the Lidl when we visit to see if our cheaper eggs have returned, but we won't need to rearrange our whole shopping schedule in the hopes of catching them there.
My favorite way to brew coffee, hands-down, is the Aeropress. It's much faster than a drip machine, uses much less ground coffee to brew the same volume, and produces excellent coffee from fairly cheap beans. It's also much easier to clean than the French press so beloved by coffee snobs. All the grounds get compacted into a dense little puck that you can shoot directly out into the compost bin, so all you have to do is rinse off the plunger.
The Aeropress has only two downsides. First, it takes a lot of effort to depress the plunger; I often have to put my full weight on it for a minute or so before it finally sinks. And second, it's not completely zero-waste. The paper filters it uses are fairly tiny and cost only a couple of cents each, and they can go straight into the compost bin with the coffee grounds, so the waste it produces is fairly minimal. But still, I have thought from time to time that it would be still more ecofrugal to replace those paper filters with a resusable one.
So, when I noticed that I was running low on paper filters, I decided this was my chance to give it a try. This was an easier decision to make since the paper filters had gone up in price, from $6 for a pack of 350 to between $8 and $10, not counting shipping. By contrast, a set of two reusable metal filters from a site called Mason Jar Lifestyle was only $10 ($14 with shipping). The price was barely any higher, and I'd have two filters to experiment with and see which I preferred. And if it turned out they were both unacceptable, I'd still have time to switch back to the paper ones.
Having now tried both filters, I can say they have both advantages and disadvantages compared to the paper ones. Most obviously, they're more ecofrugal; they produce no waste and should last for years, making them much cheaper on a per-cup basis. They also let more air through than the paper ones, which reduces the amount of muscle needed to depress the plunger. This is particularly noticeable with the perforated metal disk rather than the fine mesh one.
One downside of these metal filters is that they allow more sediment into the coffee than the paper ones. However, this isn't a huge problem, particularly with the fine-mesh disk. A much bigger drawback is the extra cleanup work. Removing the filter from the press before knocking the grounds out into the bin doesn't sound like that much added hassle, and it wouldn't be if the filter came away cleanly. But no matter how carefully I pry it off (after running cold water over it so it's cool enough to touch), at least half the coffee grounds end up stuck to the filter rather than the press. And unlike the grounds stuck to the plunger itself, they don't come off cleanly. If I simply rinsed them off the filter, I'd be washing several grams of coffee grounds down the drain with every cup of coffee I brew, and I think it wouldn't be long before our plumbing objected to that. I've tried scraping the grounds off the filter onto the plunger before emptying it, but that never works neatly. Some grounds stay stuck to the filter no matter what I do, and some get all over my hands, so they have to be washed too.
I consulted Reddit on this subject and found two suggestions for dealing with this problem. Some users say that sliding the metal filter off sideways rather than lifting it off removes most of the grounds. Others say pulling the plunger back slightly and then inverting the press and letting it rest (without unscrewing the cap first) allows the grounds to drop back onto the plunger and away from the filter, leaving it mostly clean. I'll give both methods a try, and if either one works, then I'll be able to say definitively that the mesh filter is superior to the paper ones.
[UPDATE, 5/5/24: I have now tried both methods of cleaning the metal filter. Neither one is perfect, but the first is much better than the second. When I invert the plunger and let it rest before removing the cap, the grounds do not fall away from the filter; they remain stuck to it at the top. When I remove the cap, some of the grounds fall off onto the top of the plunger, but at least half remain on the filter:
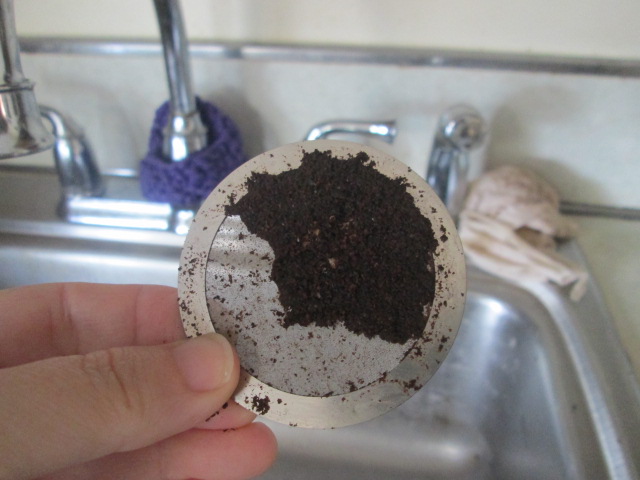
By contrast, when I rinse the plunger, unscrew the cap, and slide off the filter, it leaves only a thin film of coffee grounds behind. A quick spray with the faucet hose is enough to get them off. And I'm not concerned that the amount of coffee washing down the drain will clog it up.

I've also discovered another advantage of the metal filter: it fits more securely than the paper ones. With those, I always had to take care that the filter was exactly centered in the cap before screwing it on. If it wasn't, it would slip to the side and let some of the grounds through into my cup of coffee. I'd have to strain it a second time before I could drink it.
So, in addition to saving me money and eliminating waste, this metal mesh filter has eliminated the two biggest problems with my Aeropress: the stuck-plunger problem and the slipping-filter problem. The additional step of rinsing the filter is a small price to pay for that.]
[FURTHER UPDATE, 9/13/24: I've now figured out that the best method of all for cleaning the filter is to combine the two suggestions. After rinsing the press and unscrewing the filter basket, I pull the plunger back slightly so the metal filter is flush with the bottom of the tube before sliding it off. This takes only a few seconds and leaves almost nothing stuck to the filter.]
Ecofrugal Episode 5: A Pressing Concern
A couple of weeks ago, I mentioned that I had ordered us a new (or more accurately, new-to-us) garlic press to replace our old Oxo one that broke. After a little research, we decided to go with the Joseph Joseph Garlic Rocker, which got consistently solid reviews from cooking sites. A new one costs $15 at Amazon, but since we don't do Amazon, we bought a secondhand one from eBay for $14 ($17 with shipping).
It
has since arrived, and after testing it out several times, Brian
reports that it's better in almost every way than its predecessor. It
takes a couple of passes over a garlic clove to mince it as finely as
the old one, but on the plus side, it does mince the entire clove rather
than extruding part of it and turning the rest into a sort of squashed
blob. It's easier to clean than the old press and takes up less room in
the drawer. And since it's a solid piece of metal with no moving parts,
we can be confident it won't simply fall apart like the previous one.
No comments:
Post a Comment