
First, we had to wait for delivery on the various supplies we'd ordered for the project: the sink, the faucet, the sheet laminate, the sealant to apply it with, and a special tool for cutting it. (Total cost: around $220.) The smaller items all arrived within a couple of weeks, but at the end of a month, we were still waiting for the sink. I kept checking the order status online and the site kept telling me it was temporarily delayed. Finally I called up the store and determined, after a lengthy conversation with customer service, that the delivery was not in fact "delayed"; it was canceled, because our sink got broken in shipment. So we "returned" the item we'd never actually received and went to the store to pick up a new one.
After that, we had to go through several preparatory steps before we could install anything. The sheet laminate arrived rolled up in a narrow box, so before we could attempt to cut it, we had to unroll it and flatten it out by laying it underneath a rug in our downstairs room. Once we got it reasonably flat, Brian went through a multi-stage process to cut it to shape. First, he tested out his new tool on a corner of the laminate to figure out how it worked. This took some trial and error, but eventually he figured out that he had to use the sharp little point on the end to score the underside of the laminate repeatedly, then flip it over and snap it along the scored line.
Next, he made a template out of brown paper in the exact, complicated shape of the vanity top, with all its weird little corners and cutouts, and dry-fitted that into place to make sure it was accurate. And finally, he traced that pattern onto the laminate and cut it out with his new tool. He actually goofed up the first time he attempted this, putting the template down on the laminate wrong-side up and ending up with an exact mirror image of the shape we needed. But fortunately, the laminate came in a four-by-eight sheet—much more than we needed for this project—so he had plenty left over to cut a new piece in the correct orientation.
At this point, we were ready to start the actual installation. Unfortunately, the weather was not ready for us. When we swapped out our original can of contact cement for a nonflammable version, we assumed that we'd be able to use it safely indoors, even if the heating system was still on. But when the new can arrived, it turned out that even this safer version came with a lot of warnings in boldface capital letters about how toxic it was and how we'd poison ourselves if we used it without proper equipment and ventilation. So while we were no longer in danger of blowing up our house, we'd still have to wait until the weather was warm enough to work with the windows open.
This turned out to be much later than expected. After an unseasonably warm period in February and March, the weather turned cold again in April and stayed that way into early May. So it wasn't until this weekend that we finally had a chance to tackle the job. However, we were a little bit worried about whether one weekend would be enough for the whole project. The new, safer contact cement takes at least an hour to dry after each coat before it's ready to stick, and we knew we'd have to go through that process at least three times throughout the process. So, just to be safe, Brian took Friday off from work to give himself an extra day to get the job done.


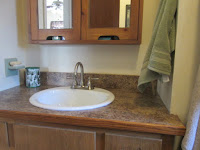
Up until this point, everything had gone much more smoothly than we'd expected. But the final phase of the project, installing the new sink and faucet, proved more complicated. Or, to be more exact, installing the sink and faucet went fine; the difficulties came in when we tried to reconnect the plumbing pipes. The hole Brian had cut in the laminate was a little bit bigger than the bowl of the sink, and it turned out he'd put the sink just a bit too close to the wall for the pipes to connect to it. So he ended up having to shove it from underneath to shift it forward. Fortunately the silicone sealant hadn't dried yet, so this wasn't too hard to do. Once he got the pipes hooked up, he re-caulked the sink to secure it in its new position. This contretemps left a bit of goop on the new laminate, but he scraped it off on Sunday morning and applied a little bit more to the places where the edges didn't meet perfectly.
And with that, the vanity project is complete. We now have a sink that is, frankly, a lot more presentable than the rest of the bathroom: clean and new, without so much as a water spot to mar the surface of the new faucet. Fortunately, there's no real risk that this small improvement will eventually drive us to redo the entire room, the way replacing our closet door did with the office. We might go on to replace a few more small items, like the grungy shower head or the old, stained toilet. But we're not about to go replacing the old tub and tile—a job that would certainly cost thousands of dollars and make the bathroom unusable for weeks—when it's still in reasonably good shape.


No comments:
Post a Comment