Showing posts with label compost. Show all posts

Sunday, March 9, 2025

Tending to organic matters

Last spring, while planting seeds in the garden, I discovered that the soil in our raised beds had become quite hard and compacted. This was very frustrating and confusing, because the beds hadn't been walked on for 15 years and had received regular infusions of compost every spring. But after doing a bit of research, I found that the amount we'd been adding—maybe one bucketful per bed—was far less than the one to two inches gardening experts recommend. Since our little home compost bin couldn't produce nearly that amount, and since bagged compost is costly and requires testing to make sure it isn't tainted with herbicides, we decided our best bet was to pick up half a yard of leaf compost every year from the Belle Mead Co-Op. This stuff isn't as rich in nutrients as homemade compost or manure, but it's still useful for improving the soil texture.

Unfortunately, we never got a good opportunity to do this last fall. As this year's spring planting drew nearer, we kept a nervous eye on the calendar, looking for a weekend that was both free and tolerably warm for outdoor work. Yesterday, we finally got our opportunity. I had to make a trip out to Somerville that afternoon for my Citizens' Climate Lobby meeting, so we combined that trip with a jaunt to Hillsborough—not directly on the way, but not that far out of it—to visit the Co-Op. We brought along a carload of trash barrels and empty birdseed bags and loaded them all up as far as we could while still being able to lift them. (In some cases, in fact, we couldn't lift them and ended up having to remove some. We forgot that that leaf compost was much finer than the bulk mulch we usually buy at the Co-Op, and consequently the volumes we're used to weighed a good deal more.) While there, we also dropped $8 on a new set of asparagus crowns, as the plants we have are now over 15 years old and their productivity has dwindled to almost nothing.

After my meeting and a little hanging out in Somerville, we decided it was too late to bother unloading all the compost from the car. We waited until this morning to suit up in our grubby gardening clothes and start hauling those extremely heavy bags and barrels out to the back 40 (square yards). First, though, we had to go through all the beds and remove the detritus from last year's garden—another chore we hadn't gotten around to tackling in the fall. Brian used both tools and bare hands to dig out the roots of last year's bean and basil plants, while I went along the trellises breaking up and extricating the tangled remains of the squash and tomato vines.

Then Brian, who could manhandle the loaded barrels a lot more easily than I could, began dumping heaps of compost out into the beds. I raked each pile out into an even layer covering the whole bed, and we added extra scoops to fill in any thin areas. By the time we were done, we'd used up the contents of both large barrels and two full bags, and all the beds were filled with dark organic matter to the very brim. 

Since we still had lots of compost left, we used up another bag supplementing the soil in our new outdoor planters. These aren't looking too good after this bitterly cold winter; of all the starter plants we put into them at the end of the summer, the only ones that look like they might still be alive are the heucheras (coral bells) and English ivy, and I wouldn't give heavy odds on either of them. But those plants were more or less just place holders anyway, the odds and ends that we were able to pick up at the Co-Op's end-of-season plant sale. Soon enough, we'll have our pick of a fresh, new batch of nursery plants to choose from, and we should be able to find some that have a better chance of lasting out the year. And when we do, they'll have a nice, new layer of fluffy leaf compost to dig into.

By this time, we were pretty tired, but we found the strength to haul one more bag down into the side yard and spread it on the asparagus bed, preparing it to receive its new batch of crowns next weekend. We stowed about half the remaining bags in the shed and shoved the rest under the planters, where they'll be ready to hand for use on any plants in the front yard that need a little topping up. (In theory, there's nothing to stop an enterprising thief from grabbing one and walking away with it, but we think their sheer weight will be enough of a deterrent.) Then we put away our tools and dragged ourselves inside for a couple of well-deserved showers.

After putting in all this work, I'm trying not to get my hopes up too high about the results. I realize that just one load of organic matter probably won't be enough to make a noticeable difference in the quality of our garden soil, and it will take another few years at least before we see real results. But having the compost layer on top of the beds should make at least part of this year's planting earlier. We'll still have to dig down into the hard-packed soil for transplanting, but most seeds should be able to go directly into the soft, fluffy compost. It won't provide much nutrition for them, but their roots won't have to probe too far to get to the richer, denser soil below.

Saturday, September 7, 2024

September discoveries

We're only a week into September, but we've already made several interesting discoveries this month—either by design, by happenstance, or by a combination of the two. Here, in order of occurrence, is a summary of our September adventures so far:

Discovery #1: A stealth melon

Most of the time, Brian and I make a point of uprooting any "volunteer" plants that pop up in or near our compost bin. We know from past experience that if we leave them be, they're liable to take over the side yard, making it difficult to navigate. Plus, they're usually the offspring of supermarket tomatoes that don't breed true, so any fruit we get off them won't be particularly tasty.

But this summer, we made an exception. A couple of what appeared to be squash vines sprouted directly out of the bin, which kept them mostly confined. Since they weren't really in the way, and since we would have had to open up the bin to remove them, we let them stay put. And this week, when Brian went to trim the weeds around the compost bin, he uncovered this underneath one of the vines.

As far as we can tell, this is the offspring of a Galia melon (a cantaloupe-honeydew hybrid) that we bought last April to put into a fruit salad for a May Day morning potluck breakfast with our Morris dance team. If that's correct, then we should be able to tell it's ripe when it turns from green to yellow-orange. The closer to orange it gets, the sweeter it's liable to be. Since the Galia melon is a hybrid, I'm not getting my hopes up too much that this fruit will be as sweet and juicy as its parent. But just in case, I've tucked a flowerpot underneath it to get it off the ground so it won't rot from excess moisture.

Discovery #2: A found puppy

After completing his planter project in July, Brian had a lot of little scraps of wood left over. Last Sunday, he came across them in the workshop and thought he really ought to get rid of them. But since they were pressure-treated, he didn't want to burn them the way he usually does with chunks of wood too small to be useful. So, rather than just toss them in the trash, he decided to play with them a little and see if he could make them into anything interesting. He also had a bunch of wood screws we'd saved after dismantling the old patio set we replaced in June, so he grabbed his drill and a screwdriver bit and started piecing them together. And when I came into the shop to ask him a question, I found him putting the finishing touches on this little guy. 

Brian and I both decided, independently, that the most appropriate name for this new addition to our family was Woody. I adorned him with an old collar we'd bought that turned out to be too big for either of our cats, and we set him outside underneath the planters that are sort of his parents. He's close enough to the street that passersby can spot him if they're paying attention, but close enough to the house that he won't be mistaken for trash being discarded. Since he's made out of pressure-treated wood, he should hold up as long as the planters do, provided no one decides to steal him.

Discovery #3: Tofu pepperoni

After his semi-successful attempt at creating a vegan pizza topping from Soy Curls, Brian decided to try the same thing with tofu. He cut half a pound of tofu into thin strips and soaked it in a mixture of canola oil, Dijon mustard, soy sauce, Liquid Smoke, paprika, garlic powder, and ground red pepper and fennel seeds. Then he baked it for about 20 minutes at 350F before adding it to the pie, which he'd already loaded with eggplant, bell peppers, and our vegan mozzarella.  

The resulting concoction looked more similar to pepperoni than his previous attempt, but the flavor and texture were wider of the mark. The tofu didn't soak up the spice mixture as well as the Soy Curls, so it tasted mostly like tofu with a dusting of spice. And despite the pre-baking, it never really browned. The texture remained soft and tofu-like, not meaty and chewy.

So, we probably won't be using this recipe again (which is why I didn't reproduce it in full). But that doesn't make this attempt a failure. It just means that, like Thomas Edison, we have succeeded in finding a method that doesn't work.

Discovery #4: An easier way to milk almonds

A second kitchen experiment was a bit more successful. A few years ago, in an attempt to cut down on packaging waste, we experimented with making our own almond milk. The first version we tried, made from almond butter, was easy but not that milk-like. And the second version, made from whole, blanched almonds, was so much hassle that we decided it wasn't worth the effort. 

But this week, I started reconsidering the issue while reading the comments on a YouTube video titled (rather prematurely, I thought) "The DOWNFALL of Plant-Based Milks." Several comments remarked on how much cheaper it is to make your own, and the thought suddenly popped into my head, "Why not try starting with almond flour?" Almond flour is basically ground blanched almonds, so using it would eliminate two of the steps involved in making it from scratch. 

A quick search revealed that I was not the first to come up with this idea. Most of the recipes I found online called for a ratio of 1 cup of almond flour to 4 cups of water. They generally included dates for sweetening as well, and sometimes vanilla, but I decided not to bother with any of that. I figured if I wanted it sweeter, I could always add sugar after the fact.

So, one morning this week, Brian obligingly loaded half a cup of almond flour and 2 cups of water into our blender and ran it on high for three minutes, the minimum time most recipes recommend. He tried straining it with a fine mesh strainer, but it just ran right through, so he poured it through an old nylon stocking and squeezed out as much liquid as possible. And the result was...okay. The flavor was very almond-forward, much more so than the stuff we'd made from whole almonds, and entirely devoid of sweetness. The texture was watery and, even after straining, faintly gritty—nothing at all like the creamy smoothness of the emulsifier-laden commercial product. And, nutrition-wise, it has nowhere near the protein content of my Lidl soymilk.

So, sadly, this homemade almond milk isn't the cheap, sustainable milk alternative that will finally get those cardboard cartons out of our lives once and for all. But it is less work than the whole-almond method, so we'll keep it in mind as an emergency backup. If we ever run out of soymilk and can't easily make it to the store, this stuff should see us through until our next visit.

Discovery #5: Decorative basil

Several of the new crop varieties we ordered this year from True Leaf Market, our new seed supplier, have been distinctly underwhelming. The biggest disappointment: a Thai basil variety we tried called Red Leaf Holy Basil. The plants were quite healthy, but the leaves were entirely flavorless. This is not an exaggeration. When Brian used the Thai basil in a dish, neither of us could detect it at all. Even when I tried putting a fresh leaf in my mouth and chewing it up, I got nothing. It was indistinguishable from chewing on a blade of plain grass.

So, when I noticed yesterday that the plants had gone to flower, I thought, well, they're not doing any good here in the garden; why not just cut them and put them in vases? Waste not, want not. And while they're useless as food, they work rather well as decoration, so at least we'll get some use out of them. (But certainly not enough to justify devoting any garden space to them next year.)

Monday, May 6, 2024

More ecofrugal episodes

Once again, we've been having some ups and downs in our ecofrugal life this week. Rather than recount these ecofrugal episodes in chronological order, I think I'll arrange them from most disappointing to most satisfying. That way I'll be able to end the post on a nice positive note. 

Thus, we'll start at the bottom, with:

Ecofrugal Episode 1: The Earth Fair Washout

I spent most of this afternoon "tabling"—that is, setting up a table and talking to people—for Citizens' Climate Lobby at a street fair in town. Unfortunately, the event was a bit of a washout—literally. The weather was chilly and wet, progressing from clouds and drizzle in the morning to steady, soaking rain in the afternoon. Fortunately we had a canopy to keep us dry while we were actually at the table, but we got pretty wet whenever we ventured away from it. By the time we finished putting away all our gear at the end of the event—including the canopy itself—we were all pretty well soaked.

Furthermore, there were fewer people to talk to than there would usually be, since many people were sensibly staying home and keeping dry. All in all, we had about 30 conversations over the course of four hours—five if you count the time we spent setting up and putting away all our gear—and only a few of those could be considered enthusiastic. It's not a lot to show for the amount of effort we put in. 

On top of that, we had to put up with a lot of other annoyances unrelated to the weather. The organizers of the Earth Fair put our booth into a slot right next to the music stage, so we couldn't converse at normal volumes. The parking lot they told us to use for unloading our gear was completely filled up five minutes before the time they told us to arrive, and we weren't allowed to use the nearby bank parking lot—not even for the few minutes required to unload—because it was reserved for an EV car show. (Fortunately, we'd already unloaded our car by the time they told us this; otherwise we would have had to find a parking spot on the street and then haul all our gear several blocks to the site.) Given how much hassle we went to for such a small benefit, I'm inclined to think it's not even worth signing up for this event next year.

Ecofrugal Episode 2: The Case of the Compacted Soil

Yesterday was our big spring planting day in the garden. We put in seeds for twelve squares of beans, four of cucumbers, six of basil, and two of herbs, and we transplanted eight tomato seedlings and four peppers. This proved to be a much harder job than I expected—literally. I'd expected to just poke some holes in the dirt and put the seeds in, but the soil was so dense and compacted that I could barely get the blade of a trowel into it, much less my fingers. I had to spend several minutes hacking at the soil in each square to break up the clods of clay before I could put the seeds into it.

This is both puzzling and frustrating, because we've had these raised garden beds for about fifteen years at this point, and we've spent that whole time following the advice in all our garden books about building healthy soil. We double-dug the beds when we first built them, turning over all the soil twice to break it up, and we haven't tilled it or walked on it since then. We add compost to it every year during spring planting and mulch the beds with leaves in the winter. And we've never once used any sort of harsh synthetic fertilizer or pesticide. By now, our soil ought to be so rich and soft we could plunge our hands right into it, not packed so hard we can barely dig in it.

Based on all the sources I've consulted, the best explanation I can find is that we're not adding enough organic matter to the beds. Our little home compost bin only provides enough compost to add a thin layer—less than one inch—to each of the beds each year, and we should be piling on at least a couple of inches. Bagged compost isn't an ideal solution either, since we would need to buy several bags and then test every one of them to make sure the contents weren't herbicide-laden "killer compost" that would kill our plants. If any of the bags failed the test, we'd have to buy new ones and test them too, repeating the process until we got only clean results. But that would seriously delay our planting schedule, so to avoid the problem, we'd have to buy a lot more compost than we thought we needed—at least twice as much—in the hope that at least one bag in two would be usable. 

Probably the best solution is to go to the Belle Mead Co-Op every year and load up with half a yard of bulk leaf mold. We haven't been using this stuff regularly because we learned that it's not actually a great source of soil nutrients, but it should be effective as an amendment to loosen up the soil, hold moisture, and attract earthworms. The only problem with this plan is that we can't do this at the same time we buy mulch because there isn't room in our car, or our garden shed, for both at once. So probably we should either buy a load of mulch every spring and a load of leaf mold every fall or vice versa.

Ecofrugal Episode 3: The Case of the Disappearing Eggs

One of the things that made Lidl an instant hit with Brian and me was its prices on Certified Humane (CH) eggs. We used to buy these at H-Mart, where sale prices ranged from $2 to $4 per dozen. But at Lidl, we consistently found them for $2.40 a dozen. Even during the pandemic, when most food prices soared, this price held steady. We did encounter occasional shortages, during which we'd go in and find the CH-egg shelf empty, but we figured these were due to temporary blockages in the supply chain. The eggs were always back a week or so later, so we didn't worry too much about it.

But in the past month or two, Lidl's CH eggs seem to have disappeared entirely. The case where they live is still there, with the price on it marked at $2.40 a dozen, but every time we show up, it's empty. Brian guessed this could mean that the store's delivery cycle has changed, so that the eggs now arrive on Friday morning, and consequently they're always gone when we show up on Thursday evening. (We found a little support for this theory last week, when we showed up a little earlier on Thursday and found exactly one carton of eggs in the case, with one of them smashed. Clearly it hadn't been sitting there all week, so it was most likely the last one left, passed over on account of the damage.) But given how full our schedule is this spring, we haven't found an opportunity to go to Lidl at some other time and check.

For a while, this problem left us stranded without a good source of CH eggs. The $8 per dozen at the farmers' market was much too rich for our blood; we hunted around at other local food stores, but none of them—not even our once-trusty H-Mart—could do much better than $5 per dozen. (Trader Joe's, we discovered, didn't carry them at all; it had only "cage free" eggs, a much wimpier standard.) And then it occurred to us to check the refrigerated case at Rite Aid, which carries a small selection of dairy products. To our astonishment, not only did the store carry CH eggs, they were only $3.20 per dozen—about 35 percent less than their nearest competitor.

We don't know how a drugstore chain, of all places, manages to offer humanely farmed eggs at better prices than any local supermarket. But we're pleased to have a new source of eggs so close to home. We'll still keep checking the Lidl when we visit to see if our cheaper eggs have returned, but we won't need to rearrange our whole shopping schedule in the hopes of catching them there.

Ecofrugal Episode 4: A Reusable Replacement

My favorite way to brew coffee, hands-down, is the Aeropress. It's much faster than a drip machine, uses much less ground coffee to brew the same volume, and produces excellent coffee from fairly cheap beans. It's also much easier to clean than the French press so beloved by coffee snobs. All the grounds get compacted into a dense little puck that you can shoot directly out into the compost bin, so all you have to do is rinse off the plunger. 

The Aeropress has only two downsides. First, it takes a lot of effort to depress the plunger; I often have to put my full weight on it for a minute or so before it finally sinks. And second, it's not completely zero-waste. The paper filters it uses are fairly tiny and cost only a couple of cents each, and they can go straight into the compost bin with the coffee grounds, so the waste it produces is fairly minimal. But still, I have thought from time to time that it would be still more ecofrugal to replace those paper filters with a resusable one.

So, when I noticed that I was running low on paper filters, I decided this was my chance to give it a try. This was an easier decision to make since the paper filters had gone up in price, from $6 for a pack of 350 to between $8 and $10, not counting shipping. By contrast, a set of two reusable metal filters from a site called Mason Jar Lifestyle was only $10 ($14 with shipping). The price was barely any higher, and I'd have two filters to experiment with and see which I preferred. And if it turned out they were both unacceptable, I'd still have time to switch back to the paper ones.

Having now tried both filters, I can say they have both advantages and disadvantages compared to the paper ones. Most obviously, they're more ecofrugal; they produce no waste and should last for years, making them much cheaper on a per-cup basis. They also let more air through than the paper ones, which reduces the amount of muscle needed to depress the plunger. This is particularly noticeable with the perforated metal disk rather than the fine mesh one.

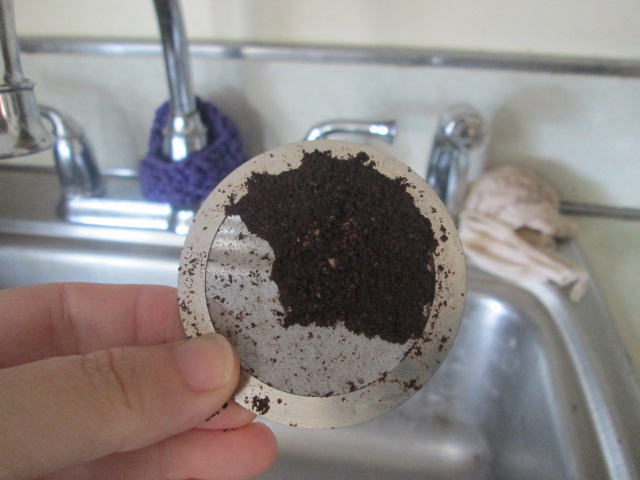
One downside of these metal filters is that they allow more sediment into the coffee than the paper  ones. However, this isn't a huge problem, particularly with the fine-mesh disk. A much bigger drawback is the extra cleanup work. Removing the filter from the press before knocking the grounds out into the bin doesn't sound like that much added hassle, and it wouldn't be if the filter came away cleanly. But no matter how carefully I pry it off (after running cold water over it so it's cool enough to touch), at least half the coffee grounds end up stuck to the filter rather than the press. And unlike the grounds stuck to the plunger itself, they don't come off cleanly. If I simply rinsed them off the filter, I'd be washing several grams of coffee grounds down the drain with every cup of coffee I brew, and I think it wouldn't be long before our plumbing objected to that. I've tried scraping the grounds off the filter onto the plunger before emptying it, but that never works neatly. Some grounds stay stuck to the filter no matter what I do, and some get all over my hands, so they have to be washed too.

I consulted Reddit on this subject and found two suggestions for dealing with this problem. Some users say that sliding the metal filter off sideways rather than lifting it off removes most of the grounds. Others say pulling the plunger back slightly and then inverting the press and letting it rest (without unscrewing the cap first) allows the grounds to drop back onto the plunger and away from the filter, leaving it mostly clean. I'll give both methods a try, and if either one works, then I'll be able to say definitively that the mesh filter is superior to the paper ones. 

[UPDATE, 5/5/24: I have now tried both methods of cleaning the metal filter. Neither one is perfect, but the first is much better than the second. When I invert the plunger and let it rest before removing the cap, the grounds do not fall away from the filter; they remain stuck to it at the top. When I remove the cap, some of the grounds fall off onto the top of the plunger, but at least half remain on the filter:

By contrast, when I rinse the plunger, unscrew the cap, and slide off the filter, it leaves only a thin film of coffee grounds behind. A quick spray with the faucet hose is enough to get them off. And I'm not concerned that the amount of coffee washing down the drain will clog it up.


I've also discovered another advantage of the metal filter: it fits more securely than the paper ones. With those, I always had to take care that the filter was exactly centered in the cap before screwing it on. If it wasn't, it would slip to the side and let some of the grounds through into my cup of coffee. I'd have to strain it a second time before I could drink it. 

So, in addition to saving me money and eliminating waste, this metal mesh filter has eliminated the two biggest problems with my Aeropress: the stuck-plunger problem and the slipping-filter problem. The additional step of rinsing the filter is a small price to pay for that.]

[FURTHER UPDATE, 9/13/24: I've now figured out that the best method of all for cleaning the filter is to combine the two suggestions. After rinsing the press and unscrewing the filter basket, I pull the plunger back slightly so the metal filter is flush with the bottom of the tube before sliding it off. This takes only a few seconds and leaves almost nothing stuck to the filter.]

Ecofrugal Episode 5: A Pressing Concern

A couple of weeks ago, I mentioned that I had ordered us a new (or more accurately, new-to-us) garlic press to replace our old Oxo one that broke. After a little research, we decided to go with the Joseph Joseph Garlic Rocker, which got consistently solid reviews from cooking sites. A new one costs $15 at Amazon, but since we don't do Amazon, we bought a secondhand one from eBay for $14 ($17 with shipping).

It has since arrived, and after testing it out several times, Brian reports that it's better in almost every way than its predecessor. It takes a couple of passes over a garlic clove to mince it as finely as the old one, but on the plus side, it does mince the entire clove rather than extruding part of it and turning the rest into a sort of squashed blob. It's easier to clean than the old press and takes up less room in the drawer. And since it's a solid piece of metal with no moving parts, we can be confident it won't simply fall apart like the previous one.

This espisode makes me inclined to add a seventh principle to my Ecofrugal Manifesto: Buy It to Last. (You could call this a subset of my sixth principle—Mend It, Don't End It—but I think it's different enough to deserve a principle of its own.) If you have to buy something new, buy something that's built to last as long as possible. Look for sturdy materials and construction, check reviews for complaints about durability, and minimize the number of moving parts that can break. And, other things being equal, opt for mechanical rather than electronic controls whenever possible. Electronics of all kinds usually cost more to repair than to replace—if it's possible to replace them at all.

Sunday, April 23, 2023

Our new strawberry bed

When I made the last-minute decision to throw some strawberries in with this year's garden seed order, my plan was to sow the seeds directly in the sloped area of our back yard. I figured if they managed to take root, we could gradually plant more each year until they'd replaced all the grass in that area, and then we wouldn't have to mow it anymore. And if they didn't, oh well, we'd only be out two bucks.

But Brian had a different idea. Our secondary asparagus patch in the back yard wasn't faring too well; the new asparagus crowns we'd planted four years ago in the secondary asparagus bed, next to the rhubarb, had never sent up more than a few spindly tendrils. Last fall, Brian suspected it was entirely dead, and he ended up digging out half of the bed and planting our garlic crop there, next to the rhubarb. So he thought perhaps the remainder of that bed, on the end, would be the best place for the strawberries. The plants wouldn't have any weeds to compete with, and we'd be able to cover them and protect them from predators, increasing our chances of actually getting to eat at least some of the berries.

In the end, we did a little bit of both. We started about half the seeds indoors, using a greenhouse kit someone had given us. As they grew, Brian transplanted the biggest and healthiest-looking ones out of their little greenhouse cells into small pots that gave them a bit more room to spread out. And the remainder of the seeds got planted directly into the ground in that sloped area, where they can fight it out with the grass and weeds.

A complication in Brian's plan came up when the remaining asparagus plants in the proposed strawberry bed poked up a couple of tentative little shoots this month. Rather than kill these plucky survivors, he decided to dig them up and transfer them to our primary asparagus bed on the south side of the house. It hadn't been performing any too well either, not giving us more than a pound or so a year, so he figured it could use all the help it would get. So he crammed the two surviving asparagus crowns into that bed, along with three new ones we'd picked up at Ocean State Job Lot. We don't know yet how well they'll do in their new home, but they definitely have more of a chance there than they did in the back.

With that area cleared, it was time to put the strawberries in the ground. The packet said they'd do best in soil that was "rich and loose with good drainage." Our heavy clay soil meets only one of those criteria, so we amended it beforehand by mixing in most of a bag of composted manure (tested ahead of time to make sure it wasn't "killer compost") and about a quart of sand (left over from our patio project years ago). I just dumped the bag of compost out in the center of the bed, broke up the big clods with gloved hands, and spread it out across the area. Then I added the sand and raked it in.

The space we had to plant in was about 30 inches wide and six feet long. We had a dozen large, healthy seedlings that Brian definitely wanted to fit into it, plus about an equal number of scrawnier ones that we could add if there was any extra room. The packet said to plant clusters of seeds 12 inches apart in rows 24 inches apart, which clearly wouldn't work in this limited space. Instead, we squeezed the 12 plants in using a staggered arrangement that gave each one about a foot of space around it. Brian planted the ones along the back row, which I couldn't easily reach with my short little arms, and I did the rest. Then I fetched the watering can and gave them all a drink to get them off to a good start.

The final step was to build some sort of cage for pest protection. Since this bed isn't within any sort of fenced-in area, Brian wanted to make sure the plants had cover right from the get-go. So after I'd gone inside to get cleaned up, he stayed out there for another hour or so, fashioning a box out of chicken wire and bamboo stakes. According to the seed packet, the plants will grow to a height of 8 to 10 inches, so he made it about a foot tall to give them a little extra clearance. That way no part of the plants will poke out and allow groundhogs or deer to chomp on it.

Now all that remains is to keep the berries watered and weeded and see how they do. Since this variety (Red and Yellow Wonder Blend), doesn't produce runners, the bed shouldn't need to be thinned out every spring. However, the packet says they will only produce well for two years and recommends adding new plants every year for good production. But we'll wait and see how they perform this first year before deciding whether it's worth the trouble of starting and planting out more in the years to come.

Sunday, July 17, 2022

Household hacks: More ecofrugal bath hacks

Five years back, I shared a series of ecofrugal household hacks for the bathroom. These included cleaning techniques and simple repairs for various items in the house's smallest room, such as the toilet flapper and toothbrush holder. All of them cost little or no money and required no nasty toxic chemicals, and many of them made use of materials that would normally go to waste.

In the years since, I've come up with several new tips and tricks for the loo along the same lines. I've already shared some of these, but I figured I might as well gather them all in one place for convenience. Thus, I proudly present Household Hacks for the Bathroom, Volume 2.

Hack #1: Reduce toothbrush waste

For years, Brian and I were loyal users of the Fuchs Ecotek toothbrush, with its a snap-out replaceable head. Using these allowed us to reuse the same toothbrush handles (which don't really wear out) for years on end, replacing and discarding only the smaller heads. When I discovered in 2020 that the Ecotek was no longer available, I went on a deep dive to figure out what would be the most ecofrugal replacement for it. 

A year later, with the help of a scientific paper from the British Dental Association, I settled on the Snap toothbrush from Greener Step: a replaceable-head model similar to my old Ecotek. Its only real downside is that, unlike the Ecotek, it has a wide, curvy handle that's no doubt meant to be ergonomic, but that doesn't fit into our built-in toothbrush holder, which can only hold old-fashioned flat handles. So, to accommodate it, we made a second wire add-on for the toothbrush holder.

Hack #2: Store your razor in a cup of oil

On the subject of reducing waste, one item in the bathroom that had always frustrated me was my cartridge razor. It wasn't so much the amount of waste it produced, since I could make one cartridge last quite a while; it was the cost of the replacement cartridges and the fact that the handles themselves inevitably broke after a while. So, last year, I bit the bullet and got a safety razor. This was much cheaper to use, but I still didn't get as close a shave as I wanted with it, and I kept nicking myself. So I eventually invested in a pricier Twig razor, which takes single-edged blades.

One problem with this new razor was how to store it. Its wider handle wouldn't fit through the gaps in my shower basket, and while the edge of the basket has hooks for hanging a razor, I was afraid of getting cut if it fell off. So I decided to kill three birds with one stone by storing my new razor head-downwards in a little cup of oil. This keeps the blade out of harm's way, prevents it from rusting, and keeps it well lubricated. The cup itself is just a repurposed moisturizer jar, and the oil is plain old canola oil out of the pantry. (I imagine it will eventually go rancid, but since I'm not planning to consume it, who cares?) 

Hack #3: Replace your plastic shower poof with a washable one

Another piece of waste in the bathroom I'd always wanted to eliminate was my plastic shower poof. I like the nice lather I'm able to work up with one of these, but I don't like the fact that it frays with use and eventually has to be thrown out. (I don't care so much about the bacteria it supposedly harbors, because let's face it, your skin is exposed to bacteria all the time; in fact, keeping them out of your body is more or less what skin is for.)

I've tried various more eco-friendly alternatives, but none of them was quite satisfactory. A washcloth didn't produce a good lather and didn't extend my reach enough for me to reach all parts of my back with it. A natural loofah was too abrasive. And a sea sponge from Bed Bath & Beyond cost 15 bucks and disintegrated after a few months of use.

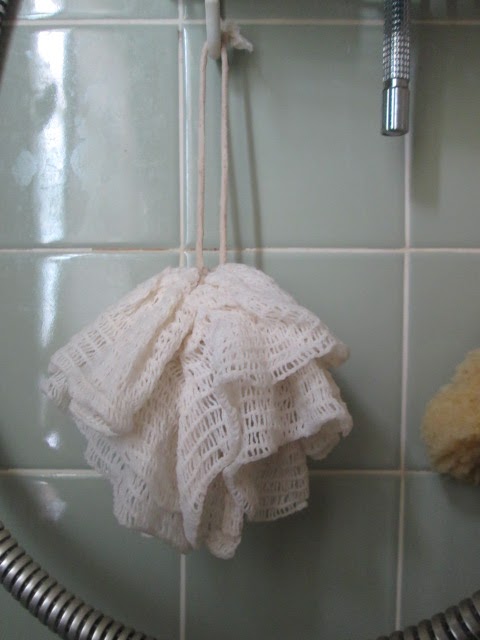
My latest plastic alternative, and the one I suspect I'm going to stick with, is a washable bath puff made from cotton. (The exact one I bought on Etsy is no longer available, but here's a similar one.) It doesn't lather up quite as well as my old plastic one, but it looks sturdier, exfoliates nicely, and can be washed if it starts to mildew.

Hack #4: Make a bath compost pail from a coffee can

This is actually two hacks in one. The first is the idea of keeping a small compost pail in the bathroom to hold biodegradable waste: cat and human hair, spilled cat litter, cotton swabs (the kind with a cardboard core), and the scraps of newspaper used for cleaning the bathroom mirror. This makes it easy to compost all that stuff without having to carry it out to the bin while still dripping wet from the shower.

My first bath compost bin was an empty Blue Bunny ice cream container, which I spray-painted silver to blend in better with its surroundings. This held up for a few years, but the paint started to flake off, and eventually the plastic top cracked from repeated use. And by the time I discarded it, I couldn't simply replace it with another ice cream tub because Brian and I were no longer buying ice cream.

However, I had started buying coffee in cans at the supermarket, so my new bin is a small coffee can with a scrap of old wrapping paper taped around it. One problem with this design is that the metal rim on the bottom leaves rust stains on the vanity, but I circumvented that by saving the plastic top from a second coffee can and adding that to the bottom. 

The first can I used for this purpose was all metal, but it eventually succumbed to rust. So I switched to a coffee can from Lidl, which is made mostly of cardboard with only a small rim of metal at the top and bottom. These cardboard cans gradually break down from exposure to moisture, but that's no problem: when one gets too worn out to use, there's always another can to replace it with.

Hack #5: Make a soap dish insert from garlic sleeves

Along with its built-in toothbrush holder, our bathroom has a built-in soap dish. This is handy, except that any bar of soap that gets used frequently throughout the day will never get a chance to dry out between uses. As a result, it gets all slimy and gross, and it disintegrates quickly.

You can buy various sorts of inserts to fit inside the soap dish so the soap can drain, but we discovered that you can easily make one from those plastic mesh sleeves that garlic cloves come in at the store. Our original design had three of these rolled up into little doughnut shapes and stitched together with dental floss, but they tended to come apart over time. So we modified it to squeeze four of the little tori together in a sort of rhombus shape, each one attached to its two neighbors. Having two attachment points for each helps it hold together better.

This DIY soap dish insert keeps the soap dry for essentially no cost. It does accumulate soap scum and dirt
over time, but it's easy to clean up with a quick rinse under the faucet.

Hack #6: Store surplus meds in a drawer

Our upstairs bathroom is pretty tiny, and it doesn't have a lot of storage space. We have enough room for our towels and cleaning supplies, but one thing we had trouble finding space for was extra bottles of various medicines. (We end up with these for a variety of reasons. Some are from refilling prescriptions online, which requires us to order a three-month supply at once; some are from buy-one-get-one sales at the drugstore; and some are products that we buy online, stocking up to save on shipping.) We tried piling these in a bin in the linen closet, but it was always overflowing, and it was a hassle to go digging through it when we needed anything.

Eventually, it occurred to me that there was one bit of storage space in the bathroom we weren't using fully: a small drawer under the sink on the left-hand side. There was nothing in it but a flashlight, and there was enough room for that to squeeze in with the other items in the right-hand drawer, such as Brian's beard trimmer.

So now this drawer is given over entirely to surplus meds, and we can see all of them at a glance. We still occasionally run out of room in there, but we can usually stick an extra bottle in the medicine chest if we have to.

Hack #7: Use clips to squeeze the air out of a tube dispenser

This is the hack I've come up with most recently, and consequently the one I'm most pleased about. I've recently started using a couple of products that come in a particularly annoying kind of package: a flexible plastic tube. This isn't like a toothpaste tube that you can squeeze the air out of; it automatically reinflates as soon as you let go of it. And you can't just roll up the tube to push the product forward like you can with a toothpaste tube, because it automatically unrolls as it reinflates. Consequently, it gets harder and harder over time to get any product out of the tube. When you squeeze it, you generally get nothing but air. To get anything else, you have to press hard with both hands, whereupon you squeeze out a huge glob of the product that goes all over the place and not where you want it. So most of it just ends up going to waste.

There are various products on the market designed to fix this problem, ranging in price from around $3 to as much as $40. But to buy one of these, I'd probably have to order it online, and the shipping cost would raise the price to at least $8. I figured there had to be a cheaper DIY solution.

I tried various tools, including large paper clips and binder clips, and eventually found two that are fairly effective and easy to use. For the smaller of the two tubes, I just clipped a small barrette across the tube. This prevents it from reinflating, allowing me to squeeze the product out by sliding the barrette down along the length of the tube.

I had two of these barrettes, but the other one was too small to accommodate the larger tube. So instead, I rolled it up, pressing the air out as I went, and then clipped it in place with a clothespin.

Thanks to these simple tools — neither of which cost me a cent — I should be able to get all the contents out of both these pesky tubes. And in future, I'll try to avoid buying any product in this kind of idiotic packaging.

Saturday, March 24, 2018

Gardeners' Holidays 2018: First Sowing

It appears to have become a tradition around here to celebrate the official first day of spring with a snowstorm. In 2015, I stubbornly went out and sowed my snap peas in a light snowfall that later accumulated to about four inches; in 2016, I did the same with only a paltry inch of snow in the forecast; and last year I had to give in and postpone the planting because there was already a couple of inches on the ground. And this year, our spring Gardeners' Holiday had to be postponed on account of this:

While that's a lot of snow for what's supposed to be springtime, it could have been a lot worse. The forecast was originally calling for eight to eleven inches of heavy snow that could take out trees and power lines; instead we got about seven inches of fairly light, fluffy snow that was fairly easy to shovel. It was already starting to melt the day after it fell, and by the weekend, nearly all of it was gone.

That freed us up to plant our peas today, right on schedule. But before we could put them into the ground, we had to prep the beds, which were full of a lot of weeds and debris left over from last year's crops.


We cleared all that out as best we could, then I worked on clearing away the worst of the weeds from the path area while Brian opened up our new compost bin and extracted several buckets full of nice, dark compost.


After dumping those out onto the beds and raking it out smooth, we were ready to start planting the peas. Fortunately the bed we're putting them in this year is the left front one, which gets more early sun than the others, so the dirt in it was fully thawed. Rather than fuss around digging a trench, Brian just out all the peas in a neat little row, two inches apart, and then pushed them down into the dirt up to the depth of his first knuckle.


Before these plants grow tall enough to latch onto the trellis, we'll need to make some repairs to the bottom part of it. Apparently we didn't leave quite enough extra at the bottom when we attached the netting after rebuilding the garden beds last year, so some of the strings have worked themselves loose (as you can sort of see in the photo). But these peas will take a while to come up, so we have plenty of time to deal with it.

And now that this chore is all taken care of, we can go out for a little walk and enjoy the spring weather...before it snows again tomorrow.

Sunday, July 16, 2017

DIY pallet compost bin

When Brian built our first compost bin, about eight years ago, he used wooden shipping pallets salvaged from behind a building on Rutgers campus. In addition to being free, these were pretty easy to work with: he simply nailed three of them together to make a box with one open side, then attached the fourth one with hinges to make a door that could swing upwards to expose the pile for turning. This simple design served us well for several years, but over the last year or two, it became apparent that the thin, untreated wood of the pallets was gradually crumbling away into compost itself. By this spring, the bin was noticeably crooked, as the rotting timbers of the pallets could no longer hold their shape. Clearly, we were going to need to build a new bin.


Unfortunately, we couldn't simply rig up another simple box like the first one, because we couldn't get hold of the materials. Or, to be more exact, we could have found some, but we couldn't have gotten them home. Our new car, a Honda Fit, can hold practically anything, but it turns out that full-sized shipping pallets are the one thing you just can't squeeze in through either the rear doors or the back hatch. Maybe if we had removed absolutely everything else, we could have managed one, but picking them up wherever we happened to spot them just wasn't feasible.

So, instead, over the course of last year, Brian scavenged several smaller pallets, mostly from the curbside, which the car could more easily accommodate. Then this month, over the long Fourth of July weekend, he started sorting through these and the pile of still-usable two-by-fours left over from our old garden bed frames, trying to work out how best to put them all together into a new bin roughly the same size as our old one. Of the various pallets he'd brought home, he identified four that he thought were sturdy enough to use—but unfortunately, they were all of different shapes and sizes, so simply nailing them together into a box wasn't going to be an option.

However, after a little measuring, he discovered that the four usable pallets all had one dimension in common: each of them was exactly 40 inches long on either its long or short side. So he decided that this would be the height of the the new bin, and he'd use the two-by-fours to eke out the odd-sized pallets to create sides of equal length. Figuring out just how to fit the the pallets together was a little bit tricky; their smaller size would make the bin narrower than our old one, so access to the pile would be a little bit restricted. However, after a little fiddling, Brian finally contrived a design that would allow one whole corner of the bin to swing open, creating a nice wide opening for turning the pile or scooping out the finished compost.

The basic structure of the box was simple enough to build. He just attached three of the pallets together—using the same stainless-steel deck screws we used for the new garden bed frames, instead of nails, to give it more stability.


The hinged extension, however, was much more complicated. He started by building a frame of two-by-fours with one long side and four shorter crosspieces, sort of like an extended letter E.


Then he added on several longer pieces connected to the crosspieces with 3.5-inch carriage bolts, each with a washer and a nut on it, so that they could swivel. This made a sort of giant wooden hinge, which would allow the corner of the new bin to swing open.


Then, he started reinforcing both sides of this hinge with some more long pieces. Attached parallel to each other, about an inch apart, these created an open, slatted structure similar to the pallets we'd already used. He used just two pieces for the short side of the hinge....


...and about six for the longer side. He couldn't add crosspieces all the way to the edge, because that would have prevented it from swinging open...


...so instead he reinforced it with two long pieces on the inside.


Once this odd swinging door was complete, he was able to attach it to the fixed, three-sided structure he'd made with the pallets. The shorter end of the hinge was clamped to the long side of the bin and screwed into place, extending the pallet to make an even longer fixed side.


The longer side of the hinge, which now formed the front of the bin, could swing open freely.


Then, to complete the short side of the bin, Brian took one more of the small pallets and clamped it to this new swinging door at a 90-degree angle.


Screwing this last piece into place was probably the most awkward part of the job, as he actually had to climb inside the bin and crouch down to attach the screws at the right angle.


Here you can see how it all finally fits together. The  three fixed sides of the bin are at the left, and on the right is the door assembly...


...which swings open to give access to the bin. In this picture, it can only open partway, as it's blocked by the pile of compost that had to be emptied out of the old bin. However, with the compost transferred back inside the bin where it belongs, it can swing open nearly to full extension, giving us a nice, wide opening.


The one thing he still isn't sure about is how to keep this swinging door closed. Right now, the bin is only about half full, but as it fills up, the pressure of the contents will likely push the sides outward and force the door open if it's not secured somehow. For now, he's just got a bungee cord latched around the slats; if that proves too awkward to use, we'll have to come up with some more permanent sort of closure.


Here's a final shot of the completed bin from above, with the contents back inside. As you can see, it stands out several inches from the side stoop, because we had to leave enough of a gap to accommodate a drainage pipe that runs through the back of the stoop. Eventually, Brian plans to add a little platform to the back to cover this gap so that waste scraps can't fall in between the bin and the stoop by accident. But for now, it's perfectly usable.


Maybe it's not exactly elegant, but to our eyes, this hodge-podge design seems oddly appropriate for its function. Every time we pass by it, we think, "Now that's a compost bin."

Saturday, June 20, 2015

Money Crashers: Composting 101

My second Money Crashers post for this past week is all about composting, a subject I've discussed here many times in the past. I've written about our preference for cold composting, also known as lazy composting, because you basically just throw everything in the bin and leave it there; about the perils of "killer compost," which contains lingering traces of highly persistent herbicides and can therefore kill your plants instead of fertilizing them; and about the various things we put into our compost that might not be obvious. This new article touches on all those topics, but it's mostly a guide to composting for people who are short on one or more resources:
  • time,
  • space, and
  • money.
It covers specific methods that are useful for busy, crowded, or cash-strapped homes, and it also includes some general info about the benefits of composting, how it's done, and how to troubleshoot your compost pile.

So if you're looking for a nice general guide (either for yourself or for a friend who's new to the compost game), or if you've always wanted to try composting but thought it wouldn't work in your situation, this is the article for you: Composting 101: How to Make Compost & Fertilizer at Home.

Monday, June 8, 2015

Curb to curb

Anyone who reads this blog regularly has probably already heard the phrase "cradle to cradle," or C2C for short. In a nutshell, it's the idea that when you design any new product, you should think about its entire life cycle, including how all the materials that go into it will eventually become part of new products. Composting is an example of a cradle-to-cradle process; we harvest vegetables from our garden, eat them, put the waste parts into the compost bin, where they break down into compost that will eventually go onto our garden to grow more vegetables. It's not a perfect closed system, of course, because the digested remains of the veggies go into our town's sewage system rather than our compost bin (some people have systems that can handle human waste, but we're not that advanced) and some of the compost that goes in our garden comes from the store, but still, every bit of the vegetables we grow goes to some useful purpose.

Last weekend, however, I thought of an even more efficient variant on this idea: "curb to curb."

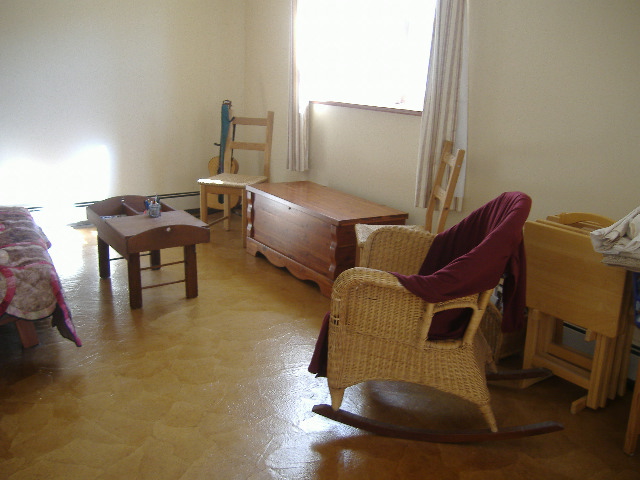
A little background: back when I lived in Princeton, about, oh, 12 or 15 years ago, my apartment was furnished with a mixture of odds and ends: hand-me-downs from friends and family, yard-sale finds, a few cheap new items from IKEA, and a couple of pieces that were scavenged off the curb. Among these was an old wicker rocking chair. One of its arms had obviously sustained some damage, most likely at the paws of a cat or cats, and one of its rockers wasn't very well secured - so either the chair was off its rocker, or I was off mine for picking it up off the curb in the first place. But I just disguised the damaged arm with a throw and positioned it in a spot where the rocker couldn't easily come loose, and with the random hodge-podge of furnishings I had in my apartment, it fit in just fine.

This curbside find ended up following me and Brian from my Princeton apartment to our first apartment in Highland Park and, eventually, to this house, where it settled in the playroom (as we're now calling the big room in the basement, since that's how our cats like to use it). Every so often we thought about replacing it, particularly since a rocker wasn't the ideal type of chair for a room almost entirely surrounded with baseboard heaters, but we never quite got around to it because it wasn't a big priority.

However, once our new kitties took up residence last spring, we noticed that the damaged area of the rocker was gradually expanding. We also started finding fragments of it strewn about the room. And while we weren't that worried about the chair itself being destroyed, given that it was technically trash when I found it, we were a little concerned about the possibility that the cats would ingest parts of it, which we assumed wouldn't be good for them.

So we waited for the first Thursday of the month, which is bulk trash pickup day, and put the chair out at the curb. In fact, we put it out bright and early on Wednesday evening, since we know items that go out for bulk pickup often get snatched up by scavengers before the official trash collectors come for them, and we thought the the chair had a good chance of going to a new home and continuing to live a useful life. And I guess we were right, because when we stepped out to door after dinner to do a little treasure hunting of our own along the curb, the chair was gone.

I would say that's pretty much the ultimate in recycling. The chair came to me off the curb in the first place, got more than ten years of use, and then went back to the curb—and on from there to a new home. So I've now saved this same chair from the landfill not once, but twice. Cradle to cradle is pretty good, but curb to curb—taking something that was waste to begin with, giving it a useful life, and then giving it another useful life after that one is finished—is about as green as it gets.

It would be the perfect end to this story to say we scavenged a replacement for the chair from one of our neighbors' bulk trash heaps, but sadly, it didn't work out that way. So instead we ended up with a Poang chair from IKEA, which I've always wanted just for the sake of the onomatopoeia (bounce, bounce, poang, poang!). And while our cats have not wasted any time taking possession of the new chair, we think they'll at least find this one a little harder to dismantle.

Monday, April 6, 2015

What we did for Easter

Yesterday, neighbors up and down our street were dressed in their Sunday best, heading to and from church, hunting for eggs, and playing games. Meanwhile, Brian and I were dressed in our grungiest gardening clothes, covered in dirt and grass stains, hauling buckets of compost to and fro. Because while for many people, Easter Sunday means candy and new dresses, for a gardener, it means it's almost time to start setting your first transplants out in the garden—and in order to do that, you've got to get the beds properly prepared. So while our gaily dressed neighbors feasted and frolicked, we spent the whole morning and a good chunk of the afternoon toiling in the fields.

By the time we finally went inside, around 3pm, we were both pretty tired and pretty grungy, but we'd accomplished quite a lot:
  • Brian hauled out the rain barrel from the shed and set it back up on its pad. This job included removing and storing away the drainpipe extension that we used throughout the winter to divert water away from the house, and replacing it with the shorter pipe that routes water from the gutter into the barrel. Once he had it back in its place, however, he found himself wondering whether the empty barrel was too light to resist blowing over in a high wind. He actually considered turning on the outside water to add just enough to the barrel to give it some ballast, but it seemed a bit silly to use household water to fill up the barrel whose whole purpose is to save on our household water use. Since there's rain in the forecast for later this week, he figured the barrel could take its chances until then; it only takes one good rainfall to fill it pretty full.
  • We pulled all the leaves and other debris off the garden beds (stashing it in buckets since there was no more room in the compost bin) and gave all the beds a good weeding. This includes the permanent beds where we keep the asparagus and rhubarb, and the mulched areas surrounding the cherry bushes and the new hardy kiwi vines. I'd been noticing ever since the snow melted that the boundary between the cherry bushes and the surrounding lawn had been growing a bit blurry as weeds gradually encroached on the mulch area, so I took the opportunity to realign the border of smooth stones that separates the two. I ceded a bit of territory to the lawn, but the line of demarcation is now clear again.
  • While we were doing this, Brian noticed that a branch had broken off one of our neighbor's trees and was now dangling by a shred of bark, at risk of coming down in our yard in the next high wind. So, rather than leave this sword of Damocles hanging over our yard, he fetched out the ladder and the handsaw and brought it down with a few well-placed strokes. Then, of course, he had this whole big dead branch he had to cut up, and while he was doing that we figured we might as well go ahead and bundle all the other woody material we had lying around the yard: sticks pulled out of the compost bin, leftover evergreen boughs from last year's Christmas decorations, heaps of dried branches and leaves trimmed off our massive sage plant, and, most hazardous of all, the prickly canes of last year's raspberries that we cut down to make room for this year's new growth. To wrap these up safely, we practiced what Brian termed "bundle engineering": padding the outside of the bundle with some thick evergreen or soft sage boughs and squirreling the prickly stuff away in the middle. That made the bundles reasonably safe to handle, though we still had to be very careful while wrapping them. Turns out those little prickers are sharp enough to go through standard garden gloves. We ended up with six big bundles of brush, waiting for the next bulk trash pick-up. (Pity to let all that wood go to waste, but we made an attempt a few years back at home chipping, and the small electric machine just wasn't up to the job.)
  • Next came the dirtiest part of the work, as Brian opened up the compost bin that had been heaped to overflowing all through the cold winter months. He dug out all the rich, black compost way down at the bottom and shoveled it into buckets, which I hauled down to the garden and spread on the beds. We eventually managed to extract about four buckets of compost per bed—enough to give each of them a thin coating, though definitely not the 1-inch layer that gardening experts recommend. We also added about one bucketful to the asparagus bed. In the process, Brian ended up removing pretty much the entire contents of the bin and then pitching it back in, with all the weeds and other debris we'd removed from the garden thrown in on top. So the bed has now had its annual turning, which is about all it gets from us, since we prefer the "cold compost" (aka "lazy") method. (By the way, those plants you can see still lingering in the beds are last year's Brussels sprouts. They hadn't produced any sprouts by the time winter came, and we never got around to hauling them out of the beds—but when the snow finally melted last month, we saw that they were still alive and starting to form tiny sprouts. So we figured we'd just leave the plants there until we actually need to plant something else in that space, and see whether the sprouts manage to get big enough to eat.)
  • While Brian was setting the compost bin back to rights, I busied myself with the old trash barrel containing the last of the bulk batch of mulch we bought last fall. By tipping it onto its side and scooping out the contents with the shovel, I was able to extract enough to spread a nice inch or two on the asparagus bed. Then Brian helped me haul the barrel up to the front yard and renew the mulch "doughnuts" around our three plum trees. The little bit that was left got dumped onto a stray corner of the raspberry bed that was looking a bit bare.
Our grubbing in the dirt made an amusing contrast with our neighbors' finery and festivity, but it occurred to me as we worked that, really, what we were doing was entirely appropriate for the Easter season. After all, the holiday is all about two things: rebirth and redemption. What could be a better celebration of rebirth than waking up the garden after its long winter's sleep and preparing it to receive another season's plants? And what could be a better symbol of redemption than the transformation of kitchen and yard waste, dead and decaying vegetable matter, into rich, dark, lush compost that will nourish new growth?

Of course, I don't actually celebrate Easter myself; I'm in the middle of Passover right now. But personally, I think gardening is an appropriate way to celebrate that holiday too. It might seem like, if the whole point of the festival is to celebrate being freed from slavery in Egypt, it would be most appropriate to spend the eight days relaxing and not having to work at all—but work isn't slavery when you're doing it for your own benefit. Being able to work hard at a job you've chosen yourself, knowing that you will enjoy the fruits of your labors come the harvest—now that's a celebration of freedom.

So happy Easter and Passover, respectively, to all those who celebrate them. And to everyone else, happy spring!