Showing posts with label reuse. Show all posts

Sunday, May 31, 2026

Honeyberry netting 2.0 (and a new honeyberry treat)

Last week, we discovered that the honeyberries on our bushes were just starting to get a little bit of color. They weren't ripe yet, but we knew our backyard birds wouldn't wait until they were to start helping themselves. If we wanted to save the berries for human consumption, we'd have to get our honeyberry netting tents up pronto.

This year, however, Brian wanted to try to improve on our original teepee design. Rather than covering each bush separately, he wanted to put up three frames—one at each end, plus an extra one for support in the middle—and cover the entire row with one giant piece of netting. This way, we'd be able to duck under the netting and work our way along the row, picking berries off each bush in turn, rather than wriggling into and out of the tents one at a time. He also believed it would be easier to set up one big tent than to put up and take down a bunch of individual frames and cover each one. I was a bit more skeptical, since I feared one big piece of netting would be more unwieldy to work with than several small ones. But since he was the one doing most of the work, I figured it couldn't hurt to try it his way.

Fortunately, we didn't have to buy any new materials for this project. We already had a big roll of bird netting that we'd scavenged off the curb on bulk trash day, and we had the six lengths of PVC pipe that we'd used to make our two original berry tents. To make the third frame for the middle, Brian dug into his stash and pulled out the narrower PVC pipe that we'd used for our very first garden trellis before figuring out we needed something sturdier. For nearly 20 years, he'd been holding on to this just in case we could use it one day, and now that day had come.

Brian then did a little experimenting to figure out the best way to arrange the pipe frames for his new design. He set up the first frame in roughly the same place it would go to cover just the one bush at the near end of the row, but skewed a bit more toward the outside and with the front legs a bit closer together. This made the whole frame taller to create as much vertical space as possible under the netting. He set up the second frame in a mirrored position at the other end of the row. Then he played around with the pieces of narrower pipe to figure out the best arrangement for the central trellis before cutting them to size. As he'd done with the first set of trellises, he drilled holes in the ends of the pipes to thread the string through, making it easier to tie them together.

Then came the tricky part: deploying the netting. We got out the big roll and worked in tandem to unspool it, with me in charge of holding the loose end down while he rolled it out across the yard in front of the bushes. When he'd unrolled enough to cover the entire row, we picked up the loose end and draped it over the trellis at the near end, making sure it reached all the way to the ground on all sides with room to spare. Then I held that piece in place while Brian lifted the unrolled netting over the middle trellis and finally over the end one, all while it remained attached to the roll. Only when we had the whole thing in place and were sure it reached down to the ground on both ends did he cut it off. Because the bird netting was only 7 feet wide, it took two lengths of it to cover the row of frames fully: one for the rear side, one for the front. We clipped the two pieces together with binder clips to make sure they wouldn't separate and leave a gap in the middle.

Next we needed a way to secure the netting in place. With the mini-tents, we'd simply draped the netting over each set of poles and held it down with rocks, but for this big tent, we wanted something to hold it in place at the top of each frame so it wouldn't sag too much. I suggested rubber bands, and as it happened, Brian had a whole bunch of them out in the shed that he'd recently discovered just sitting in our back yard near the fence. (His best guess was that some critter had dragged them in there and left them, though he had no idea why.) They turned out not to be very good rubber bands, as several of them broke while we were trying to wrap them over the ends of the poles, but eventually we managed to get one in place on the top of each frame.

That took care of the top of the frames, but we still needed something to hold the netting down at ground level. In fact, we got a vivid demonstration of why this was necessary, as two birds managed to get under the netting during the brief time it was unsecured and were flapping around in a panic trying to escape. After shooing them out, we made sure they wouldn't get back in by covering the netting with rocks. Luckily, we had plenty of these, because we'd hauled away several buckets that my parents didn't want during my Mother's Day patio cleanup. They even gave us several slate flagstones they were no longer using, allowing Brian to replace the one he'd scavenged from his backyard rain channel to repair the damaged path in our front yard. On the western end of the honeyberry hedge, we tucked the edge of the netting under these slate pavers to secure it; on the north side, Brian shoved it under the big concrete blocks lining the fence. Along the other two sides, we used the biggest rocks out of the collection we'd hauled home from my parents' place, one every 8 inches or so. 

This new, all-in-one honeyberry tent is a bit harder to get into than the old, individual tents. Since it's all one big piece of netting with no openings, you have to remove all the rocks along a stretch about eight feet long to give you enough slack in the net to squeeze under. But once you're in, you can move about pretty freely, crawling from bush to bush to harvest from each of them in turn. Occasionally one of the binder clips will come loose if you jostle around too much under there, but it's easy to clip it back on after you exit. Eventually, we'd like to replace this array  with some sort of more permanent structure that will require less setup work each year and be easier on our aging backs and knees. But on the whole, this design is probably a bit easier to set up and use than the single-bush teepees, and it won't take up much more room in the shed during the off-season.

Safe under their new protective cover, the honeyberries are ripening rapidly. Most of the ones nearest the house have turned a lovely deep blue, and we've already gathered about a cup of fully ripe ones. To celebrate the harvest, Brian decided to try something new: honeyberry ice cream. Here's his improvised recipe:

Mash 1/2 cup honeyberries with 3 Tbsp sugar and 1/2 teaspoon vanilla. Let it sit awhile to get juicy. Add 2 Tbsp soy milk and mix thoroughly. Stir together with 1/2 cup Country Crock Dairy-Free Whipping Cream (our current favorite now that Trader Joe's vegan whipping cream has been discontinued) and chill for several hours. Churn it to soft-serve consistency in an ice cream maker and transfer to the freezer to set fully. 

The finished product has a vivid pink color and a powerful fruity flavor—a bit too powerful for Brian's taste, in fact. He's thinking of reducing the amount of fruit next time and possibly increasing the amount of vanilla to counterbalance the acidity of the berries. But speaking for myself, I think it's lovely just the way it is.

Monday, April 13, 2026

Our new asparagus bed

First of all, I apologize for being a bit late with this week's blog entry. But as you'll soon see, there's a good reason for it. 

For several years, our asparagus crop has been steadily shrinking. In fact, checking over my posts, I see that it's been ten years since we last celebrated the May 1 Gardeners' Holiday as the Age of Asparagus, largely because there just hasn't been enough asparagus to celebrate. For the past couple of years, we've harvested barely enough for one meal. And so far this year, we've had no spears at all big enough to pick. Our mature plants have produced only tiny, spindly fronds, and as far as we can tell, none of the ten new asparagus crowns we added to the bed last year have put up any shoots at all.

In light of this, I suggested maybe we it was time to do what we considered doing last year: dig up the entire asparagus bed and start over from scratch. Brian agreed that might be a good idea, but he wondered whether we should consider starting over in a different location. In the first place, our current asparagus patch had never been all that productive, and in the second place, it was likely to get torn up at some spot to put in the condenser for a heat pump system when we finally got around to installing one. So if we had to put in a whole new bed, why not put it in a new location where we'd know it wouldn't be disturbed?

Well, it was a nice idea in theory, but there was one obvious problem: asparagus likes a well-drained, even sandy soil. The current asparagus bed has the only soil on our property with even a little bit of sand in it. If the asparagus plants didn't like that, they'd really hate the heavy clay in the rest of our yard. The only way around this that we could think of would be to build a raised bed and fill it with a more asparagus-friendly soil mixture.

I knew this was possible, because I'd recently seen a GrowVeg video that discussed the advantages of planting asparagus in raised beds. However, it didn't go into much detail about how to construct one. Digging a little deeper, I found this article at Garden Betty, which talked more about how to build the bed and how to plant and tend the asparagus for optimal growth. (One thing it recommended was a phosphorus-rich organic fertilizer, something we'd never used on our current asparagus patch, which might explain its lackluster production.) But it also called attention to one key point: asparagus crowns are only available for sale in stores for a short period in the springtime. So, if we really wanted to do this, we'd have to do it as soon as possible.

Since I already had my monthly Citizens' Climate Lobby meeting to attend in Somerville on Saturday, we decided to combine that trip with a visit to the Belle Mead Co-Op for asparagus crowns and bulk soil. That gave us just a few days to plan out the location and design for the new raised bed. We decided the best spot for it would be the area in front of the shed, which is relatively level and gets sunlight for most of the day. In that location, we'd have room for a 4-foot square bed without blocking off our access to the shed, the main garden, or the cherry bushes. After a little tinkering, Brian determined that he could build a 4-foot square frame roughly 17 inches deep entirely out of reclaimed materials: two large boards we'd recently scavenged off the curb and a bunch of narrower pieces trimmed off from the stack of wood pallets stored in the shed. He started constructing it on Friday and had it finished by Saturday morning, just in time for our trip to the Co-Op. 

We'd already called the Co-Op ahead of time and found that they had several varieties of asparagus in stock, including the highly recommended Jersey Knight and Millennium varieties. We planned to get one 10-pack of each, allowing us to plant eight of each variety in our 4-by-4 bed with a few to spare. When we got there, we found that there were two different bundles of Millennium crowns available: one-year old crowns for $10 or two-year-old ones for $20. We decided to spend the extra $10 in hopes that we'd be able to harvest at least a little asparagus from our new bed next year. 

Next on our shopping list was soil. Garden Betty recommended using a "well-draining soil" and amending it with 2 inches of "well-aged compost." To simplify things, we opted for the Co-Op's blended topsoil, which has compost and sand already mixed in. The Co-Op's website suggested amending this mixture for raised beds with a bagged product called Bumper Crop, so we added a couple of bags of that to our order, along with one bag of an organic fertilizer called Bulb-Tone that Garden Betty recommended. The total came to $129, probably the most we'd spent on any garden project since we bought our fruit trees 13 years ago, but like them, this is a long-term investment.

Loading the half-yard of topsoil we'd purchased was a lot more work than we expected. We've bought bulk compost and mulch from the Co-Op enough times to have the drill pretty well down: Dump out our half-yard into our two big trash barrels, muscle those into the car, then shovel up the rest into bags and load those. But the topsoil was much denser than either mulch or compost, and the filled barrels were far too heavy for us to lift or even drag. We had to shovel about half the dirt out of them before we could get them into the car, and even then it took all our combined strength. And although we filled the bags only about halfway full, they were still too heavy for me to lift more than an inch or two. Brian had to heave them all into the car, and then, with still more difficulty, heave them back out again. To haul them down to the back yard, we dragged out the wheelbarrow and the ramp we hadn't used since our patio project in 2013, but even hefting the bags up into the wheelbarrow was a challenge. By the time we'd finished shifting everything, we didn't have the energy to do more than change clothes, eat supper, and collapse on the couch to watch Critical Role.

On Sunday afternoon, we began preparing the bed for planting. First, we toted the frame Brian had built down to the spot we'd picked for it in the yard (popping one side loose in the process, which he had to reattach). We carefully adjusted it until we were satisfied, then set a brick at each corner to marked out its exact position. After that, we moved the frame out of the way so Brian could go all the way around the edges of the square with our King of Spades, cutting a line to mark the boundaries of the new bed. He then used the same tool to score horizontal and vertical lines across the bed, dividing the sod into squares. We removed these squares one at a time, whacking each one with a trowel to shake the clods of dirt loose from the grass roots so none of it would go to waste before dumping the grass into a bucket bound for the compost bin. 

When all the sod had been turfed up, we shifted the frame back into place. It wasn't quite level, so we scooted it over just a bit and Brian dug the hole a bit deeper along one edge to get it situated securely. Then he made one more adjustment to the frame: stapling a layer of cardboard to the inside so that none of our precious soil would escape through the cracks. On this cardboard layer, he used a Sharpie to mark three lines at the center of each side of the bed, at 8, 5, and 2 inches below the top edge. The first mark showed the level to which we'd need to fill the bed before placing the crowns; the second showed the level to which we should pile additional dirt on top of them; and the third showed how much more dirt we'd need to add later in the season, once the spears had started to sprout. The remaining two inches would be for a layer of mulch on top to protect the plants during the winter. He also marked off one-foot lengths along the top edges of the bed as a guide to help us place the asparagus crowns.

That, once again, proved to be all the work we could handle for one day, so it wasn't until this morning that we started actually filling up the beds (which is also why this blog entry was delayed). Since we weren't sure our half-yard of soil would be quite enough to fill them to the level needed, we started by adding a layer of sticks, as recommended in this other GrowVeg video. Aside from adding bulk, they'll help the soil in the bed drain more easily, and they'll break down over time to release their nutrients into the soil. On top of that, we began adding the actual dirt—first shoveling it out of the big bins until they were light enough to tip out, then dumping in about five bags' worth on top of that until we'd nearly reached the first mark. Then we dumped in one of the two bags of Bumper Crop and, following the instructions on the package, worked it into the soil to a depth of about six inches.

Once we'd reached this point, we were ready to start the actual planting. First, on Garden Betty's advice, we soaked the asparagus crowns in a bucket of water for about 15 minutes to rehydrate them. While they were soaking, we opened up the package of Bulb-Tone, sprinkled three cups of it across the soil surface, and lightly worked it in with our fingers. Then we carefully laid out the asparagus crowns according to Brian's guidelines, one per square foot, with the two-year-old Millennium crowns toward the front of the bed and the younger Jersey Knight crowns in back. 


Finally, we topped up the bed to Brian's second level marker with a mixture of soil and some more of the Bumper Crop and gave the freshly planted asparagus a good watering. Our sources said it would need 1 to 2 inches of water every week for its first couple of years, which Brian worked out to be 10 to 20 gallons—about five full watering cans' worth. However, we found the soil was looking pretty well saturated after three cans full, so we decided to leave it at that and top it off later.

After learning how much water the plants would need, Brian decided to add one more thing to the new asparagus patch: a rain gauge. The standard design for this is simply a plastic bottle with the top cut off and inverted to funnel rainwater into the opening, with lines marked on the outside to show how many inches of rain you've had. Sources like Wikihow suggest adding pebbles to the bottom to keep it from tipping over, but Brian decided to get a little fancier and use some of the colorful marbles we'd both saved from our childhood. He did a little measuring to figure out how much water the marbles would displace and adjusted the marks on the side accordingly. The new rain gauge now sits on a corner of the bed, so we can see at a glance how much water the plants have had and calculate how much they still need.

Although it was a lot of work, I'm extremely pleased with our new asparagus bed. I like the fact that Brian built it himself. I like the fact that he used only salvaged materials. I like the fact that we assembled it together (even if he did most of the literal heavy lifting). And I like the fact that, having planted it once, we can expect to continue harvesting asparagus from it from the next 15 to 20 years. Granted, at around $3 per pound for in-season asparagus, it will need to produce 43 pounds to pay for all the material that went into it, but that's less than three ounces per plant per year. I think we can hope to at least break even, and one thing we can be sure of is that any asparagus we do get will be far fresher than anything we could buy at the store. And if asparagus proves to be one of the commodities that skyrockets in price due to tariffs or global instability, we'll be at least somewhat insulated from the shock.

Sunday, March 29, 2026

Ecofrugal (semi) successes

I don't have any big news to blog about this week, so instead, I'm sharing a few quirky little incidents in our ecofrugal life. To balance out my recent post on ecofrugal fails, these are all successes—well, sort of, at least.

Incident #1: A belated curb find

In the spring, my Citizens' Climate Lobby chapter spends a lot of time "tabling": setting up tables at public events so we can talk to the attendees about climate change. This year, one of those events was NJ Makers Day, at which all kinds of groups set up tables with craft projects for the public to try. The project we chose was this mini collage based on the global warming stripes, a graphic created by a British scientist to show how much the planet has warmed since 1850. (We used a simplified version of the graphic with one stripe per decade, instead of one per year.)

Since we knew we'd have limited time for the project, we decided to prepare all the materials ahead of time: bookmark-sized strips of card stock and narrower strips of paper in various shades of blue, pink, and red. My partner in the project bought some paper from an art supply thrift shop and cut out strips on a paper cutter, so hers came out nice and neat. But Brian and I didn't have a paper cutter, so I cut my strips by hand from a mixture of junk mail and origami paper. This was a time-consuming process, and the strips I ended up with were pretty uneven in size and shape.

I didn't want to rely on this imprecise method for the backing strips, so I turned for help to my lab-trained husband. After a little thought, he came up with the method of stacking the card stock sheets (old manila folders cut in half), clamping them to his worktable, marking off the correct width, and cutting across them with a utility knife. It took several passes to go through all the layers, but we ended up with neatly cut bookmarks all more or less identical in size and shape.

Right after he finished with this task, we went out for a walk. And as we approached the library, what did we see sitting out on the curb but a paper cutter, all packed in its original box. At first it looked like it had been discarded because the handle was broken, but we quickly realized that it had just been disassembled to fit it into the box. It was a perfectly good, practically new paper cutter, free for the taking—roughly 30 minutes after we could have used it.

Of course, we took it anyway. We couldn't just let it go to waste, and if we'd passed it up we'd surely have had another need for it right away. But the timing of the find was still perfectly ironic.

Incident #2: A tale of two grocery bills

This one happened on our last trip to Lidl. As per usual, we were waiting in line at the checkout with a cart full of mostly healthy, mostly plant-based foods. Our load included a cauliflower, an eggplant, a bunch of celery, a pound of mushrooms, three pounds of apples, a can of crushed tomatoes, a can of tomato paste, three cartons of soy milk, a dozen free-range eggs, a box of brownie mix, a bag of chocolate chips, and a bar of dark chocolate. The only non-food item was a bottle of dish soap. 

As we were waiting, I noticed that the guy in line in front of us had a much smaller load that was completely orthogonal to ours. He had about six individually wrapped steaks, a package of hamburger, a small bag of pastries, and just one produce bag containing three small zucchini. The clerk rang up this assortment at a little over $80. The shopper seemed a little taken aback at this price tag, but he paid it. Then we went through with our groceries, and they came to just over $35—less than half as much for about three times the volume of food. 

Feel free to share this story next time you hear anyone trot out the myth that a plant-based diet is more expensive.

Incident #3: The case of the conflicting egg prices

The one animal-based product in our Lidl cart was a carton of eggs. We always buy the ones that are labeled Certified Humane, since we're willing to pay extra to avoid contributing to animal suffering. The dozen eggs we bought cost $2.89—not so bad compared to the $4-to-$5-per-dozen price tags we were seeing a year or so ago, but still considerably pricier than regular, inhumane eggs. Or at least, so we thought.

On our way out the door, I grabbed a copy of the sale flier for the upcoming week. It prominently advertised a special on Eggland's Best eggs: $2.59 a dozen. These are just standard eggs with no certification, yet they're selling for just 30 cents less than what we pay for the Certified Humane ones. And according to the flier, that price is discounted by $1.28. If that's true, the regular price must be $3.87—roughly 34 percent more than the regular price for the Certified Humane eggs.

I'm not sure what to make of this. Is Lidl engaging in the same pricing shenanigans some retailers use on Black Friday, deliberately raising its "regular" price for eggs right before Easter to make the $2.59 "sale" price look like a great deal? Or is this a case of humanely farmed eggs being genuinely cheaper because smaller farms are less susceptible to bird flu? And more puzzling still, if these two types of eggs are sitting side by side in the refrigerator case, why would anyone ever pay nearly a dollar more for the less humane ones? Are people so prejudiced against brown eggs that they'll pay 34 percent more for white ones?

The causes may be murky, but the upshot is clear: the eggs that are better for the environment and animal welfare are better for our wallets, as well. For now, at least, our eco and frugal instincts are in perfect harmony. 

Monday, January 19, 2026

Thrift Week 2026, Day 3: How to Recycle Batteries

As regular readers will know, I'm not a particularly tech-oriented person. I'm a late adopter who only replaces her computer every ten years or so and didn't even own a smartphone until 2018. So I was quite surprised the first time I calculated just how many devices we had that ran on batteries. There were literally dozens—some with their own built-in rechargeable batteries, some with single-use alkaline batteries. Even when batteries aren't included, they're very much required.

In the years since, we've swapped out most of those alkaline batteries for either rechargeable ones or longer-lasting lithium batteries. (We still have a few partially discharged ones lurking in a drawer, waiting for us to eke the last little bit of charge out of them.) Both of these, particularly the rechargeables, are a big improvement on the alkaline ones. They produce a lot less waste and cost less over their lifespan. But sadly, no battery lasts forever. Eventually, like their disposable cousins, they'll need to be tossed.

Fortunately, when their time finally comes, there are plenty of places to recycle them. Our local Department of Public Works takes them, as do many Home Depot and Lowe's stores. But the old-fashioned alkaline batteries pose a bigger challenge. Our local DPW no longer accepts these, telling us we should simply toss them in the trash. But this doesn't sit well with me. Although modern alkaline batteries contain a lot less mercury than they used to, they still have some, along with other metals like manganese and zinc that go to waste when they're discarded. Environmentally conscious areas, like California and most of Europe, don't allow them into household trash, and I don't want to allow them in mine if I can help it. 
 
The Earth911 Recycling Search isn't all that helpful in this particular area. Most of the places it lists in my area for recycling alkaline batteries are municipal programs that are only open to residents. I've had better luck with a couple of sites specifically devoted to battery recycling: Battery Network and Call2Recycle. As far as I can tell, both these sites use the same search tool, which you can customize to find recycling locations near you for multiple types of batteries: rechargeable, single-use, cell phone batteries, and even specialty kinds like e-bike batteries. In our area, there are several Staples that accept single-use batteries, including one that's quite easy to swing by on our weekly trip down to Princeton. It takes only a few minutes to drop them off, and we can even earn reward points for them.
 
So, if you live near a Staples store, or if you pass by one on your regular route, you can dispose of all your depleted batteries there—both rechargeable and disposable—at one fell swoop. If that's not an option and your only choice is the trash, then take the precaution of putting tape over their terminals before tossing them. (Actually, it's a good idea to do this even while they're sitting in the drawer so you don't risk a short-circuit if the terminals come into contact.) 
 
Of course, the best long-term solution would be to switch to rechargeable batteries for everything, so you'd never need to dispose of single-use ones at all. But with most rechargeable batteries still available only in AA and AAA sizes, it may be a while before that's practical.

Sunday, January 18, 2026

Thrift Week 2026, Day 2: How to Recycle Electronics

One category of waste that's particularly tricky to recycle is electronics. Electronic waste, or e-waste, includes old phones, computers, and pretty much anything else containing circuits, which these days can mean anything from light bulbs to refrigerators. It's a huge category, over 60 tons a year worldwide, and it poses an even thornier problem than textiles. If worse comes to worst, those old jeans can go into the landfill, where they won't cause any more pollution than anything else in the landfill with them. But old phones and computers contain all sorts of nasty components, such as dioxins, mercury, and lead, which you definitely don't want getting into the environment. At the same time, they contain lots of valuable metals and minerals, such as gold, copper, and lithium, which you definitely don't want to go to waste. That makes recycling them both very difficult and very important.

Because e-waste is also hazardous waste, most places have specific rules about recycling it. In our town, for instance, we're supposed to take it down to the Department of Public Works. This is what we do with any device that's no longer usable, like the old VCR and tape deck we discarded earlier this month. (If your town doesn't have an official collection site, you can drop off most kinds of electronic gizmos at your local Best Buy or Staples store. Check Earth911 for locations near you.) But, just like with clothing, it's much better to keep an object that's still usable in use if possible. 

The most recent case in point for us was my old smartphone. When I replaced it in 2022, it was technically still working; it had just become so unreliable that it was impractical to use. (Not only did the battery drain really fast, even after I'd replaced it with a new one, but it would randomly shut down without warning.) It might have been possible to fix it, but it wasn't within my extremely modest abilities. So, rather than simply take it to the recycling shed, I did a quick search and found an organization called 911 Cell Phone Bank. They take old cell phones, repair or recycle them, and donate them to victims of domestic violence and human trafficking. If my old phone was fixable, they could probably fix it; if not, it would be recycled. So, worst-case scenario, it would be the same as if I'd taken it to the DPW; best-case scenario, I'd not only keep it out of the waste stream but help out someone who really needed it.

Donating my phone through this program was quite straightforward. First I wiped it by going into Settings and doing a factory reset. Then I went to the website, clicked the Donate Phones button, and selected 10 Devices or Less and Print Shipping Label. There was one minor snag when the label didn't print properly, so I had to submit my information a second time and have the label emailed to me as a PDF. But eventually I got it printed out, packed up the phone and the spare battery that hadn't done it much good, slapped on the label, and dropped it off at the post office. Easy peasy.

Computers are a bit trickier to dispose of than phones, mainly because they're bigger. However, they're also more valuable, so if you have a computer that's still usable, you can almost certainly find a new home for it. If it's a reasonably new one, you might even be able to get a little cash for it on Craigslist. We've never sold an old machine this way, but we recently bought one: Brian's new laptop, which will replace his work laptop when he retires this year. (Like his work computer, it's a Lenovo ThinkPad, which gets high marks for repairability, and buying it secondhand will make it even more sustainable. It's far from state of the art, but it's more than adequate for jobs like email and streaming TV shows, and it was only $200.)

But even if your computer is ancient and creaky, you can probably find someone willing to take it on Freecycle (or Buy Nothing or Trash Nothing). I've never Freecycled one of my own old computers, since I tend to keep them until they're effectively unusable, but I've successfully found homes for two old machines that had belonged to my parents. I forget exactly how old they were, but I know neither one was any spring chicken, and I still got multiple offers for each of them within 24 hours.

And if your computer is so old that, like mine, it's barely working at all, you may still be able to find a home for it through Computers4People. Like 911 Cell Phone Bank, they accept both working and nonworking machines. After wiping the data, they refurbish the ones that can be salvaged and donate them to people in need; everything else gets recycled. It's not quite as simple to use, because you can't just pop the device in the mail, but you can drop it off at any of over 10,000 FedEx and Walgreens stores across North America. Most sites only accept laptops, tablets, and smartphones, but there are few that take desktop machines and peripherals.
 
One important caveat: before getting rid of a computer or a phone, make sure to transfer all the files you need from it, then scrub the hard drive to remove all your personal data. PCMag offers guidelines on how to do this with both computers and phones. But if your device is well and truly bricked and you can't get onto the drive at all, don't worry; both 911 Cell Phone Bank and Computers4People promise to clear all data off donated devices before passing them on to new users.

Saturday, January 17, 2026

Thrift Week 2026: How to Recycle All the Things (starting with textiles)

I've been writing this blog for over 16 years now (counting from January 2010, when I first decided to give my old blog an ecofrugal theme). In those 16 years, I've published over 1,600 posts. And the most popular of them all, by a huge margin, was a 2014 post on how to recycle whipped cream cans. In the 12 years since I posted it, it's received roughly 31,000 views—blowing away its nearest competitor, my post on building a raspberry trellis, with a mere 5,100 views. Over 160 people have viewed it just in the past week. Evidently, how to recycle hard-to-recycle objects is a topic that interests many, many people.

Hence, this year's Thrift Week is going to be all about that topic. I've already said pretty much all that needs to be said on the topic of whipped cream cans, but there are loads of other recycling challenges that I've explored over the years, and this will be my chance to share what I've learned. I've written about this subject before, most notably in my 2013 post "How to recycle everything (if you can)," but a lot of the info in that post is now outdated. This week's series will expand on that material and bring everything up to date. And I'm kicking it all off with one particular category of theoretically-recyclables that's given me considerable trouble over the years: textiles.

When you look for information on textile recycling, most of what you'll find is advice on clothing donation. And obviously, if you need to get rid of clothes in usable condition, this is the best thing to do with them. There are tons of places that will take old clothes, from local thrift shops to veterans' organizations. I personally just gave a big box of worn but still serviceable garments to the United War Vets Council, which emails me every so often to see if I have anything to donate. You can also give old clothes away on Freecycle (or its close cousins, the Buy Nothing Project and Trash Nothing) or offer them to your friends at a clothing swap. You might even be able to make a little money reselling them at a consignment shop (in store or online) or at a yard sale. In short, there's no shortage of ways to find a new home for wearable garments.

But if you're a frugal person like most readers of this blog, you tend to wear your clothes until you've worn them out. An old pair of jeans with thighs so threadbare you can't even patch them is clearly no longer wearable, yet it may still have plenty of good fabric left on it that could be put to use. Yet most of the sites listed under "textile recycling" won't actually take them. They're not really planning to recycle your garments; they're planning to resell or donate them, so they'll only accept clothes in good condition. And the few that do accept clothes for actual recycling may require you to cover the shipping costs, which can be considerable. Terracycle's prepaid Zero Waste Boxes, for instance, cost between $160 and $379. 

In my area, there are only two places I know of that genuinely recycle textiles. The one I rely on most is Helpsy. It accepts all types of fabric goods, donates the stuff that's still usable, and downcycles the rest into insulation, stuffing, or rags for industrial use. Only about 5 percent of it needs to be thrown out. Unfortunately, this organization operates only in the northeastern U.S., and even within that area, the number of its bins seems to be dwindling. The last time I tried to make a dropoff, both the bin I had been using in Princeton and the one closest to me in New Brunswick had mysteriously vanished. Fortunately, I was still able to find one, but it keeps getting more difficult. (Which is why I currently have a small collection of old socks, tights, and one battered potholder that's been sitting in the bedroom for several months, waiting until I can get it to a usable recycling bin.)

If Helpsy ever disappears completely, I can always fall back on the garment collection program at H&M. The store has bins where you can drop off clean, used garments from any brand, which get sent to its "partners" overseas to be sorted. The usable items are resold, the unusable ones get downcycled, and a small fraction of the material gets fully recycled into new textiles. This isn't an ideal solution for me because the nearest H&M store is in a mall we never otherwise visit (the traffic is awful), and because of the additional carbon costs of shipping the garments halfway around the world. But it's better than nothing.

If neither of these organizations works for you, you might be able to find a better one through Earth911. This handy site has a tool to help you find recycling facilities near you for just about anything, including clothing. Unfortunately, its suggestions aren't always helpful. Many of the textile recycling programs it lists near me either (a) only accept items in good condition, (b) only accept specific items, such as sneakers or bras, or (c) are only available to residents of a particular town. But it's at least worth a check.

Whenever possible, though, we prefer to take the recycling of our clothes into our own hands. Those old trousers too worn to hold a patch usually get tucked away in my scrap fabric bin so I can cut them up to make patches for other garments. If the bin is too full to hold the entire garment, I at least keep the pockets, which make handy ready-made patches for holes in the knees of Brian's jeans. Similarly, when his T-shirts and socks get too worn out to be darned, we rip them up and turn them into cleaning rags. And little scraps too small to get used for anything, if they're made of natural materials, can go into the compost bin, where they'll eventually break down into useful fertilizer for our garden. Now that's truly cradle-to-cradle recycling.

Monday, January 12, 2026

Ring out the old, ring in the older

To my great relief, the pile of stuff we hauled home from our trip to Indiana has by and large integrated itself neatly into our home. The camp chair and the various tools have all found new homes in the reorganized workshop. The table lamp now graces an end table in the big downstairs room. The automated cat feeders haven't been put to use yet, but we found space for them on the shelves in the workshop, so at least they're not in the way.

In fact, many of these new acquisitions have actually helped us fix minor but annoying problems. For instance, in the office, the power strip next to Brian's computer used to keep tipping over because it was so lightweight that the heavy cord plugged into the outlet would pull it sideways. Brian glued a couple of the powerful hard-drive magnets acquired from his dad to the bottom, and now the power strip is firmly secured to the metal filing cabinet it sits on. 

Likewise, most of the glass Ball jars we brought home are now on the top shelf of our pantry, holding various staples that used to be in plastic bags. Actually, most of them were double-bagged, with the bags the products came in tucked inside zip-top bags to protect them from both spillage and spoilage. This resulted in an unsightly jumble of identical-looking bags that made it hard to find anything because they all looked alike. The row of neatly labeled glass jars is a decided improvement. (We still have a few things in bags, but three zip-top bags look much better than a dozen.)

But the biggest transformation has taken place in our media cabinet. We spent the better part of a day hauling out all our old A/V components, testing them and the ones from Indiana, and putting back only the ones that worked best. As it turned out, it was a good thing we were forced to do this, as some of the components—like my 25-year-old VCR and even older cassette player—proved to be entirely kaput. We replaced these with a working VCR from Brian's folks and an old workhorse of a tape deck, and Brian hauled the broken ones down to the recycling shed. (This turned out to be unnecessary, since they were so old that they didn't contain any computer chips and could safely have gone into the regular trash, but the Department of Public Works graciously agreed to dispose of them for us.)

A couple of other pieces were technically still usable, but not really useful for us. The centerpiece of our old stereo system was Brian's old Marantz receiver—older than him, in fact—which we'd hauled all the way across the country when he moved here in 2003. But it had become increasingly cranky over the years, and it had pretty much reached the limits of Brian's ability to repair it. He reluctantly concluded that it should go to someone who had both the time and the skill to bring it back to its full glory, so we listed it on Freecycle as a project "for the audiophile and do-it-yourselfer." The posting immediately got multiple responses from people fitting that description, and we sent it off to a good home. In its place, we hooked up an equally ancient, but still working Dynaco receiver and a smaller, separate amplifier. This addition gave us more plugs than our power strip could accommodate, so we daisy-chained it with the small, square power strip we'd gotten from his folks to fit everything in. We also Freecycled an old set of Pioneer speakers we'd been storing in the back of the cabinet as a just-in-case backup.

One thing our new setup doesn't currently include is a record player. We own two of them—my old one and another we got from Brian's parents—but neither one is working properly. We've stowed them both in the basement until Brian has time to tinker with them a bit more. If he can't fix either of them on his own, perhaps someone at our town's repair cafe event next month will be able to help. (Watch this space for details about that.) In the meantime, we've got all the rest of the components—TV, receiver, tape player, disc player—hooked up to Brian's nice Polk Audio speakers, and everything sounds lovely. Brian also added his Iron Giant figure to stand guard on top of the amplifier and prevent cats from sitting on it, which would definitely create a fire hazard.

So, contrary to my fears, the big pile of junk we brought back from Indiana has not turned into another big pile of junk in New Jersey. In fact, hauling it all home turned out to be quite helpful. It gave us the kick in the pants we needed to test all that stuff in the cabinet we hadn't been using and get rid of the actual junk that wasn't usable at all. If we hadn't had this pile of stuff to deal with, we might not have learned our VCR didn't work until we actually wanted to play one of our old tapes, and then we'd have had to hunt down and spend money on a replacement for it. This way, we have a fully functioning stereo setup (minus phonograph), Brian's parents have less stuff in their garage, and two happy Freecyclers have new toys to play with. Win-win-win.

Sunday, November 23, 2025

Three quick fixes

A big part of living ecofrugally is finding ways to fix problems without throwing a lot of money at them. Just in the past week, we've had three problems that most people probably would have solved by purchasing something—possibly something quite expensive. Instead, we fixed them with minimal expense, plus a little ingenuity.

Problem #1: The Unkindest Cut


During one of our afternoon walks, Brian and I decided to pop into the supermarket and see what kind of Hanukkah candles they had available. (Answer: the cheap kind that drip all over the place.) On the way back out, Brian bumped his arm against the railing that runs along the pedestrian pathway leading up to the store—right at the spot where there was a small gap in the railing. And apparently that little, innocuous-looking break was pretty sharp, because it slashed right through the sleeve of his winter coat, leaving a right-angled gash a couple of inches long.

If this had happened to any other garment, I'd just have whipped out my trusty sewing kit and stitched it up as soon as we got home. But because it was his winter coat, I had some doubts about whether I could sew up the tear securely enough to make it watertight. Brian thought maybe the best fix would be to darn it first, then add a patch to protect the stitches, and then, as a final layer of protection, give it a coat of waterproofing spray. But as it turned out, once I'd finished darning it—going over the entire length of the rip twice, first with a back stitch to fasten the torn pieces together, then with a whip stitch to tack down the raw edges—Brian thought it looked secure enough to wear as is. If it turns out not to be, we can still go over it with the waterproofing spray, but it seems to be good enough for now.

Obvious fix: a new winter coat for around $200. Ecofrugal fix: a few cents' worth of thread and about 20 minutes of work.

Problem #2: The Dark Room

In order to stitch up Brian's coat, I had to take it into the bedroom, which is the only place I can reasonably sew without being interrupted by cats. (This is not only a hassle but a hazard, since eating a length of thread—something they would definitely do if they got the chance—could literally tear up their insides.) Unfortunately, this room isn't really ideal for the purpose. The only place to sit is the bed, which is also the only surface to work on, but the worst problem is the light level. Like most of the rooms in our house, the bedroom has no built-in lighting, and there's no spot in the room that could accommodate a floor lamp like we use in the office. So for the past 18 years, it's been lit solely by a table lamp on Brian's dresser with a single 1600-lumen bulb. This might be enough to light up the whole room if it were more centrally placed, but as is, it leaves the bed largely in shadow. Several times while working, I had to haul the bulky coat over to the dresser and maneuver the sleeve up next to the light to see my work, then take it back to the bed to continue sewing.

From time to time over the years, Brian and I had discussed ways to get more light into that room, but we'd never settled on anything. But this time, I decided I'd had enough. I told Brian I really, really needed more light in there, and he proposed a trip up to the Habitat for Humanity ReStore in Manville. I was hoping to find a table lamp there that could accommodate two bulbs, like the one we currently have in the guest room, but their limited lamp selection didn't include any. What we did find was a little desk lamp with a flexible neck that we could set up on my dresser as a secondary light source. It was marked at $5.49, but because it had a half-price orange tag, the final price was only $2.74.

Since the lamp didn't come with a bulb, and since we didn't have any spares at home that were bright enough, we made a side trip over to the nearest Home Depot. There we discovered that LED light bulb prices, after falling steeply for years, had apparently shot back up. A four-pack of soft white, 1,600-lumen LED bulbs would set us back a minimum of $16, or $4 per bulb—twice as much as we'd paid in 2016. Fortunately, there was a Target right next door, so we checked there and found a 4-pack of soft white, 1,340-lumen bulbs—not quite as bright, but probably bright enough—for only $10. With one of these installed, our new lamp provides perfectly good task lighting on the bed surface. It can also be angled up to splash light against the ceiling for more general illumination. And with three bulbs left over, we were able to upgrade the two-bulb fixture in the guest room to get a bit more light in there too.

Obvious fix: a brand-new two-bulb lamp for around $107 plus $16 for new bulbs, for $123 total. Ecofrugal fix: Around $13 for the lamp and bulbs together.

Problem #3: The Face Monster

For about five years now, Brian has been using a CPAP machine for sleep apnea. And hating it. He hates being tethered to it while he sleeps. He hates the way the mask feels on his face. He hates having air literally forced down his throat. He hates having to haul it with him whenever we travel. After a lot of effort, he's trained himself to fall asleep while wearing it, but if he wakes up at any point during the night, he can't get back to sleep with it on. So he ends up unplugging for the rest of the night, which means he's often just teetering on the edge of the minimum four hours a night required to be a "compliant" patient (a loathsome term that strips the patient of any agency in their own care and replaces it with a duty to obey orders without question).

But perhaps the most annoying thing about it is that it was kind of forced on him. When he was first diagnosed with sleep apnea, his doctor told him that he "needed" a CPAP, without so much as mentioning other options like positional therapy (side sleeping). True, positional therapy doesn't work for everyone, but neither does CPAP; as many as 50 percent of patients give up on the machine because it's more unbearable than the symptoms that sent them to the doctor in the first place. Wouldn't it make sense to let patients at least try the cheaper, less intrusive method first?

Brian has tried a couple of DIY solutions to force him to sleep on his side, like attaching a tennis ball to the back of his T-shirt and wearing a backpack to bed, but neither one worked very well. The tennis ball didn't stay put, so he'd wake up on his back with the ball twisted around to the side of his body. The backpack did a better job of keeping him in place, but it was too uncomfortable to wear all night.

Still, in light of how much he dislikes the CPAP, I thought it was worth another try. I was going to suggest he try a commercial device like the Rematee "bumper belt," which is basically a mini backpack filled with inflatable air pillows. But then it occurred to me that we actually had something that might serve the same purpose: a mini backpack Brian picked up years ago as conference swag. I fished it out of the box where we'd stowed it and experimented stuffing it with different things. First, I tried some old T-shirts from the pile bound for textile recycling, but Brian said those were too soft; if he had that squishy pack on his back, he'd just roll right on top of it. Then I tried filling it with books, which offered more resistance but tended to slide around a bit. Finally I went to the stash of old boxes we keep for wrapping gifts and found a couple that filled the bag snugly: one large flat one and one smaller one in front, shimmed up by an old pair of sandals (also from the textile recycling pile) on either side. When Brian tested the pack with these in, he found that it fit on his back without sliding around and was rigid enough to prevent him from rolling over.

So far, this is just an untested prototype. We still have to see how it performs in an actual sleep situation: whether it can manage to keep him on his side, and if so, whether that's enough to keep him from snoring and sputtering. But if it does, it may allow him to finally free himself from the face monster.

Obvious fix: a $125 commercial device. Ecofrugal fix: a makeshift gadget that took only a few minutes to assemble and cost nothing at all.

Monday, July 28, 2025

Recyclable =/= sustainable

Late last year, I subscribed to the One5C newsletter, which drops tidbits of climate news and tips for lowering my carbon footprint in my email inbox twice a week. Some of this info is useful, but occasionally the editors make silly mistakes about things that would have been easy to check. One recent newsletter called "natural gas" a misleading term invented by fossil fuel companies "to confuse consumers" when it's actually been used since the 1820s to refer to methane gas that's naturally occurring, as opposed to synthetic. (Consumers may indeed be confused because they mistakenly assume "natural" means "wholesome," but that doesn't mean the term itself is inaccurate.) Another touted a proposed law it said would require schools to provide nondairy milk "for any child that wants it—no note required," when the bill in question actually would require students to provide a note identifying the "disability" that prevents them from drinking cow's milk. And a third recommended bidets on the grounds that they save water, a claim I debunked last year.

Having run across problems like these before, I was a bit wary of One5C's recommendation for Ball's new aluminum party cups. I didn't doubt the editors were technically right in claiming that these aluminum cups are "infinitely recyclable," while "Classic red Solo cups...are #6 plastic, which few facilities recycle." But I wasn't prepared to assume this automatically made the aluminum ones the more ecofrugal choice. After all, the widely demonized single-use plastic bag actually does a lot less damage to the environment than a single-use paper bag or even an organic cotton tote bag. How could I be sure these new aluminum cups were really the most sustainable choice—both economically and environmentally?

To tackle these questions, I started out by shopping around in the "disposable tableware" section on Target.com. There I found several alternatives, some marketed as green and some not. First, as a baseline, I looked at the 18-ounce red Solo cups the One5C editors alluded to. These cost $8.99 for 72, or 12.5 cents each. Target also has its own brand of plastic cups that cost only $5.89 for 72, or 8.2 cents each. Both brands are made of polystyrene (#6 plastic), which isn't typically recyclable, just as One5C claims.

One product marketed as a greener alternative is Repurpose compostable cups. These clear plastic cups hold 12.2 ounces and cost $7.99 for 20 (40 cents each). That's more than three times the cost of the Solo cup and nearly five times the cost of the store brand in exchange for a questionable environmental benefit. The bioplastic these cups are made from has a lower carbon footprint than petroleum-based plastic, but it also uses more land, produces more pollution, and depletes the ozone layer more. Even the cups' claim to be "compostable" is dubious; bioplastics will break down in a commercial composting facility, but not in a home compost bin.

Compared to the Repurpose cups, the new Ball aluminum cups seem at first glance like a more legitimately sustainable alternative. Unlike most plastics, aluminum really can be recycled indefinitely, and aluminum recycling really does save significant resources and energy. Unfortunately, the cups themselves are not recycled; they're made from virgin aluminum, which has a significantly higher environmental footprint. In fact, a life-cycle analysis by Upstream found that these single-use aluminum cups are much worse for the environment than plastic ones, using 47% more energy and producing 86% more emissions. They also have by far the largest footprint in terms of cost. At $5.29 for 10, each cup costs 52.9 cents, more than four times as much as that "classic red Solo cup" and more than six times as much as the store brand.

Clearly, there's no good reason to recommend the Ball aluminum cups over traditional plastic ones. It only took me a few minutes of research to figure that out, and I'm a bit annoyed at the editors of One5C for not doing even that minimal amount of due diligence before recommending them. But what annoys me much more is that they're recommending a single-use product at all. Surely we all know by now that the slogan "reduce, reuse, recycle" puts recycle last for a reason, and that there's almost always more environmental benefit to reducing and reusing when you can.

And in this particular case, there's a very obvious reusable alternative that doesn't cost a cent. If you're having a gathering at your home, using your own cups and glasses costs nothing and creates no waste, aside from a little bit of water and energy for washing. In fact, I went to a potluck this weekend, and the host did exactly that. She served the meal with reusable glasses, reusable plates, and metal utensils, all of which worked much better than flimsy disposable equivalents.

And if you don't have enough glasses for that many guests? Well, if you plan on throwing parties often, it could be worth investing in a dozen 16-ounce mason jars, sold elsewhere on the Target website for $13.49, or $1.12 each. They'd be a better deal than the Ball aluminum cups after just three uses. Even compared to the cheapest plastic ones, they'd pay for themselves after 14 uses. They can accommodate both hot drinks and cold ones. And while the Upstream life-cycle analysis didn't look specifically at glass cups, a separate one by the UN's Life Cycle Initiative found that they're one of the greenest alternatives in just about every situation.

The moral of the story? It's not simply that reuse trumps recycling, although that is the case more often than not. It's that it's worth doing your homework rather than just assuming a product is ecofrugal, or even eco-conscious, just because it's recyclable. If there's an existing life cycle analysis out there, it will only take you a few minutes to find it, and it could save you from a costly mistake—for you and for the earth.

Saturday, May 17, 2025

The gift of less stuff

We're in the middle of a busy couple of months. Between events with Citizens' Climate Lobby (CCL), Morris dance performances, and stuff we're doing with family and friends, we don't have a single free weekend until June. And some weekends, including this one, are crammed full of events on both days. Today, I was "tabling" (staffing a table at a street fair) for CCL in the afternoon, and we're going to the opening of our local outdoor movie series tonight; tomorrow, we have a Morris performance down in South Jersey during the day and a CCL get-together in exactly the opposite direction in the evening. With all that going on, this hour before dinner is about the only time I've got to update my blog, so you're only getting a quickie post this week.

One of the things that kept us busy last weekend was Mother's Day. My mom is a difficult person to buy gifts for, because her house is so full already that she doesn't need any more stuff. On the contrary, she's always saying she wants to get rid of the stuff she has. So, last year, I had a brainwave: I offered, as my Mother's Day gift to her, to come to her house and spend the day helping her clean out one room of her choice. I didn't suggest this because she had any heavy boxes to move, nor because I thought I could do a better job than she could deciding what to throw away, what to keep, and where to put it. The main advantage of having me there all day was that it would force her to sit down and do the work of going through things, instead of wanting to do it and never finding the time. And it seemed to work pretty well. She chose her office, and by the end of the day we'd cleared away all the piles of paper in there, removed some old things of mine that had been sitting in that room since it was my bedroom, and put all her computer equipment in places where she could easily find it.

Since that was such a success, I decided to give her the same "gift" this year. This time around, she decided to get a bit more ambitious and tackle the sun porch, which is a repository of all kinds of miscellany: decades-old toys, plants and garden supplies, old sporting equipment, a big bookshelf full of board games and puzzles, and a huge stack of my old notebooks from high school and college. Mom seemed to think we could go through this stuff quickly and maybe have time to move on to another room, but I suspected we wouldn't even make a dent in the contents of the the porch itself. 

It turns out the answer was somewhere in the middle. We didn't clean out the whole porch, but we did get through a lot more of it than I expected. I spent a large portion of the day going through my old notebooks, pulling out the few things I wanted to keep (mostly stories and poems that I didn't have digital copies of), then breaking down the notebooks themselves so the contents could be recycled. I discarded so much paper that I had to split it between two separate bins so they wouldn't be too heavy for my dad to haul to the curb. But I also found time to review the contents of several bins and shelves with my mom. She opted to keep a lot more of the games and puzzles than I would have in her place, but we still set aside quite a lot of them to give away. We also cleared out things from the bins I'd had no idea were in there: a couple of giant "magic bubble wands," several old tennis rackets, a baseball bat and a few balls, multiple Frisbees, an old model airplane kit, and even an old jump rope of mine that I hadn't seen in decades.

All that stuff went downstairs into the storage room, where it will sit until Hopewell holds its next town-wide yard sale. My parents aren't planning to host an official sale, but they'll haul out a folding table, set it up on the lawn, and put out all their unwanted items with a big sign saying that everything (barring the table itself) is free. They hope that the yard-sale shoppers, always eager for a bargain, will snap up most of it, leaving them with only a few items to either Freecycle or discard.

All in all, I'd say this was a pretty ecofrugal present. It was something my mom actually wanted, and it cost nothing and used no natural resources to produce. Better still, it helped get all this unwanted stuff out of the house and, hopefully, into the homes of people who can use it—people who might otherwise have spent their own money, and the planet's resources, on new products. In fact, it worked so well I'm thinking of offering the same gift to my dad for Father's Day next month. (That will result in one more rather full weekend in June, but at least it will be only one weekend out of an otherwise quiet month.)

Monday, May 6, 2024

More ecofrugal episodes

Once again, we've been having some ups and downs in our ecofrugal life this week. Rather than recount these ecofrugal episodes in chronological order, I think I'll arrange them from most disappointing to most satisfying. That way I'll be able to end the post on a nice positive note. 

Thus, we'll start at the bottom, with:

Ecofrugal Episode 1: The Earth Fair Washout

I spent most of this afternoon "tabling"—that is, setting up a table and talking to people—for Citizens' Climate Lobby at a street fair in town. Unfortunately, the event was a bit of a washout—literally. The weather was chilly and wet, progressing from clouds and drizzle in the morning to steady, soaking rain in the afternoon. Fortunately we had a canopy to keep us dry while we were actually at the table, but we got pretty wet whenever we ventured away from it. By the time we finished putting away all our gear at the end of the event—including the canopy itself—we were all pretty well soaked.

Furthermore, there were fewer people to talk to than there would usually be, since many people were sensibly staying home and keeping dry. All in all, we had about 30 conversations over the course of four hours—five if you count the time we spent setting up and putting away all our gear—and only a few of those could be considered enthusiastic. It's not a lot to show for the amount of effort we put in. 

On top of that, we had to put up with a lot of other annoyances unrelated to the weather. The organizers of the Earth Fair put our booth into a slot right next to the music stage, so we couldn't converse at normal volumes. The parking lot they told us to use for unloading our gear was completely filled up five minutes before the time they told us to arrive, and we weren't allowed to use the nearby bank parking lot—not even for the few minutes required to unload—because it was reserved for an EV car show. (Fortunately, we'd already unloaded our car by the time they told us this; otherwise we would have had to find a parking spot on the street and then haul all our gear several blocks to the site.) Given how much hassle we went to for such a small benefit, I'm inclined to think it's not even worth signing up for this event next year.

Ecofrugal Episode 2: The Case of the Compacted Soil

Yesterday was our big spring planting day in the garden. We put in seeds for twelve squares of beans, four of cucumbers, six of basil, and two of herbs, and we transplanted eight tomato seedlings and four peppers. This proved to be a much harder job than I expected—literally. I'd expected to just poke some holes in the dirt and put the seeds in, but the soil was so dense and compacted that I could barely get the blade of a trowel into it, much less my fingers. I had to spend several minutes hacking at the soil in each square to break up the clods of clay before I could put the seeds into it.

This is both puzzling and frustrating, because we've had these raised garden beds for about fifteen years at this point, and we've spent that whole time following the advice in all our garden books about building healthy soil. We double-dug the beds when we first built them, turning over all the soil twice to break it up, and we haven't tilled it or walked on it since then. We add compost to it every year during spring planting and mulch the beds with leaves in the winter. And we've never once used any sort of harsh synthetic fertilizer or pesticide. By now, our soil ought to be so rich and soft we could plunge our hands right into it, not packed so hard we can barely dig in it.

Based on all the sources I've consulted, the best explanation I can find is that we're not adding enough organic matter to the beds. Our little home compost bin only provides enough compost to add a thin layer—less than one inch—to each of the beds each year, and we should be piling on at least a couple of inches. Bagged compost isn't an ideal solution either, since we would need to buy several bags and then test every one of them to make sure the contents weren't herbicide-laden "killer compost" that would kill our plants. If any of the bags failed the test, we'd have to buy new ones and test them too, repeating the process until we got only clean results. But that would seriously delay our planting schedule, so to avoid the problem, we'd have to buy a lot more compost than we thought we needed—at least twice as much—in the hope that at least one bag in two would be usable. 

Probably the best solution is to go to the Belle Mead Co-Op every year and load up with half a yard of bulk leaf mold. We haven't been using this stuff regularly because we learned that it's not actually a great source of soil nutrients, but it should be effective as an amendment to loosen up the soil, hold moisture, and attract earthworms. The only problem with this plan is that we can't do this at the same time we buy mulch because there isn't room in our car, or our garden shed, for both at once. So probably we should either buy a load of mulch every spring and a load of leaf mold every fall or vice versa.

Ecofrugal Episode 3: The Case of the Disappearing Eggs

One of the things that made Lidl an instant hit with Brian and me was its prices on Certified Humane (CH) eggs. We used to buy these at H-Mart, where sale prices ranged from $2 to $4 per dozen. But at Lidl, we consistently found them for $2.40 a dozen. Even during the pandemic, when most food prices soared, this price held steady. We did encounter occasional shortages, during which we'd go in and find the CH-egg shelf empty, but we figured these were due to temporary blockages in the supply chain. The eggs were always back a week or so later, so we didn't worry too much about it.

But in the past month or two, Lidl's CH eggs seem to have disappeared entirely. The case where they live is still there, with the price on it marked at $2.40 a dozen, but every time we show up, it's empty. Brian guessed this could mean that the store's delivery cycle has changed, so that the eggs now arrive on Friday morning, and consequently they're always gone when we show up on Thursday evening. (We found a little support for this theory last week, when we showed up a little earlier on Thursday and found exactly one carton of eggs in the case, with one of them smashed. Clearly it hadn't been sitting there all week, so it was most likely the last one left, passed over on account of the damage.) But given how full our schedule is this spring, we haven't found an opportunity to go to Lidl at some other time and check.

For a while, this problem left us stranded without a good source of CH eggs. The $8 per dozen at the farmers' market was much too rich for our blood; we hunted around at other local food stores, but none of them—not even our once-trusty H-Mart—could do much better than $5 per dozen. (Trader Joe's, we discovered, didn't carry them at all; it had only "cage free" eggs, a much wimpier standard.) And then it occurred to us to check the refrigerated case at Rite Aid, which carries a small selection of dairy products. To our astonishment, not only did the store carry CH eggs, they were only $3.20 per dozen—about 35 percent less than their nearest competitor.

We don't know how a drugstore chain, of all places, manages to offer humanely farmed eggs at better prices than any local supermarket. But we're pleased to have a new source of eggs so close to home. We'll still keep checking the Lidl when we visit to see if our cheaper eggs have returned, but we won't need to rearrange our whole shopping schedule in the hopes of catching them there.

Ecofrugal Episode 4: A Reusable Replacement

My favorite way to brew coffee, hands-down, is the Aeropress. It's much faster than a drip machine, uses much less ground coffee to brew the same volume, and produces excellent coffee from fairly cheap beans. It's also much easier to clean than the French press so beloved by coffee snobs. All the grounds get compacted into a dense little puck that you can shoot directly out into the compost bin, so all you have to do is rinse off the plunger. 

The Aeropress has only two downsides. First, it takes a lot of effort to depress the plunger; I often have to put my full weight on it for a minute or so before it finally sinks. And second, it's not completely zero-waste. The paper filters it uses are fairly tiny and cost only a couple of cents each, and they can go straight into the compost bin with the coffee grounds, so the waste it produces is fairly minimal. But still, I have thought from time to time that it would be still more ecofrugal to replace those paper filters with a resusable one.

So, when I noticed that I was running low on paper filters, I decided this was my chance to give it a try. This was an easier decision to make since the paper filters had gone up in price, from $6 for a pack of 350 to between $8 and $10, not counting shipping. By contrast, a set of two reusable metal filters from a site called Mason Jar Lifestyle was only $10 ($14 with shipping). The price was barely any higher, and I'd have two filters to experiment with and see which I preferred. And if it turned out they were both unacceptable, I'd still have time to switch back to the paper ones.

Having now tried both filters, I can say they have both advantages and disadvantages compared to the paper ones. Most obviously, they're more ecofrugal; they produce no waste and should last for years, making them much cheaper on a per-cup basis. They also let more air through than the paper ones, which reduces the amount of muscle needed to depress the plunger. This is particularly noticeable with the perforated metal disk rather than the fine mesh one.

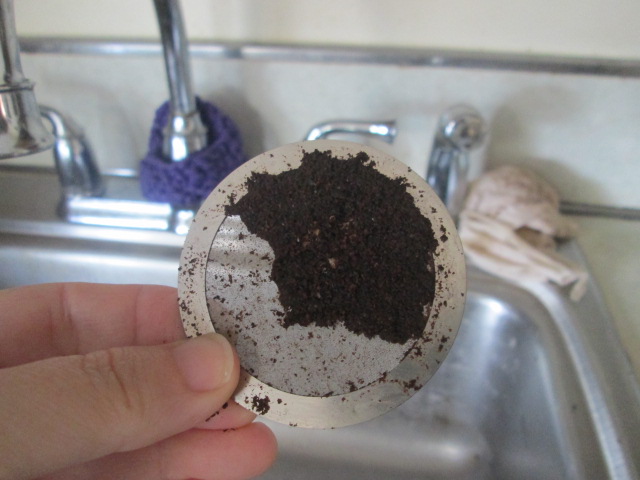
One downside of these metal filters is that they allow more sediment into the coffee than the paper  ones. However, this isn't a huge problem, particularly with the fine-mesh disk. A much bigger drawback is the extra cleanup work. Removing the filter from the press before knocking the grounds out into the bin doesn't sound like that much added hassle, and it wouldn't be if the filter came away cleanly. But no matter how carefully I pry it off (after running cold water over it so it's cool enough to touch), at least half the coffee grounds end up stuck to the filter rather than the press. And unlike the grounds stuck to the plunger itself, they don't come off cleanly. If I simply rinsed them off the filter, I'd be washing several grams of coffee grounds down the drain with every cup of coffee I brew, and I think it wouldn't be long before our plumbing objected to that. I've tried scraping the grounds off the filter onto the plunger before emptying it, but that never works neatly. Some grounds stay stuck to the filter no matter what I do, and some get all over my hands, so they have to be washed too.

I consulted Reddit on this subject and found two suggestions for dealing with this problem. Some users say that sliding the metal filter off sideways rather than lifting it off removes most of the grounds. Others say pulling the plunger back slightly and then inverting the press and letting it rest (without unscrewing the cap first) allows the grounds to drop back onto the plunger and away from the filter, leaving it mostly clean. I'll give both methods a try, and if either one works, then I'll be able to say definitively that the mesh filter is superior to the paper ones. 

[UPDATE, 5/5/24: I have now tried both methods of cleaning the metal filter. Neither one is perfect, but the first is much better than the second. When I invert the plunger and let it rest before removing the cap, the grounds do not fall away from the filter; they remain stuck to it at the top. When I remove the cap, some of the grounds fall off onto the top of the plunger, but at least half remain on the filter:

By contrast, when I rinse the plunger, unscrew the cap, and slide off the filter, it leaves only a thin film of coffee grounds behind. A quick spray with the faucet hose is enough to get them off. And I'm not concerned that the amount of coffee washing down the drain will clog it up.


I've also discovered another advantage of the metal filter: it fits more securely than the paper ones. With those, I always had to take care that the filter was exactly centered in the cap before screwing it on. If it wasn't, it would slip to the side and let some of the grounds through into my cup of coffee. I'd have to strain it a second time before I could drink it. 

So, in addition to saving me money and eliminating waste, this metal mesh filter has eliminated the two biggest problems with my Aeropress: the stuck-plunger problem and the slipping-filter problem. The additional step of rinsing the filter is a small price to pay for that.]

[FURTHER UPDATE, 9/13/24: I've now figured out that the best method of all for cleaning the filter is to combine the two suggestions. After rinsing the press and unscrewing the filter basket, I pull the plunger back slightly so the metal filter is flush with the bottom of the tube before sliding it off. This takes only a few seconds and leaves almost nothing stuck to the filter.]

Ecofrugal Episode 5: A Pressing Concern

A couple of weeks ago, I mentioned that I had ordered us a new (or more accurately, new-to-us) garlic press to replace our old Oxo one that broke. After a little research, we decided to go with the Joseph Joseph Garlic Rocker, which got consistently solid reviews from cooking sites. A new one costs $15 at Amazon, but since we don't do Amazon, we bought a secondhand one from eBay for $14 ($17 with shipping).

It has since arrived, and after testing it out several times, Brian reports that it's better in almost every way than its predecessor. It takes a couple of passes over a garlic clove to mince it as finely as the old one, but on the plus side, it does mince the entire clove rather than extruding part of it and turning the rest into a sort of squashed blob. It's easier to clean than the old press and takes up less room in the drawer. And since it's a solid piece of metal with no moving parts, we can be confident it won't simply fall apart like the previous one.

This espisode makes me inclined to add a seventh principle to my Ecofrugal Manifesto: Buy It to Last. (You could call this a subset of my sixth principle—Mend It, Don't End It—but I think it's different enough to deserve a principle of its own.) If you have to buy something new, buy something that's built to last as long as possible. Look for sturdy materials and construction, check reviews for complaints about durability, and minimize the number of moving parts that can break. And, other things being equal, opt for mechanical rather than electronic controls whenever possible. Electronics of all kinds usually cost more to repair than to replace—if it's possible to replace them at all.