Tuesday, May 30, 2023

Recipe of the Month: Vegan "Sausage" Rolls

Until yesterday, I thought I'd have to use Brian's homemade tortillas as my Recipe of the Month. They're definitely not the kind of veggie-centric recipe I had in mind when I first came up with the idea, but May has been so busy that we just haven't had a chance to try new dishes. But yesterday, with the day off for Memorial Day, Brian decided to surprise me with a new dish that definitely fits the bill: Vegan "Sausage" Rolls. The "sausage" is in quotes because honestly, there's nothing particularly sausage-like about it. But it is tasty all the same.

I found this recipe in a rather indirect way. Now that the weather is warm enough for grilling, I was thinking about what we could put on the grill besides veggies. Grilled eggplant, peppers, and zucchini are all lovely, but they're not that substantial by themselves. So I was searching for a reasonable meatless sausage. Nowadays, companies like Beyond Meat are making vegan sausage links that are apparently quite decent, but they're generally either Italian sausage or a bratwurst that, according to Brian, tastes nothing like any of the three kinds of sausage that can be labeled as bratwurst. What I wanted was something more along the lines of the kielbasa we used to buy at the Amish market. Several sites I consulted recommended Field Roast, but we've tried those before and they're not suitable for grilling. (They don't have a real casing, just a piece of plastic you have to cut off the links before cooking them, so they don't hold together.) And other highly recommended brands like Future Farm and THIS don't appear to be available in the U.S.

So I concluded if we wanted sausages for grilling, we'd have to make our own. We've attempted this before and it wasn't a great success, but I thought maybe it would work better with a different recipe. So I started hunting around, and I happened on a site called BGang (don't ask me why) with a recipe for what it called "Vegan Sausage Rolls." Upon examining it, I found that these weren't anything you could throw on the grill; they were more like little turnovers with a blend of tofu, mushrooms, and seasonings wrapped in puff pastry. But they looked like they might be pretty good anyway, so I printed out the recipe for future use.

I assumed when I found this recipe that we'd have to wait to try it until we could get our hands on some vegan puff pastry. According to this site, at least one well-known brand, Pepperidge Farm, is made without butter or eggs, so I figured we'd just grab a pack next time we were at Shop-Rite. But Brian was more ambitious than I was. He decided to go all out and make his own puff pastry with our new homemade plant butter

He made a half batch of the recipe from From the Comfort of My Bowl, but he had to modify it slightly. It called for plant butter in stick form, which was supposed to be frozen, grated, and then frozen again. But our homemade plant butter melts so easily that Brian knew even if he froze it first, it would melt if he tried to grate it. So he just scooped it into a bowl, cut it up as best he could with the pastry cutter, and froze that. Luckily the recipe listed all the ingredients by weight rather than volume, so he didn't have to figure out what volume of our light, whipped plant butter was equivalent to a stick.

We'd seen puff pastry made many times on "The Great British Bake-Off," so Brian knew more or less how to do it. You have to make the dough, then roll it out flat, layer on the shredded butter, and fold it in thirds (what the Great British Bakers call a "book fold"). Then you rotate it 90 degrees, roll it out again, add more butter, fold it the same way, and chill it for at least an hour. After that, you repeat the rolling-and-folding process twice more and chill it yet again. All this is supposed to create layers within the dough so it will have a flaky texture when baked. The recipe said you only had to go through the roll-fold-chill process twice, but you could choose to do it a third time to maximize the flakiness. Brian decided to take this option to give our vegan butter its best possible chance.

Once the dough had finished its final chilling step, Brian started work on the filling. This was much simpler than making the dough. The only thing that had to be done in advance was making a "flax egg"—ground flaxseed mixed with hot water—to serve as both a binder for the filling and a glaze for the pastry. Then he just had to grind up and saute the onion, garlic, and mushrooms and combine them with all the remaining ingredients: crumbled tofu, flax egg, oats, nutritional yeast, and seasonings. We didn't have the chives the recipe called for, so he used a tablespoon of chopped green onion instead. He also cut the salt down to a teaspoon and used only a pinch each of black pepper and red pepper flakes to give it just a hint of spice. Then he rolled out his homemade puff pastry, cut it into squares, filled them, loaded them with the filling, and folded them up. A quick brush with the remaining flax egg and a sprinkle of poppy seeds, and they were ready for the oven.

The finished turnovers weren't perfect. Despite all Brian's efforts, the pastry had not laminated noticeably. But it was still crisp and light, making a nice container for the delicately flavored filling. I was glad Brian hadn't used the full amount of spice, as even a pinch of red pepper flakes was quite enough for my sensitive taste buds. On the other hand, I thought using the full amount of salt—and perhaps a bit more of the umami flavors, like garlic and nutritional yeast—probably wouldn't have hurt it. But I still happily polished off two of the rolls, while Brian had two and a half (two full-sized rolls plus the itty-bitty one on the edge of the tray). Along with a small green salad from our own homegrown lettuce, topped with walnuts and a few of our honeyberries, it made a satisfying meal.

Although these were pretty good, I'm not sure they were good enough to justify all the hassle of making them. Making puff pastry from scratch is all very well as an experiment, but it's very time-consuming. If Brian enjoyed the challenge enough to want to make these again, of course I'll be happy to eat them. But as vegan recipes go, we know loads of others that are at least as good and a lot less work.

Sunday, May 28, 2023

Homemade tortillas are a game changer

Last week, Brian was making some fish tacos. This is a dish we make fairly often: pan-fried nuggets of fish with salt and chili powder, served in either corn or flour tortillas with a cabbage-and-tomato slaw. Only this time, we were all out of both kinds of tortilla, and since our local supermarket has closed, we couldn't just make a quick run to the store to pick up some more. So Brian decided to make his own, using a simple recipe he found online. In a nutshell, you make a dough from flour, salt, baking soda, water, and oil and knead it for just a couple of minutes. Then you break off little balls of dough, roll each one out with a rolling pin, and cook them in a hot, ungreased pan.

These do not come out looking like store-bought flour tortillas. They're smaller, thicker, and not nearly as symmetrical. And, more importantly, they do not taste like store-bought flour tortillas, which don't really taste like much of anything, good or bad. In most recipes, they just blend into the background, like a canvas on which anything from black beans and spinach to sauteed shrimp and peppers can be the paint. They're more of a packaging material for other, more flavorful foods than a food in their own right.

These tortillas were nothing like that. They had all the flavor of fresh-baked bread, with a satisfying chew that gave my teeth far more to work on than a flimsy commercial tortilla. They weren't simply a vessel for the more flavorful fish and slaw; they were an integral part of the experience. I found myself flashing back with newfound appreciation to a story I'd read as a kid in which a little Mexican girl and her abuelita eat fresh tortillas with butter and jam. At the time, picturing the kind of flat, neutral tortillas I was used to, I didn't see the appeal of this dish, but now I got it.

The homemade tortillas are cheaper, too. The ingredients for this half batch—a cup and a half of flour, a half-teaspoon each of salt and baking powder, and a sixth of a cup of canola oil—cost less than 30 cents for eight tortillas. That's less than 4 cents a tortilla, as compared to about 10 cents off the shelf. And we can be sure they contain no palm oil.

Up until now, I'd always thought of tortillas as something that couldn't possibly be worth the effort of making from scratch. Even Jennifer Reese, author of Make the Bread, Buy the Butter—an analysis of which foods are and aren't worth making from scratch—admits that "Even though they taste inferior and cost more, packaged tortillas are so convenient I can't give them up." But after tasting just how good the homemade ones are, I don't know if I could ever go back to store-bought. Maybe if I were really in a hurry, I'd settle for the packaged kind. But it would definitely feel like settling.

Friday, May 19, 2023

Oh, what a tangled net we weave

Last weekend, while puttering around in the garden, Brian noticed two things, one good and one bad:

  1. Our honeyberries were starting to ripen. They weren't ready to pick yet, but it looked like some of them would be within a week.
  2. The birds were not waiting for that point. A hungry catbird was already on the bushes, scavenging any berry that looked remotely close to ripe.

Brian chased away the invader, but he knew it would be back the minute his back was turned. So, not even taking the time to call me in from the house to help, he hastily ran to the shed, grabbed a roll of bird netting, and threw it over the bushes. He didn't bother to wrap each bush individually as he usually does; he just covered the entire row, willy-nilly, bending the bushes as much as necessary to fit them underneath. He managed to get the whole net in place and held down with bricks just before losing the last of the daylight.

So far, this hasty wrapping job has succeeded in keeping out the birds. The problem is, it more or less keeps us out as well. So while the berries have managed to ripen without further molestation, there's no good way for us to harvest them. I managed to get a few by squeezing my fingers through the netting from outside, and then I tried removing a couple of the bricks and crawling under the netting so that I could sort of feel my way around the bush while half reclining on the slope where it was planted. But neither method allowed me to get a good grasp on the berries and give them the very gentle tug that's needed to distinguish the ripe ones from the almost-ripe. So while I was able to harvest a generous handful, not all of them were ripe enough to make good eating.

Brian thinks we can this problem by simply uncovering the berries and re-covering them more carefully, wrapping each individual bush in its own piece of netting. This will allow us to wrap them more loosely so they're not all bent out of shape. But even with each berry bush netted separately, we still won't exactly have easy access to the berries. Harvesting them will still involve removing the bricks around one of the bushes, pulling up the net to climb underneath, and re-wrapping the bush afterward. With that many steps involved, it won't really be practical to bounce over there and pick a few berries whenever we happen to notice they're ripe.

I can't help wondering if there might be a more elegant solution. This site suggests enclosing blueberry bushes in tomato cages before netting them, but I don't think that would help us much. I've never seen a tomato cage big enough to fit around the largest of our honeyberry bushes, and even if we found one, we'd still have to unwrap and re-wrap it each time we wanted access to the berries. I was thinking something more along the lines of a tent, with poles erected between the bushes and the netting over the top. We'd only have to remove the bricks on one side, the front, to get under the netting, and the pole would hold it up over our heads so we wouldn't have to bend double under it. I don't mean a permanent enclosure, which wouldn't really work on that slope, but something more like this teepee arrangement made from bamboo poles and netting. We could erect the tent around the start of May, pop inside as needed to gather the berries, and take it down once all the berries were harvested.

Hmm...Brian did see a place a few blocks away where some bamboo had recently been cut down. I wonder....

Monday, May 15, 2023

The vanity project completed

Like most of our home projects, redoing our bathroom sink and vanity took a lot longer than we expected. When I requested this as my birthday present back in January, I figured we'd have it done by February or early March, and we just finished it this weekend. This time, though, most of the delays weren't our fault. 

First, we had to wait for delivery on the various supplies we'd ordered for the project: the sink, the faucet, the sheet laminate, the sealant to apply it with, and a special tool for cutting it. (Total cost: around $220.) The smaller items all arrived within a couple of weeks, but at the end of a month, we were still waiting for the sink. I kept checking the order status online and the site kept telling me it was temporarily delayed. Finally I called up the store and determined, after a lengthy conversation with customer service, that the delivery was not in fact "delayed"; it was canceled, because our sink got broken in shipment. So we "returned" the item we'd never actually received and went to the store to pick up a new one.

After that, we had to go through several preparatory steps before we could install anything. The sheet laminate arrived rolled up in a narrow box, so before we could attempt to cut it, we had to unroll it and flatten it out by laying it underneath a rug in our downstairs room. Once we got it reasonably flat, Brian went through a multi-stage process to cut it to shape. First, he tested out his new tool on a corner of the laminate to figure out how it worked. This took some trial and error, but eventually he figured out that he had to use the sharp little point on the end to score the underside of the laminate repeatedly, then flip it over and snap it along the scored line. 

Next, he made a template out of brown paper in the exact, complicated shape of the vanity top, with all its weird little corners and cutouts, and dry-fitted that into place to make sure it was accurate. And finally, he traced that pattern onto the laminate and cut it out with his new tool. He actually goofed up the first time he attempted this, putting the template down on the laminate wrong-side up and ending up with an exact mirror image of the shape we needed. But fortunately, the laminate came in a four-by-eight sheet—much more than we needed for this project—so he had plenty left over to cut a new piece in the correct orientation.

At this point, we were ready to start the actual installation. Unfortunately, the weather was not ready for us. When we swapped out our original can of contact cement for a nonflammable version, we assumed that we'd be able to use it safely indoors, even if the heating system was still on. But when the new can arrived, it turned out that even this safer version came with a lot of warnings in boldface capital letters about how toxic it was and how we'd poison ourselves if we used it without proper equipment and ventilation. So while we were no longer in danger of blowing up our house, we'd still have to wait until the weather was warm enough to work with the windows open.

This turned out to be much later than expected. After an unseasonably warm period in February and March, the weather turned cold again in April and stayed that way into early May. So it wasn't until this weekend that we finally had a chance to tackle the job. However, we were a little bit worried about whether one weekend would be enough for the whole project. The new, safer contact cement takes at least  an hour to dry after each coat before it's ready to stick, and we knew we'd have to go through that process at least three times throughout the process. So, just to be safe, Brian took Friday off from work to give himself an extra day to get the job done.

First thing on Friday, he set about pulling the wooden facing strips off the front and side of the vanity top. He was hoping to reuse these, but he wasn't sure if he'd be able to get them off in one piece. To his surprise, they did come off cleanly—but they took the laminate off the old vanity top with them. Apparently, the glue he'd used to attach them was more secure than the glue securing the laminate to the underlying wood. There was even a little bit of laminate sticking past the end of the wood strip, showing where the original vanity had overlapped with the door frame. Apparently, the vanity had somehow been installed before the door frame was, and the frame had been cut to fit over top of it.

This got Brian thinking about his plan for the rest of the vanity top. His original idea had been to remove as much of the paint as possible from the surface, sand it to rough up the surface, and apply the new laminate right over top of the old. But after one bit of the laminate came up so easily, he wondered if perhaps he could just remove all of it, giving himself a fresh surface on which to lay the new laminate. When he tried prying up one corner, the top didn't come off in a single neat sheet like the front bits had, but he did break off a large chunk of it. Well, after that, he had no choice but to keep going, and eventually he managed to get all the laminate off the top surface. (He didn't attempt to remove it from the backsplash, instead just sanding it as he'd originally intended to do with the whole thing.) In the process, he discovered that the vanity top itself wasn't particularly well fastened down; as he worried at the laminate, he found himself at risk of prying the entire thing loose from the wall. So he added a couple of screws to get the top of the vanity properly secured to the base before moving on to the gluing phase.

By Saturday morning, we had the whole area stripped down to a blank canvas, and it was time to start adding to it. Brian decided to reinstall the wooden strips first, thinking they would help him fit the laminate top more exactly. With the cats temporarily sequestered in a bedroom and a desk fan stuck sideways into the bathroom window for added ventilation (since it was too narrow to accommodate our window fan), he applied a coat of our new sealant to the front of the vanity top and another coat on the backs of the facing strips. Then he left those pieces in the bathroom for an hour to dry (with the door closed so we could release the cats from captivity) and stuck them back on.

Next, we started working on the large top surface. For this stage of the process, Brian brought in a card table and set it up with two of its legs in the bathtub so he could lay out the laminate sheet on that while he applied the sealant to it. I worked alongside him to apply it to the wooden vanity top so we could get both pieces done at the same time. I was glad we'd followed the instructions about ventilating the room while doing this; the fumes weren't overwhelming, but they were certainly noticeable, and I think they could have gotten pretty unpleasant if we'd been trying to work in an enclosed space. It was a relief to get out of the room and shut the door behind us, leaving the pieces to dry on their own.

After another hour of drying time, we were ready for the fiddliest part of the job: sticking on the top. The instructions I'd found online said to place dowels about eighteen inches apart on the bottom surface, lay the laminate on top, then remove them one by one and press each section  down with a roller. This was a bit awkward to do in such a small space, but we managed it. And fortunately, the odd shape of the vanity top worked to our advantage here; Brian's carefully cut piece fit so exactly into its spot that there was very little risk of anything slipping out of position. We pulled out the dowels and pressed the top firmly into place, using our heavy stone rolling pin and, in the places where that couldn't reach, our hands. At that point, I broke off to attend a Zoom meeting, and during that two-hour period  Brian applied the smaller strips of laminate to the front and top of the backsplash by himself. He also touched up the paint on the walls, which had gotten damaged when he removed the old surface.

Up until this point, everything had gone much more smoothly than we'd expected. But the final phase of the project, installing the new sink and faucet, proved more complicated. Or, to be more exact, installing the sink and faucet went fine; the difficulties came in when we tried to reconnect the plumbing pipes. The hole Brian had cut in the laminate was a little bit bigger than the bowl of the sink, and it turned out he'd put the sink just a bit too close to the wall for the pipes to connect to it. So he ended up having to shove it from underneath to shift it forward. Fortunately the silicone sealant hadn't dried yet, so this wasn't too hard to do. Once he got the pipes hooked up, he re-caulked the sink to secure it in its new position. This contretemps left a bit of goop on the new laminate, but he scraped it off on Sunday morning and applied a little bit more to the places where the edges didn't meet perfectly. 

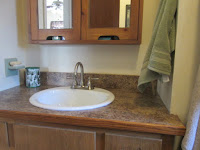
And with that, the vanity project is complete. We now have a sink that is, frankly, a lot more presentable than the rest of the bathroom: clean and new, without so much as a water spot to mar the surface of the new faucet. Fortunately, there's no real risk that this small improvement will eventually drive us to redo the entire room, the way replacing our closet door did with the office. We might go on to replace a few more small items, like the grungy shower head or the old, stained toilet. But we're not about to go replacing the old tub and tile—a job that would certainly cost thousands of dollars and make the bathroom unusable for weeks—when it's still in reasonably good shape.

Sunday, May 7, 2023

Pest protection upgrade

When we built a deer fence around our garden last summer, we decked it out with streamers that we cut from the plastic bags our weekly shopping fliers come in. These had the advantages of being lightweight, waterproof, and free. It seemed like a perfect way to put a waste product to good use.

We can't say for sure how effective this line-and-streamer fence has been. On one hand, no deer have intruded into the garden since we built it, but on the other hand, there's no sign that any deer have come into our yard at all during that time. So it's not really clear that the fence deserves the credit for deterring them.

But one thing we know for sure is that the plastic streamers didn't hold up very well. In the first place, they didn't stay put. They were so light that they slid along the fishing line with every breath of wind, so they tended to end up all clumped at one end rather than evenly spaced along the line. We tried just repositioning them every so often, but then they started to come off altogether. I'm not sure whether it was wind, rain, or birds that damaged them, but one way or another, the ends of the streamers kept tearing off and leaving only the little knotted bits sliding about on the line. There clearly wasn't enough up there to make much of a visual barrier for the deer.

Our first idea was to replace the damaged plastic strips with some metallic ribbon, which we thought we could pick up at our local dollar store. When they turned out not to have any, we figured we'd try Michael's the next time we happened to be in that area. But when we had to make a trip to Lowe's for a washer to fix the leaking spout on our rain barrel, I decided to look there for something that might work on the deer fence. And lo and behold, we found a product designed for that exact purpose: Mylar flash tape. Right on the package it says, "Scare critters away!"

The instructions say to cut this stuff into strips 2 to 3 feet long and attach them by a 6-to-8-inch length of string. This is supposed to "assure maximum rotation and reflection" to scare away wildlife. But when Brian tried attaching a streamer this long to one line of the fence, it dangled down and got tangled up in the line below. So instead he went for 15-inch lengths attached just a few feet apart. He used most of the roll this way and is thinking of tying the remaining strips to the branches of our plum trees, in hopes that they will offer at least a mild deterrent to squirrels.

So far, the streamers are simply tied to the fishing line by lengths of additional fishing line. We'll keep an eye on them over the next week or so to see how well they stay in place. If they slide around like the previous ones, Brian plans to add a dab of epoxy to each one to hold it in its proper place. But one thing we can definitely say for the new ribbons is that they're much more presentable than the plastic ones: neatly cut and shimmery, rather than flimsy and tattered. I'd say they were almost worth the five bucks we spent on them for their aesthetic value alone.