Sunday, February 28, 2016

The Bifold Project: Phase Two

It may not be all that obvious from this photo, but Brian has actually made a lot of progress on the installation of the new closet doors in the office. It's just that  he's had to proceed in a sort of two-steps-forward, one-step-back sort of way.


Last weekend, he got the doorjambs "skinned," using the new pieces of molding he had cut to size at the local millworks. First, since the doors themselves, weren't quite as tall as the door opening, he fitted all the pieces loosely into place to figure out how just much of a gap he would have at the top.


After measuring the distance carefully, he cut a few pieces of scrap wood to fit into this gap so he'd have something solid to nail the lintel (top piece) into. This didn't have to look pretty, since the molding would eventually cover it, so he just made little blocks of wood and nailed them up into the studs - which gave him his first opportunity to use the new nail gun he got for Christmas. Then, he used the same tool to nail the lintel and jambs into place.


Once that was done, he was able to dry-fit the doors themselves. After puzzling out the somewhat ambiguous directions that came with the doors, he figured out how to install the track hardware, screwing it into the lintel, and mount the doors on it. The fit wasn't exactly perfect - one door hung a tiny bit higher than the other - but it was good enough to confirm that the doors could in fact fit into the newly refinished opening.


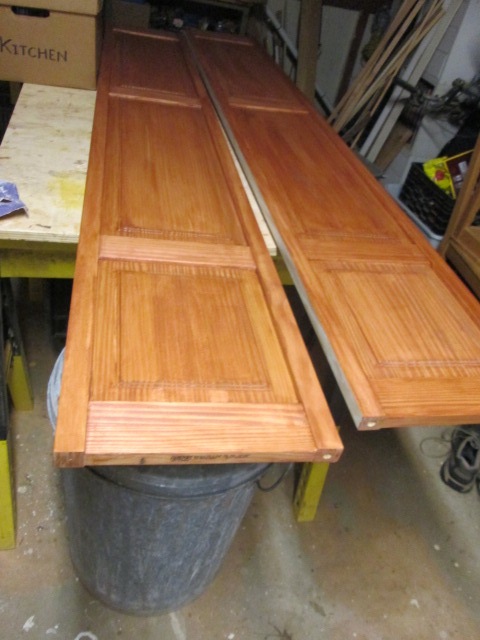
Unfortunately, having gone to all the trouble of putting up the doors, Brian then had to take them down so they could be properly stained and finished. So he made a start on that this weekend, using the same maple stain we used on the other doors we have refinished so far (three downstairs and two in the guest room). Since these doors were unfinished to start with, they may need a couple of coats, but eventually they should match the rest of the room and closet doors upstairs.

And in the meantime, Brian has also done some work on the closet opening. This was another part of the job where he had to take a step back before he could move forward: he realized that since the opening is now a bit wider than it used to be, he would need to take about half an inch off the baseboard molding before putting the casing back on. And since he didn't have a tool capable of cutting them in situ without damaging the floorboards, he had to move a bookcase out of the way, pull off the baseboards, take them downstairs, cut them down, and then nail them back in place.

He also had to replace the top piece of molding, which wasn't wide enough for the new, wider opening. Fortunately, we had some extra pieces, because we noticed while cleaning out the closet that it also had casing around the inside that didn't really need to be there (since no one ever looks at the closet door from the inside), so we pulled it all off to give us an extra quarter-inch of closet space. Brian was able to re-purpose one of the long side pieces from the inside of the closet to make a new top piece, cutting it to the proper angle with his miter saw (yet another former Christmas present from his dad, who just loves to shop for tools).

Which brings us back to the original picture we started with: the closet opening with the new jambs and lintel installed and all the casings back in place, waiting to be primed and painted. Tackling that, and completing the staining and finishing of the closet doors, will probably be next weekend's job...and the weekend after that, we can finally get the doors back into place and put the closet back to work again.

So if all goes well, my birthday present should be completed by mid-March, only a couple of months after my actual birthday. It's not so much the gift that keeps on giving as the gift that takes a really long time to give. Next year, maybe I'll ask for something simpler, like a new faucet for the kitchen sink.

Thursday, February 25, 2016

Money Crashers: Cohousing – Types & Benefits

A lot of the articles I've been doing for Money Crashers deal with various aspects of the sharing economy. I've covered tool libraries, toy libraries, community gardens, seed exchanges, and community cafes. Sharing is an inherently ecofrugal concept, because it saves both money and resources to have two people share one thing - whether it's a lawn mower or a plot of land - rather than each buying their own.

Now, in my latest Money Crashers article, I'm getting into a way to share something even bigger: housing.

I don't mean sharing a home the way a family does (though I covered that to an extent in my article on the costs and benefits of marriage). What I'm talking about here is cohousing: a type of intentional community in which people have both private homes and shared spaces that they care for as a group. So, for example, you can have your own bedroom, bathroom, living room, and kitchen—but your laundry room, which you don't need to use that often, can be shared with others so you don't each have to shell out for a separate washer and dryer. You can also share a workshop stocked with shared tools, a big communal kitchen that can hold all the seldom-used gadgets you don't need cluttering up your own kitchen, and other spaces like a garden or a playroom for all the kids in the community.

Of course, living in cohousing does take a bit of work. The whole group is responsible for taking care of these shared spaces, so you have to divvy up the chores and hold regular meetings to deal with maintenance and other issues. But for many people, it's well worth the effort to be part of a real community where neighbors don't just wave at each other over the fence—they also share meals together, watch each other's kids, put on plays or concerts together, and help each other out in difficult times.

If this sounds appealing to you, you can learn more about how it works here: Communal Living & Cohousing – Types & Benefits of Intentional Communities. I cover the structure of a cohousing community, the different types that exist, and the financial, environmental, and social benefits of living this way. And, at the end, I provide information on how to find a cohousing community in your area, or possibly even start your own.


Money Crashers: Estate & Inheritance Tax

My latest Money Crashers post is on a topic that isn't exactly related to ecofrugality, but that might be relevant to some of you anyhow: estate taxes. It covers everything you ever wanted to know about estate taxes, but were afraid to ask: the difference between estate taxes and inheritance taxes, how many people actually have to pay federal estate tax (spoiler alert: very few), how the tax is calculated, and how to plan your estate to leave as much money as possible for your heirs.

If any of that sounds interesting to you, you can read the article here: Estate & Inheritance Tax – Threshold, Rates & Calculating How Much You Owe. If not, tune in tomorrow, and we'll return to our regularly scheduled blog.

Sunday, February 21, 2016

Our new toy

I didn't do my usual Green Gift Roundup after the holidays this year, because we didn't give nearly as many green gifts as usual, aside from assorted secondhand books. But we did get one gift that was green in more than one sense of the word: a greenhouse. No, really! Take a look:


Now that those vast piles of snow have melted, Brian was able to set it up yesterday in the southeast corner of our backyard, where it'll get sunlight for about half the day. Then he took one of the other Christmas gifts we got, an indoor/outdoor weather station, and set up the "outdoor" sensor in the greenhouse to see just how warm it got in there. And the answer, as it turned out, was pretty warm. Admittedly, after last week's cold snap, we have had a couple of days of rather warm weather for February, so the outdoor temperature was peaking at above 50. But inside the greenhouse, it was a good ten degrees warmer than that. In fact, this afternoon he came in to report that it was about the temperature in the greenhouse as it was inside the house.

His next step was to set up a folding table in there and set up some of our parsley seedlings on it. Brian always makes it a policy to start extra seeds for every crop we grow in case they don't all germinate, but usually most of them do, so we end up with extra seedlings. So he left the four seedlings that we'll need for the garden inside under our grow light, while setting the others outside to see how they do in a less sheltered environment. His plan is to do the same with all our other seedlings as they come up—leeks, peppers, tomatoes, and so on—and compare the indoor plants with the outdoor ones.

The way I see it, this will be like a less extreme version of the winter sowing experiment we tried a few years back, which didn't prove terribly productive. The winter-sown seeds actually did pretty well compared to the indoor ones, but neither set really thrived, and setting them up outdoors was actually more work than keeping them under the grow lights. But our new seed-starting medium was successful enough last year that I think we've eliminated the stunted seedling problem, and having a permanent greenhouse set up will eliminate the extra work of setting up those mini-greenhouses for the outdoor seedlings. So if they turn out to do as well in the greenhouse environment as their indoor counterparts, then we may actually be able to start them all that way next year and bring our gardening process a little bit closer to nature.

Sunday, February 14, 2016

Recipe of the Month: Veggie Frittata

First of all, let me offer a quick apology for not posting any updates on our new closet doors. The fact is, like all our other home projects, this one is going rather slowly. It's not that Brian has been putting off the job; it's just that he keeps running into snags. First, after unpacking the doors and reading the instructions, he found that he needed a little more than 48 inches of clearance, and we actually had a bare 48 inches—and we didn't even have that everywhere, since the doorframe wasn't perfectly even throughout. So he had to take off the door frame, and with that, we had an inch to spare—but then we had to go out and buy new, narrower molding to replace it. And after trying both Lowe's and Home Depot, we found that the dimensions we were looking for—1/4 inch thick, 4.5 inches wide, and at least 80 inches long—simply weren't available.

So we ended up having to go to Edison Millwork, a full-service lumber yard about a mile and a half outside of town, where they can cut pretty much any piece of wood to your exact specifications. Shopping there was very straightforward; the guy we talked to understood exactly what our project was (he referred to it as "skinning a jamb," a phrase Brian is now determined to use often in casual conversation), expressed no surprise that we couldn't find what we needed at the "toy stores," and cut down some pine boards to the exact dimensions we needed in a matter of a few minutes. However, it cost us a pretty penny—5,478 pennies, to be exact, bumping the total cost of the project up to about $245. And now, Brian still needs to put the door frame back together, hang the doors, adjust all the pieces to make sure everything fits properly, and then take the doors back down again so that we can stain them and finish them and paint the moldings. So all in all, my birthday request is turning out to be both much more expensive and much more time-consuming than I expected.

Fortunately, one other task on our agenda for this month got done right on schedule: February's Recipe of the Month. Last night, Brian had a few vegetable odds and ends to use up—some broccoli florets left over from a Super Bowl veggie tray, a few Brussels sprouts that didn't fit the pan with our last batch of Roasted Brussels Sprouts, half an onion—and he whipped up a very good frittata to use them all up.

The usual problem with frittatas is that they don't hold together very well; you pour the eggs in around the veggies, and it sets faster in some places than in others, so you end up either burning it on the bottom or trying to flip it too soon and having pieces of it break off. This time, Brian solved that problem by using a trick from the Crustless Veggie Quiche recipe in The Clueless Vegetarian: he added some flour and cheese to the beaten eggs to help the mixture set. The result was a very firm, tasty frittata with plenty of healthy veggies, plus enough protein and carbs to make a satisfying meal. Here's the recipe:
QUICKIE VEGGIE FRITTATA
Saute in about 2 Tbsp. oil:
  • 1 Yukon Gold potato
  • 1/2 red onion
  • 4-5 Brussels sprouts
  • 2 cups broccoli florets
Mix in a bowl:
  • 3 eggs
  • 1/4 c. flour
  • 1/4 c. milk
  • 1/4 c. shredded Monterey Jack cheese
  • 1/2 tsp. salt
Pour the beaten eggs over the veggies in the pan. When it starts to look firm, sprinkle a little extra cheese on the surface (to help it hold together still better) and flip. Cook until set.
Eked out by a couple of slices of oatmeal-wheat toast, this made a satisfying meal for two, with enough left over to provide lunch for one the next day.

Saturday, February 13, 2016

Money Crashers: What Does It Mean to Be Rich?

For some time now, I've been puzzling over the whole idea of wealth as the American Dream. Back when Mitt Romney was running for president, I took issue with the idea expressed in the Washington Post that everyone, deep down, wants the kind of lifestyle that he has—"We want the pony. We want the Jet Ski. We want the big house on the beach"—and countered that my idea of wealth, otherwise known as financial independence, was easier to achieve by spending less rather than more.

So I started asking myself: what does wealth really mean? Is it just having a certain amount in the bank? Is it living a lavish, Romney-esque lifestyle? Is it having enough to quit your job and live on for the rest of your life—or enough to provide for your family for life, as well?

In my latest Money Crashers article, I explore all these different definitions of wealth in detail. I don't reach any conclusions about which is the "right" way to define wealth, but I do explain why it's important to figure out which definition is the right one for you, personally—because you need to know what your "dream of wealth" looks like before you can figure out how to achieve it.

Here's the scoop: What Does It Mean to Be Rich? – Defining Wealth by Income, Net Worth & Lifestyle


Money Crashers: What Is Smart Growth

Three years back, I talked about how I considered small towns like the one where I live to be the best of all worlds for people who want to live an ecofrugal life. I pointed out that our town offers "all the perks of suburban living without the sprawl," including good schools, a variety of housing and shopping options, and a good public library—all within walking distance. This partly explains why, at least in New Jersey, towns are attracting a lot more new residents than suburbs.

What I didn't say explicitly at the time, but probably should have, is that this kind of development—compact and walkable, with homes and businesses close together—is a textbook example of "smart growth." This type of development, which is designed to protect the environment and improve quality of life, is based on ten basic principles:
  1. Mixed land use, with housing and retail close together
  2. Compact development (sometimes worded as "growing up, not out")
  3. Varied housing choices
  4. Walkable neighborhoods
  5. Distinctive communities
  6. Open space
  7. Developing within existing borders
  8. Transportation choice
  9. Supportive government
  10. Community involvement
Pretty much everything that makes Highland Park, and other towns like it, such ecofrugal places to live fits somewhere on this list. It's because our town fits these smart-growth principles that Brian can bike to work, I can run errands on foot during the day, we can walk in the park when the weather is nice, and we can stay in with books and movies from the library when it isn't.

So I've written a piece for Money Crashers all about smart growth. I cover the ten principles in more detail; go into the many benefits of smart growth for the economy, environment, and communities; provide several real-life, award-winning examples of smart-growth projects; and conclude with advice on how to get involved with the smart-growth movement where you live. I hope this article will serve as a useful basic primer for anyone who wants to know what smart growth is all about.

You can read it here: What Is Smart Growth – Urban Planning Principles, Benefits & Examples