With my new OS, however, the software no longer worked, and the camera was so old that no upgrades were available for it. So after some experimenting, we concluded that the best way to get the pictures off the camera would be to buy a little microSD card reader that I could just pop the camera's card into directly. That only cost about 15 bucks at NewEgg.com.
This setup worked fine, and it was a lot easier to use than the old system, but it made my desk a bit cluttered. I had the little Mac mini itself sitting next to the monitor, a USB hub plugged into that (for the camera and various other peripherals that are used only occasionally, such as a webcam), an external hard drive, a pair of speakers, and a power strip that holds the plug for my monitor and the charger for the camera battery. The little gadgets all stuck out at odd angles, and the various cords that connected them looked exactly like chew toys to our cats.
I searched Staples and other office supply sites for an organizer to corral all these little gadgets, but I couldn't find anything suitable, so Brian generously offered to custom-build one for me. First, he constructed a simple stand out of scrap wood that would fit over the top of the Mini.
This would hold the USB hub and the card reader side by side, with the cord from the card reader plugged into the back of the hub and the cord for the hub extending out the back and down to the power strip below.
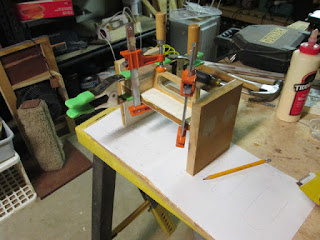
Once that was done, he added a top piece. He glued the wooden frame for the USB hub to the top as well as the bottom to keep it extra secure. (The card reader wasn't completely snug against the top of the stand, so he shimmed it up with a piece of cardboard cut from a raisin bran box.)
At this point, the stand did everything it really needed to do, but he went the extra mile to make it look nice. First, he stained the outside with some leftover stain in a dark color. (I believe it's "Rosewood," the shade we used on our living-room futon frame.)
Then, he made a face plate for it out of some thin wood, and stained that piece to match.
Then came the hard part: cutting the holes in the face plate for the slots of the hub and the card reader. He measured carefully to get the positions exactly right and traced their outlines onto the wood. Then he cut around the outlines with an Exact-o knife and used a woodworking tool to scrape away the plywood from the middle. It wasn't the most elegant way to do the job, but it worked.
He wanted the face plate to be screwed on rather than glued, so it could be removed to pull the peripherals out if necessary. Initially, he used a pair of wood screws, but their bright steel heads clashed with the dark finish, so he ended up replacing them with darker-colored drywall screws.
The finished stand sits next to my desk and keeps everything neatly contained. The hub and the card reader are tucked inside the stand, the power strip sits neatly next to it, and the external hard drive rests on top.
The best part, from my ecofrugal standpoint, is that the whole gadget was made from materials we had on hand: scrap wood, stain, screws, and glue. So while he invested a fair amount of time in building it, he didn't spend a penny on materials. And this free, handmade contraption does a much better job containing the clutter on my desk than any fancy organizer the tech world has to offer.


No comments:
Post a Comment