Sunday, May 29, 2022

Recipe of the Month: Red Lentil Pasta Sauce

I recently discovered a new group on Reddit: Eat Cheap and Healthy. It's not specifically about vegan or vegetarian cooking, but given that meatless dishes tend to be both cheaper and healthier than meaty ones, this board is a pretty good place to find them. In my very first day of browsing there, I came across a post that enthusiastically recommended the red lentil pasta sauce from Kitchen Treaty, saying it was both delicious and "very flexible if you want to make changes based on what you have around."

This piqued my interest, since we've had a jar of red lentils sitting on our shelf for years (fourth from the left in the picture at the top of the page) and haven't done a lot with them. We bought them to make the curried red lentil soup from The Clueless Vegetarian, which is pretty good, but we got tired of it after a while and didn't know what else to use the lentils for.

I showed the recipe to Brian, and he noted that we already had most of the necessary ingredients to make this dish with a few tweaks. We didn't have any canned fire-roasted tomatoes, but the recipe noted that plain whole tomatoes would also work in a pinch. We figured we could safely substitute a yellow bell pepper, which we had on hand, for the green bell pepper the recipe called for and use sherry in place of the red wine. We could easily whip up a vegetable broth (if not technically a low-sodium one) with our trusty Penzey's vegetable stock. And while we didn't have Italian seasoning in the spice cupboard, we had all the necessary components (three parts basil, two parts oregano, one part thyme, and one part rosemary) to whip up a quick DIY version.

The recipe was simple enough to make, but Brian found the instructions a little questionable. They said to simmer the sauce for 25 minutes "or until the lentils are tender," but they were nowhere near tender at the 25-minute mark. He let it go another 10 minutes and they were still a little on the crunchy side. 

Aside from that, though, the sauce was quite satisfying. It had the flavor you'd expect from a traditional ragu-style sauce, but the texture was more interesting, with the diced carrot adding a chunkiness most pasta sauces don't have. The red lentils themselves didn't contribute in a noticeable way to the sauce's flavor, but they gave it a surprisingly meaty texture. You could probably feed this dish to a meat-eater who wasn't particularly observant and they would never realize it was vegetarian, much less vegan. (Brian used sugar instead of honey to ensure it would fit that bill.)

All in all, we both like this sauce and think it's a worthy addition to our dinner repertoire. Next time, Brian plans to try preparing it in the pressure cooker, which should cut down on the cooking time. He figures he can just saute the veggies in the pot, then add the rest of the ingredients and give it about 10 minutes at full pressure. If that works, the sauce will only take about 20 minutes in total to prepare, which means it can be ready in the time that it takes to heat the water and cook the pasta. 

With that adjustment, this will be just about everything we could ask for in a dinner dish: quick, easy, cheap, tasty, vegan, and possible to make from ingredients we almost always have on hand. It's the perfect sort of recipe to have tucked away in your files for those nights when there's nothing in the fridge.

Money Crashers: Two inflation articles

Just a quick update to fill you in on my two most recent articles at Money Crashers. The first is a quick "explainer" on inflation, a much-discussed topic in the news these days. It covers all the basics about causes inflation, what its effects can be, how it's measured, some historical examples, and the monetary policy tools the Fed uses to combat it. So the next time someone (inevitably) starts grumbling about inflation, you'll be able to join intelligently in the conversation.

What Is Inflation (Definition) – Causes & Effects of Rate on Prices & Interest

One particular form of inflation a lot of people are worrying about is rising gas prices. One way to deal with them is to use a gas savings app, which helps you find the cheapest gas station in your area and fill up your tank for less. For my second piece, I compare the features of six top gas savings apps to help you find the one that's best for you.

The Best Apps to Find Cheap Gas Stations & Save Money On Fuel


Sunday, May 22, 2022

Waste not wood, want not wood

COVID wasn't the only outbreak to hit New Jersey in 2021. Last summer, we also experienced an incursion of the beautiful but destructive spotted lanternfly. These pesky critters lay their eggs on trees, and when they hatch, the nymphs feed on their sap and excrete a substance that can cause fungal growth. At the height of the infestation, Brian and I were squashing a dozen or more of these critters every time we went out for a walk.

However, squashing them one by one can only do so much. The really important thing, officials told us, was to get rid of the plants most likely to host the bugs, particularly tree of heaven. This plant is itself an invasive species, and a particularly common weed in our area; before I knew its name, I referred to it as "stink weed" because of its distasteful smell, which is something like a cross between peanut butter and skunk. We'd always made a point of uprooting it whenever we found it in the yard, but unfortunately, a few of the tricksy weeds had managed to hide themselves away behind the shed, where we didn't spot them until they had grown to tree-like proportions. So when the lanternflies invaded, Brian went out there with a saw and cut them down, while I busied myself trying to kill as many as possible of the hundreds of lanternflies scattered across their surface.

This left us with several fairly substantial lengths of wood, each a few feet long and ranging from about two to six inches in diameter. At first, Brian propped these up against the shed to serve as a "decoy" for other lanternflies. And we did continue to find, and squash, more bugs on these logs for a week or so afterwards. But eventually, the bugs were gone and the wood remained, just sitting there with no obvious purpose.

Fast forward to this spring, as we're getting our garden ready for planting. Along with all the weeding, we're making note of things that need to be repaired, such as the boards that form the front border of our rhubarb patch. They were originally placed on their edges and partially buried to make a sort of wall, but the underground portions have rotted away, causing the wall to collapse inward. And as I was trying to figure out if there was any way to fix this without buying new boards, I noticed those tree-of-heaven logs still leaning there against the shed and thought, well, why not?

So I hauled the boards out and replaced them with some of the longer tree-of-heaven sticks. These make a rather rustic-looking barrier that actually looks nicer, to my eyes, than the old boards, and will probably hold up pretty well since they've still got the bark on them. That used up about half of the wood. 

I didn't think of a use for the rest of it until this weekend, when I was attempting to spread mulch around the honeyberry bushes on the north side of the yard. I say "attempting" because this is a particularly awkward spot for mulching; the slope is very steep, so the mulch has a tendency to slide downhill. Rather than staying around the bushes, where it's needed, it piles up at the bottom, leaving unsightly patches of bare ground cloth behind.

However, there are some spots on that slope where the mulch does stay put. There are a couple of large boulders (some natural rock, some concrete) buried in the side of the hill that impede its downward slide. So, in an attempt to keep the mulch contained, I started hunting around for more rocks and other heavy objects that I could use to shore up the slope. But I was only able to find one sizeable rock and a few brick fragments, so I decided to try grabbing the remaining tree-of-heaven logs and using them to make a sort of border near the bottom of the slope. 

I'm not sure how well these will work to corral the mulch. They may end up sliding down the slope themselves, or the mulch may tumble over and under them. But they're probably better than nothing, and even if they do no good at all, it gets them out of the way. 

It's not exactly a major money-saver. But it is about as neat an embodiment of the ecofrugal motto "Waste not, want not" as you could ask for.

Sunday, May 15, 2022

Environmental news roundup

It's been a busy week for me and Brian, but unfortunately, none of the things that have been keeping us busy are really suitable fodder for the blog. So instead of highlights from our own life, this week's post will feature a quick roundup of interesting stories related to ecofrugality harvested from other corners of the Internet.

Story #1: A "True Price" Store

The main reason I came up with the concept of ecofrugality in the first place is that many people assume an eco-friendly lifestyle is costly. One one level, that's natural, since products and services labeled as green tend to come with a price premium. But if you look at these products and their mainstream equivalents more carefully, you realize that the eco-friendly products aren't overpriced; it's actually the mainstream ones that are underpriced. Their price tags don't reflect the true cost to society of producing them.

Take organic produce, for instance. If you look only at the price on the label, organic tomatoes look more expensive than conventionally grown tomatoes. But the conventional ones may require more water to grow, along with fertilizer and pesticides that harm wildlife and add to their carbon footprint. They damage the land, the water, and the atmosphere, creating social costs — destructive storms, wildfires, drought — that society will have to pay down the line. And yet none of these costs are reflected in their price tag.

Except now, they can be. A nonprofit called True Price has developed a system for calculating the "true cost" of various products, factoring in their social benefits and costs. Brands that want to do social good, such as Tony's Chocolonely, are working with True Price to measure and reduce the True Price of their products. There's now a store in Amsterdam, De Aanzet, where the True Price of every product appears on the label, along with the purchase price, so customers can make an informed decision about what to buy. And in the cafe at Deloitte's Amsterdam office, The Edge, customers can opt to pay the True Price for their cup of coffee or tea, with the extra money going to the FairClimateFund.

Story #2: Turning CO2 Emissions into Raw Material

At this point, it's pretty clear that if we want to keep the planet from warming more than 1.5C, we'll need to do more than cut our greenhouse gas emissions as fast as possible. We'll also need to find ways to  remove a lot of the carbon that's already in the atmosphere. And two researchers at Johns Hopkins University have come up with an intriguing new way to do that: turning CO2 into pure, solid carbon.

Most carbon drawdown methods do one of two things. Carbon capture and storage (CCS) typically sucks up carbon and buries it deep underground — which keeps it out of the atmosphere, but also keeps it from being put to any practical use. And carbon capture and reuse (CCR) typically converts CO2 into some kind of fuel that releases the carbon back into the atmosphere when it's burned. That's an improvement over burning fossil fuels, since that releases carbon that was captured millions of years ago, but all it really does is reduce the amount of carbon going into the atmosphere; in the long run, it doesn't actually take any out.

This method is different. It pulls carbon out of the atmosphere and turns it into solid carbon, which the researchers say can be used for all kinds of applications. Strong and lightweight, it can form bodies for cars; it can be incorporated into fabrics; or it can become biochar, a potent, eco-friendly fertilizer. 

Right now the researchers are a long way from being able to do this on a large scale. But they're planning to make a start by capturing the emissions from a single on-campus power plant and convert it all to solid carbon. If that works, it will serve as a proof of concept, perhaps leading to bigger and better things in the future.

Story #3: Plastic Upcycling

While we're on the subject of turning waste products into useful materials, there have been some positive developments in the field of plastic recycling. What makes plastic so difficult to recycle is that most methods degrade the plastic, making it weaker. So most plastic recycling is really "downcycling": turning plastic products into different, weaker products that typically can't be recycled themselves. You can turn plastic soda bottles into Trex boards or fleece jackets, but not into new soda bottles, because the recycled plastic isn't strong enough.

But this year, a startup called Novoloop seems to have found a way around this problem. Its founders, Jeanny Yao and Miranda Wang, have developed a method called Accelerated Thermal Oxidative Decomposition (ATOD) that can break down polyethylene (the stuff in soda bottles) into "chemical building blocks that can be synthesized into high-value products." 

They're starting with a thermoplastic polyurethane (TPU) material called Oistre that can be used in footwear, apparel, sporting goods, automotive and electronics. According to Novoloop, Oistre's carbon footprint is up to 46% smaller than conventional TPUs. So replacing existing TPUs with it will (1) reduce carbon emissions and fight climate change, (2) reduce the use of oil (and all the environmental harms of drilling) for producing virgin plastic, and (3) cut down on plastic waste, all in one fell swoop.


I realize that these three developments, though positive, are all fairly small. Compared with the scale of the problems facing the planet as a whole, each one is a drop in the bucket. But every drop helps. And with this big a bucket to fill, we can't afford to say no to any solution, no matter how small.

Sunday, May 8, 2022

Homemade oat milk experiment, part 3

Nearly four years back, when Brian and I first began seriously exploring the idea of going dairy-free, we decided to try making our own oat milk. If this worked, I thought, it would be the ultimate ecofrugal milk alternative, made from a cheap, readily available grain with a low carbon and water footprint. And no packaging waste, either.

Sadly, this experiment did not turn out well. The oat milk wasn't too bad on cereal or drunk straight, but when I tried heating it up for cocoa, it turned into a thick, gluey, and quite undrinkable substance. So I discarded that idea and eventually settled on a store-bought almond milk as my new cocoa delivery system.

From an ecofrugal standpoint, this was okay but not great. It wasn't that much more expensive than dairy milk, especially once the new Lidl supermarket opened up in our area selling it for $1.89 a carton, and it was definitely a better choice for the climate. But there was still the heavy water use associated with the almonds and, even more annoying, all the nonrecyclable cartons, which now make up the bulk of our household trash.

We experimented with making our own almond milk from scratch and, after a bit of tinkering, came up with a recipe that worked reasonably well. But it was a lengthy process — first peeling the almonds, then blanching them, then grinding them to a paste, blending that paste with water, and sweetening it. And even after all that work, the finished result wasn't quite as good as the commercial almond milk; it was thinner, more watery, and gritty with suspended bits of almond. It didn't seem worth the effort just to avoid the packaging waste.

Still, I couldn't get past the idea that there must be some better, more ecofrugal option. I kept thinking back to our earlier experiment with oat milk and thinking there must be some way to fix the texture problem. After all, commercial oat milk doesn't turn to glue when heated, so what do the manufacturers know that we don't? What are they doing to their product to preserve its texture, and why can't we do the same?

After a bit of searching, I finally hit on the answer: enzymes. As this Popular Science article explains, the reason oat milk slimes up when heated is that it releases a sugar called amylose, which bonds together into a sort of gel. But if you add an enzyme called amylase, it breaks down the amylose and amylopectin in the oats into glucose, which eliminates the sliminess and makes the oat milk sweeter. The article even provides a detailed recipe explaining how to do it.

After reading this article, I was eager to give it a try for myself. However, the first step — getting my hands on some amylase — proved trickier than I expected. You can't just buy this stuff at the supermarket, and searching for it online turned up a lot of products that contained some amylase, but not the pure form I needed for the recipe. But eventually, I managed to find a 1.5-ounce container for just a few bucks from a Walmart seller.

The next hurdle was figuring out how much to use. The recipe calls for 16.7 milligrams per quart of oat milk, but we have no scale capable of measuring out such a tiny quantity, and the recipe provides no information about what volume this translates to. At first, Brian considered emptying out the entire 1.5-ounce package into a measuring cup to figure out its volume, then using that information to figure out what percentage of the volume to use. But eventually, he decided to use the instructions on the package for brewers, which said to use "1 teaspoon per 5 gallon batch." That worked out to one-twentieth of a teaspoon for a quart of oatmilk, so he just took our tiniest eighth-teaspoon measure, filled it a little less than half full, and hoped for the best.

Even once he'd worked out the ingredients, making the oat milk was a fairly complicated and messy process. The enzymes had to sit with the oats and water for about ten minutes before blending, and then the resulting liquid had to be strained twice, once through a colander and once through cheesecloth (or, in our case, thriftily reused old pantyhose) to remove all the solids. It took a messy ten minutes or so of work to produce a reasonably milky-looking liquid.

The first thing we discovered upon tasting it was that adding the amylase hadn't sweetened it noticeably. We still had to add a fair amount of sugar to get it to approximately the sweetness of dairy milk. It still had a noticeably oaty flavor, but it wasn't unpleasant. But our real concern was the texture. Even cold, it was definitely thicker than the almond milk; how would it stand up to heating?

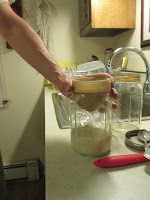
The answer turned out to be "so-so." When I made a cup of cocoa from the homemade oat milk the next day, it did thickened up noticeably in the microwave, but it remained liquid enough to drink. However, despite the two-stage straining Brian had given it (plus a thorough shaking before use), the oat milk still had a somewhat grainy quality, leaving a fair amount of sludge in the bottom of the cup. It also needed quite a bit of sugar to get it to its normal level of sweetness.

In short, this recipe was a limited success. We were able to produce a drinkable milk substitute from it, and one that's a lot eco-friendlier and a lot cheaper than our packaged almond milk. (By my calculations, the recipe used about 20 cents' worth of oats and maybe 10 cents' worth of amylase, for a total of 30 cents per quart — less than a third of the price of the Lidl almond milk.) But it took a lot of effort, and the flavor and texture of the finished product were only okay. I'm not sure that either the savings or the environmental benefits are enough to justify making the switch.

We've still got a lot of amylase left, so we'll probably try playing around with this recipe some more to see if we can improve it further. One post I found on Reddit said it was possible to produce a "sweet, smooth, and creamy" oat milk using considerably more enzymes — half a teaspoon each of alpha and gluco amylase — and letting the mixture sit for a full two hours before blending, so maybe we should see what we can do with a larger amount of amylase and a longer steeping time. That won't eliminate the hassle of mixing and straining the stuff, but it might produce a good enough beverage to make it worth the effort.

Thursday, May 5, 2022

Three new articles

Three new articles of mine have popped up in the past week — two on Money Crashers and one at Perch Energy. Two of them fall squarely in the realm of ecofrugality, and the third is only loosely related, but still interesting.

Let's start with the Perch Energy piece: Pros & Cons of Renewable Energy: Advantages Over Fossil Fuels. Anyone who reads this blog knows that renewable energy sources such as wind, solar, and hydropower have many advantages over fossil fuels. They’re cheaper, they’re greener, and they’ll never run out. Transitioning from dirty fossil fuels to clean renewable energy is essential to stopping climate change and building a sustainable future. 

But to meet this goal, there are certain challenges we need to overcome. In this article, I outline the most common renewable energy sources in use today, as well as others that show promise for the future, and explore their pros and cons. I conclude with some practical tips (again, probably already familiar to regular readers) on how to be a part of the clean energy future.

Moving on to the Money Crashers articles, the one more directly related to ecofrugality is Buy Nothing Project – What It Is, Rules, How to Start and Participate in One. The Buy Nothing Project is a lot like Freecycle, but with a different platform and different rules about who can share what with whom. And the nice thing is, there's no reason you can't be a member of both. Check out the article to learn how the Buy Nothing Project was founded, how it works, and how to try it for yourself. 

The other Money Crashers piece is Market Economy – What It Is & Characteristics of Free Enterprise Systems. It's not related to ecofrugality as such, but it does provide context for the system within which we make our ecofrugal choices, and how it can work for and against us. It's a basic primer on how markets work, what they do well, what they do poorly, and how they compare to the alternatives.


Sunday, May 1, 2022

Gardeners' Holidays 2022: Weeding Day

Normally, the Gardeners' Holiday at the end of April and beginning of May is all about the asparagus, the only crop that's really producing at this time of year. But sadly, we're not getting much asparagus at the moment. The bed on the south side of the house has produced only a few ounces' worth, and the bed outside the fenced garden hasn't yielded a single spear big enough to harvest. Only a couple of the plants have sent up so much as a tiny frond.

Part of the problem, I guessed, was that there were too many weeds in the beds. Unfortunately, pulling them out by hand is a time-consuming process, and it's difficult to do without crawling into the bed itself and compressing the soil. And even if I'd spent the time and energy to do it, I suspected the weeds would have been back with a vengeance in a week or two. What the beds really needed, I thought, was a good layer of mulch to suppress the weeds.

So last weekend, we went off to the Belle Mead Co-Op to buy half a yard of their bulk mulch. And while there, I took the opportunity to pick up a tool I'd had my eye on for a while: a stirrup hoe. Some garden book — I forget which one — had recommended this tool for weeding garden beds because it can fit in between the existing plants. Considering the state of the asparagus beds, not to mention the flowerbed, the raspberry canes, and the cherry bushes, I decided it was worth hazarding $35 on.

After we unloaded the mulch, I went inside to tend to a few things, including this blog. I then went back out to tackle the asparagus bed and discovered, to my surprise, that it had been weeded already. I found Brian in the process of spreading some mulch on the flowerbed, which was also looking remarkably weed-free, and he pointed to the new hoe and said, "Good call." 

Of course, after witnessing this success, I just had to give it a try myself. So I turned to the raspberry patch, which was pretty thickly overgrown with dandelions and deadnettles. And sure enough, I quickly discovered that by simply inserting the head of the hoe between the canes and yanking, I could clear weeds quickly and easily from a standing position, rather than having to get down on my hands and knees and stick my hands in amongst the prickly canes. 

This new toy didn't do quite as thorough a job as hand-pulling. It only lopped off the tops of the deep-rooted dandelions, rather than pulling up the entire long taproot. The plants also suffered a little bit of collateral damage, losing a few stray suckers that got grabbed by the hoe alone with the weeds. And because the raspberry canes are so tall, I still had to crouch down on a few times to find all the weeds underneath. 

But overall, weeding this way was much, much less work. It only took me twenty minutes or so to turn the overgrown bed from this...

 to this.


All in all, I'd say this tool was an extremely sound investment. It's turned weeding from a long and arduous task that we need have to set aside time for on a weekend to a job we can do whenever we have ten to twenty minutes to spare. Which, in turn, means that it will probably get done a lot more often, rather than put off until we can find the time for it. And if it helps keep our garden weed-free and productive, it was well worth the $35 we spent on it.