Showing posts with label repair or replace. Show all posts

Sunday, November 3, 2024

Testing the heat pump waters

Brian and I have known for a while that we want our next home heating system to be an electric heat pump. Last time we replaced our boiler, this wasn't really an option; the heat pumps available at that time were old-fashioned models that struggled to produce heat as the temperature dropped below freezing. But in the ten years since, the situation has changed dramatically. Modern cold-climate heat pumps can run at full strength in temperatures as low as -5F, a temperature that we seldom see here in New Jersey. And, on top of that, the Inflation Reduction Act now offers a 30% tax credit to help pay for them. So we've been assuming that we'd ditch our fossil-fuel boiler whenever it reached the end of its lifespan. However, since it's only ten years old, we figured it would be at least another ten years before we got to that point.

A couple of weeks ago, we got a hint that might not be the case. We'd hired a heating contractor to do a routine tune-up on our heating system, and he informed me that the boiler had some major problems. He showed me a photo he'd taken that appeared to show a significant amount of rust on the heat exchanger, which he said "means there has to be a leak somewhere." Also, he said, the pressure gauge was reading around 20 psi, even though the system was supposed to be at between 12 and 15. To fix this, he claimed, we'd need to replace not just the pressure valve but the entire "trim kit": basically, all the valves, pipes, and other parts that connect to the boiler itself. And then he quoted me a jaw-dropping price for this repair: $3,500.

Well, given that the boiler itself had only cost us less than twice that price in the first place, I started wondering if it would be a better idea to simply replace it. So I went onto HomeAdvisor and put in a request for several contractors to give us quotes on a heat pump system. Unfortunately, I didn't get them. All four of the contractors I spoke with said that it wasn't practical to heat a home with electricity in this area, at least not without a fossil fuel backup. Some claimed that it just couldn't be done—that a heat pump would never be able to keep a house sufficiently warm. Others said it was possible, but the cost would be unreasonably high—as much as double what we were currently paying with gas.

This was baffling to me. I'd done a lot of reading about this topic in the past couple of years, and tons of reliable sources—Consumer Reports, Wirecutter, Yale Climate Connections—had assured me that modern heat pumps could totally handle climates much colder than ours. I'd also crunched some numbers using the Electrification Planner at Rewiring America, and it had estimated that for a home like ours, the costs for heating with a heat pump would be pretty close to what they are with gas. It said we might pay anywhere from $170 more per year to $350 less, with the median household saving $75.

Seeking more data, I made a post in the heat pumps forum on Reddit to ask if anyone else had successfully used a heat pump in our area. I got tons of responses from people as far north as Canada assuring me that they used heat pumps with no backup, no problem. A few people said that I should expect to pay more heating with electricity as opposed to gas, but only one claimed the cost would be prohibitive.

Eventually, I did manage to get one contractor to give me a quote on a heat pump system. I'd done a little research ahead of time to figure out what a reasonable price would be and gotten back a fairly wide range of estimates, so I was prepared to hear anything from around $5,000 to $18,400. You can imagine my shock when I opened the contractor's estimate and saw that he would want over $23,000 to install a ducted system (including the cost of adding new ductwork). A mini-split system, which most sources had said was the cheapest option for homes that lack existing ductwork, was even worse: close to $29,000.

Fortunately, by the time we got this quote, we knew we wouldn't need it. Because we'd learned one other thing from the various contractors who'd come out to our house: the quote the first company gave us for repairs was way, way too high. (Several of them said the company in question was notorious for this.) One of them, after taking a look at our system, said the only part we really needed to replace was the expansion tank, and that would cost less than $400. We eventually hired his company to fix it for a mere $355—about one-tenth of the price we were quoted for the initial repair.

So, the bad news is, we're not going to be ditching our old fossil-fuel boiler this year. The good news is, we don't have to make any decisions about replacing it under time pressure. We can afford to wait at least a few more years, and perhaps by the time we're ready, there will be more installers in New Jersey who are actually familiar with modern cold-climate heat pumps and can install one for a decent price. Or, who knows, by then there might actually be air-to-water heat pumps on the market that can work with our existing radiators, so we can simply swap one in for the old boiler with no need to alter the rest of the system.

Sunday, December 10, 2023

Return of the Shoe Conundrum

Just when you thought it was safe to go back in the snow...

Last March, I bought myself a new pair of winter boots. I'd already limped through most of the winter with boots that leaked—two pairs of them, in fact—and all attempts to repair them had come to naught. After spending over a month searching for a replacement that met my tough criteria (comfortable, weatherproof, leather-free, not too ridiculously expensive, and not too ridiculous-looking), I finally found a pair at Woman Within that seemed acceptable. Not ideal, but acceptable. They weren't available in my exact size, but they were wearable; they weren't very warm, but with a thicker sock, they were tolerable; they didn't have much in the way of arch support, but I could add that with a suitable insert; and while they didn't look all that durable, they were cheap enough that I figured I could at least get my money's worth out of them. And they were actually kind of cool-looking—nice enough for both indoor and outdoor use and even reasonably appropriate for wearing with skirts. Of course, by the time they arrived, winter was nearly over, so they didn't get a lot of use before I put them away for spring. But it was nice to know that when colder weather came around again, I'd have suitable footwear ready to go and wouldn't have to subject myself to another frantic round of shoe shopping.

Fast forward to late October, when I decided it was cool enough outside to start wearing my new-ish boots again. All through the fall, I remained quite pleased with their looks and comfort...until the first wet day, when I discovered after about 20 minutes of walking in them that my right foot had become damp around the toes. I hadn't been stomping through puddles or anything, just walking outdoors in a light rain, and even that was enough to get my feet wet. In short, I now had not two but three pairs of leaky boots, including one that was practically brand new.

So here it is, the start of another winter, and I'm right back to where I was a year ago. Once again, I'm facing the same old dilemma: what's the most ecofrugal way to get through this winter with dry feet? Is there any reasonable hope of repairing these boots, even if I was unable to repair either of their predecessor pairs? And if that doesn't work, where, oh where, can I find a replacement pair that meets my criteria?

However, I do have a couple of advantages that I didn't have last year. First of all, I'm armed with the knowledge of what didn't work last time around. I know not to bother trying to fix these boots with Shoe Goo or hot glue, as neither will hold up. I also know where not to look for replacements, as I've already tried a bunch of different styles that weren't suitable. For instance, I'm not going to waste time or money on any more Sperry boots, given that the last pair I bought wore through at the heel and began taking on water within a matter of weeks. (If only I'd seen this YouTube video deconstructing the boots before I bought them, I could have saved myself the hassle.) Nor am I going to bother with specialty vegan retailers from overseas, like Will's Vegan store, since last time I hazarded $136 on a pair of their boots I ended up having to ship them all the way back to Britain.

Also, I've found some better sources of information this year about both boot repair and boot shopping. For starters, I found an article on how to fix boots that leak at the seams with a product called Aquaseal SR. A little research showed that this product has different ingredients from Shoe Goo, and it appears to do a better job with waterproofing, so there's hope that it may succeed where Shoe Goo failed. It's not available in any local stores, but I found a tube for $13 or so on eBay (shipping included). So I'll start by trying to repair my existing boots with that. If it works, I should be able to make it through the winter with them.

If that doesn't work, I also have more possible places to look for replacement boots than I had last year. Thanks to my uncle's Hanukkah gift, a full-access subscription to the New York Times that includes their product-review site, Wirecutter, I was able to consult this roundup of the best winter boots for recommendations. Most of their picks didn't fit my criteria in one way or another—either they contained leather or they were pull-on styles that would never fit onto my feet—but there was one "also consider" pair from Bogs that looked like it might do. (The pair they recommended is a pull-on boot, but there's a similar style available that laces up and is leather-free.) It's rather pricey (around $150), but it has solid reviews and a one-year warranty, so I know it will at least get me through one winter, which is more than I can say for the $100 Sperry boots. Wirecutter also recommended a Columbia boot that's no longer available, but there are a couple of similar styles priced at $100 to $120 that get good reviews for warmth and waterproofing.

The YouTube video I linked to above—part of a series in which a guy cuts up four pairs of duck boots to assess their construction—also yielded some useful information. The best performers of the lot were the pricey L.L. Bean boots, which don't meet my criteria because they have leather uppers. But the review also found that a truly crappy pair of $30 boots from Walmart performed almost as well as the the $100 Sperry boots. Both were terrible, but one was terrible for a much lower price. So if I just need a stopgap pair of boots to get me through the winter, a cheap pair from Walmart might not be such a terrible idea. Even if they fall apart after a few months like the Sperry boots, I won't have to feel as bad about it.

Saturday, January 22, 2022

Thrift Week 2022, Day Six: Mend It, Don't End It

Coming into the home stretch now on this year's Thrift Week. For my penultimate entry, I present...

Ecofrugal Principle #6: Mend It, Don't End It

In Brave New World, Aldous Huxley's vision of a futuristic false utopia, all children are subjected to subliminal moral education while they sleep. One of the principles they're taught this way is, "Ending is better than mending." Through this message, the state encourages its subjects to be good consumers and replace all their belongings regularly, at the first sign of wear, rather than repair them. Obviously, Huxley was commenting on what he perceived as a trend in his actual society at the time (1930s Britain), but he didn't know the half of it. If he could see our modern world, where "planned obsolescence" and "fast fashion" are simply accepted as the norm, he'd think all his worst nightmares had come true.

But even in this world, it's possible to opt out. To get off the endless treadmill of working and spending, buying and discarding. Each time you decide to repair something broken or damaged, rather than simply throw it out and buy a new one, you're engaging in a small act of rebellion against the forces of mindless consumption and the environmental degradation that goes with it. You're striking a blow for your economic freedom and also for the health of the planet.

And repairing works more often than you might think. Most people know that you can take your car to the mechanic when something goes wrong, but not everyone would think to reattach a book cover, restring a pair of Roman shades, or take in an oversized waistband. And even those who know it's possible to patch a pair of pants might assume you need serious sewing skills to do it, when in actuality, I can manage it with nothing but a needle and thread and a simple whip-stitch.

Sadly, repairing instead of replacing isn't always possible. Sometimes, you simply can't restore a bricked device or find a tailor willing to shorten the sleeves on an old coat. And even when it's physically possible, it isn't always economically feasible, such as when the cost to resole a pair of boots is more than a whole new pair. 

So, like most of the other principles in my Ecofrugal Manifesto, "mend it, don't end it" is a rule of thumb rather than an absolute dictum. Repairing rather than replacing should be the default choice, the first thing you think of when something breaks. But if a little (or a lot of) investigation reveals that repair is impossible or impractical or both, it's perfectly acceptable to replace, especially if you choose a secondhand item (Ecofrugal Principle #2) as a replacement.

Sunday, April 18, 2021

Money Well Spent, part 2

Years ago, I read a post by another frugal-living blogger that centered on a saying popular with her family: "A problem that can be solved with money isn't a problem." At the time, I had an instinctive and negative reaction against this idea, because it seemed to me that this attitude is not only privileged (since plenty of people in the world cannot afford to solve their problems with money) but also limiting. It encourages you to solve problems by throwing money at them rather than coming up with the kinds of creative ecofrugal solutions that I tend to enjoy, such as constructing a toothbrush holder from coat-hanger wire or a soap-dish insert from garlic wrappers.

But over time, I've gradually softened this viewpoint. Mind you, I still don't think reaching for your credit cards should automatically be your first approach to dealing with any problem. But I now feel prepared to endorse a more moderate version of the saying: "If you have a problem that you can easily solve by spending money and can't easily solve without spending money, and you have the money, then you have no problem."

I first came around to this way of thinking back in 2017, when my old winter boots started leaking. For an ecofrugal person, the obvious thing to do in that situation would be to try to fix them, rather than spending money on a new pair. But in the first place, it might not work; in the second place, even if it worked, it would only be a temporary solution; and in the third place, I'd never really been all that happy with those boots to begin with. So I concluded that, under the circumstances, it made sense to spend some money — even spending an amount of money I wouldn't normally consider, but could easily afford — for a new pair of boots that would completely fix the problem.

Since then, I haven't been what you'd call a knee-jerk shopper, but recently I've found myself placing a lot of online orders, every one of which addressed some sort of "pain point" in my lifestyle. The term "pain point" is kind of marketing jargon, but I think it does a good job of expressing the idea of one of those little things in your life that's just always bothering you, like a rock in your shoe. It may be no more than a minor annoyance, but if it's a minor annoyance you experience every single day, it adds up to a problem worth spending some money to fix.

For instance, in recent weeks, I've felt entirely justified in spending money on:

  • A new over-the-door shoe rack for our basement door. Since we use our kitchen door as our main entrance to the house, we need a place nearby to put wet shoes. There isn't enough space for a wall-mounted shelf, so until recently, we were using an over-the-door shoe bag on the back of the basement door. But the pockets weren't really big enough to accommodate Brian's shoes, which therefore had a tendency to fall out, sometimes on our heads, whenever the door was moved. Also, wet shoes trapped in the enclosed pockets would take days to dry out. So eventually I got fed up and hunted up this shoe rack at Home Depot, which can accommodate shoes of any size and actually provide enough airflow around them to let them dry out after a wetting. This new rack looks much better, works much better, and (with a minor adjustment to the door) actually allows the door to close.
  • A new folding umbrella. When my purse was stolen in 2018, I treated this crisis as an opportunity to upgrade my everyday carry. I vowed that I would replace each and every item I had lost with something at least as good, if not better. Yet as time went on, I realized I hadn't really done this with my folding umbrella. The old one had been kind of flimsy, not great protection in a storm, but it did have one big advantage: it folded up to a compact 7 inches, allowing me to tuck it into the purse vertically. The new one wasn't really any sturdier, but it was longer, forcing me to lay it down lengthwise in the bottom of the purse, which left me less room for everything else. After spending two years cursing with frustration every time I tried to cram all my stuff into the bag, I finally decided to shell out some money for an umbrella as compact as my old one — and since I didn't want to have to replace it yet again in a year, I decided to get the best one I could find at that size. A search for "best folding umbrella" led me to the $50 Davek Mini. Normally, this price tag would be a deal-breaker, but after two years of living with this pain point, I was ready to look on it as an investment (especially since the umbrella comes with a lifetime warranty, which reviews say the company is really good about honoring). The new umbrella feels very sturdy, looks cute, and fits neatly in the purse, leaving me enough room to add back in the collapsible cup I hope to be able to use again soon once Starbucks joins the rest of the world in concluding that surface transmission of COVID really isn't a threat.
  • A new cordless phone. Ever since we switched from Optimum to Verizon, we've been having problems with our phone occasionally failing to ring when a call comes in. Verizon, needless to say, was unable to solve this problem and told us our phones must be to blame. Initially we were skeptical, but sure enough, when we tried unplugging our cordless phone, it seemed to solve the problem. Unforunately, doing this creates three new problems: (1) we're tethered to a cord every time we have  a conversation, (2) we can only get caller ID by checking the printer, and (3) the ringtone on the corded phone is really loud and annoying. So at this point, we had three choices: (1) live with these three problems, (2) live with the problem of an occasional dropped call, or (3) just shell out fifty bucks for a new cordless phone (from a different manufacturer, just to make sure) to deal with the problem entirely. (Mind you, we don't have the new phone yet, so we can't be sure it actually will fix the problem, but we can always return the phone if it doesn't.)
  • A warm cardigan. As I noted in February, I've been repeatedly frustrated over the past several years by the gap in my wardrobe left by the demise of my favorite winter cardigan. I have one cardigan that fits and goes with everything but isn't warm; I have one that's warm and goes with most things, but is so huge I can barely get my coat on over it. So when I found a simple grey wool cardigan on ThredUP in what looked like my size, I just took the plunge and clicked "buy." Yes, there's the risk it won't fit or won't meet my needs, but if it doesn't, I can always return it. And if it does, that will be one more pain point removed from my life.
  • New handles for the TV cabinet. A few months ago, one of the handles on our TV cabinet broke. We quickly realized we couldn't repair it, and replacing it was complicated by the fact that the old handles were a non-standard size. We searched the entire stock at Home Depot and Lowe's and couldn't find a single pair that would fit into the existing holes. So we just lived with it for months, opening the door by grasping it at the top. It wasn't that hard, but it was an annoyance, as was the lopsided appearance of the now one-handled cabinet. So I finally did a little more investigation and found that Home Depot sold handles online that could adjust to fit holes of any size. Took but a minute to place the order and no more than five to install them.

All told, these five items cost us around $220 — not a trivial sum, but a sum we can easily spare — and each one of them will make our lives just a tiny bit better, every single day. If that's not what money is for, I don't know what is.

Sunday, February 14, 2021

A closet tinkering experiment

Like last week's, this post is about clothing that doesn't quite fit. But while that one was about a garment I've been afraid to try altering because I didn't want to mess it up, this is about one that I decided to go ahead and mess with because I pretty much had nothing to lose.

The piece in question is a simple white blouse that I bought many years ago from, if I recall correctly, the Newport News catalog. While many of the garments I bought years ago have grown too tight for me, this one has gone in the opposite direction. Its stretch cotton fabric has gradually lost its resilience, leaving it too loose all around. This is mainly a problem because the over-large shirt no longer stays tucked in neatly, so whenever I wear it as part of my Morris dance costume, it pulls itself loose as I dance, even with a snugly cinched belt over it. And even when I'm only wearing it about my everyday activities, the shirt keeps pulling free each time I sit, stand, or otherwise move around, and I have to keep tucking it back in.

Taking the shirt to a tailor obviously wouldn't be worthwhile. It cost less than $20 when it was new, and now it's decades old, worn thin and with yellowish stains about the armpits. Having it altered would definitely cost far more than the shirt is now worth. And yet, at the same time, it's still a wearable and pretty nice shirt. True, I own a couple of other white shirts I can wear for Morris dancing, but this one is warmer, so it's useful for gigs in cold weather, as well as for wearing under a sweater in the wintertime. It seems like a shame to just throw it out, even assuming I could find a new one that's just as good.

Taking all these facts into consideration, I decided, well, I really have nothing to lose by tinkering with it myself. It's not much use to me as it is, so I'm not running the risk of spoiling a useful garment; the worst that can happen is that I'll have to discard it and buy a new one, which is probably what I'll have to do anyway if I don't mess with it.

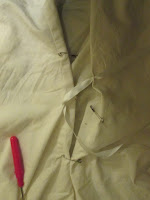
So I got out some safety pins and started experimenting. I found that by pinning it in several places across the back, I could get it back to a reasonably snug fit - still comfortable, but tight enough to wear and keep it tucked in. However, I quickly discovered that wearing it with the pins in place all the time wasn't really a solution, as a sudden movement could cause the well-worn fabric to tear around them. I'd need to stitch it up somehow.

Rather than simply stitch the two sides together, I decided to try a technique I'd seen while dabbling with DIY Renaissance garb: adding holes and connecting the two sides with laces. This would make the shirt adjustable, so I could make it tighter or looser as needed to accommodate any future fluctuations in weight, as well as giving it a cool, vaguely Renaissance vibe.

So I dug through my scrap bin for the longest piece of white ribbon I could find, then searched through my sewing box for a needle large enough to accommodate it. I tied a knot at one end to keep the ribbon from slipping all the way through and started poking holes in my shirt. I knew this would probably make the shirt unwearable if it didn't work, but again, since it was pretty close to unwearable anyway, I didn't have much to lose. It took a bit of repeated jabbing and wiggling to get the needle all the way through the fabric, but I eventually managed to create a series of holes, crisscrossing from bottom right to middle left to top right and back over and down. Then I adjusted the ribbon until it was more or less even on both sides, tied it loosely in a bow, and tried the shirt on.

And it fit, sort of. That is, the shirt was snug enough in the waist to wear tucked into trousers without it coming loose. Under a sweater, in fact, it would look perfectly normal. But by itself, well...it looked a little weird. Basically, the upper part of the shirt was now much looser than the lower part, so there was all this excess fabric that bulged out on top like a big balloon. I don't think I'd really want to wear the shirt for Morris dancing in its present condition.

So, if this experiment wasn't really a success, why am I sharing it here? Because I think it's important to talk about the ecofrugal endeavors that don't work out, as well as those that do.

The trend nowadays seems to be to curate the public version of our lives, as presented on social media, and show only the best bits - the parts that make us look more successful, more glamorous, more fun, more exciting than we really are. The problem is, seeing only the best parts of all our friends' and acquaintances lives makes us less satisfied with our own. So, for instance, if you're a regular reader of a blog about ecofrugality, and all the ecofrugal experiments you read about on that blog are incredibly successful, you might easily become frustrated that so many of your own attempts to save money and/or the earth don't work out very well. Perhaps you'd even conclude that you just aren't cut out to live an ecofrugal life, and you shouldn't bother trying anymore.

That's exactly the message I don't want to send. I want you to know about the things I do that don't work so that you can learn from my mistakes - but I also want to show how I keep plugging away at my attempts to live an ecofrugal life, even if I don't always succeed at it. I want to encourage you to try little money-saving experiments like this one, even if they might not work out, because trying things that don't work is an important part of learning what does. Maybe something that doesn't work the first time can work better on the second or third. (For instance, I'm already considering the possibility that this shirt might look better if I just continued the lacing farther up the back, and planning to keep an eye out for cheap white ribbon so I can give it a shot.) And even things that turn out not to work at all - like all the crops we've tried in our garden that we couldn't grow to save our lives - provide useful information about what not to do. Now that we know we're no good at growing Brussels sprouts, for instance, we can just set aside more space for green beans.

In the words of Samuel Beckett: "Try again. Fail again. Fail better."

Sunday, February 7, 2021

What if you can't repair OR replace?

Have you ever owned an article of clothing you were deeply attached to, one that you held onto long after it wore out or stopped fitting properly because you just couldn't stand to get rid of it, and that you've never found a suitable replacement for?

That's happened to me many times, but the best example I can think of is this old cardigan sweater. I've had it for literally decades — in fact, if I recall correctly, I received it as a gift from my late grandmother when I was thirteen. All through high school and college, I wore it pretty much all the time in cold weather, because it was cozy and warm and went with absolutely everything. And I continued to cling to it throughout my adult life, even as it got harder and harder to button, because I just couldn't imagine anything else taking its place. When I wore holes into the elbows, I hired a knitting-empowered friend to repair them so I could keep wearing it longer.

Eventually, it got to the point where it was simply no longer practical to keep wearing it. Only the middle two buttons could physically be fastened anymore, leaving big gaps uncovered at the top and bottom. This clearly wasn't a problem that could be repaired, so I reluctantly set out searching for a replacement...and I couldn't find one. This particular decades-old model, obviously, was no longer available from the manufacturer, and there was simply nothing at all on the market like it. It seemed like a simple enough thing to look for — a warm cardigan in a multicolored pattern that would go with most of my other clothes — yet I searched everywhere, from department stores to thrift shops to Amazon and eBay, without finding anything that really fit the bill.

Over the years, I've tried a couple of other cardigans that seemed like they might make acceptable replacements. In 2012, my sister gave me a really nice one as a Hanukkah present, and I kept it for several years, but I found that I just wasn't pulling it out to wear very often; it was too long on me, and the brown background color didn't go with the rest of my wardrobe. So I finally decided to pass it on in the hopes that it would find some taller, warmer-complexioned person who could truly appreciate it. Another given to me by my mom met the same fate; though it was comfy, the length and bulk weren't flattering. And while my latest pick, a plain grey zip-up from L.L. Bean, went reasonably well with everything, its cotton fabric just wasn't up to the job of keeping me warm in the coldest weather.

Over the past few weeks, I've become kind of obsessed with trying to find a suitable replacement for my beloved cardigan. I've searched endlessly on Google, eBay, and all the online thrift shops like thredUP and Swap.com. I've bookmarked pricey wool cardigans on Etsy and The Irish Store, but never hit the "buy" button because they weren't exactly right (wrong assortment of colors, didn't look like they would fit properly) and I didn't want to waste money on something that might not be any better than what I've tried already. 

But the greatest source of frustration for me is the fact that I already own a sweater that's almost perfect. It's this extra-large men's cardigan that I picked up some years ago at the local thrift shop. It's the right material, a warm blend of acrylic and wool. It's the right color, with a dark grey background and a variety of jewel tones in the pattern that go with most, though not quite all, of my winter clothes. It doesn't have pockets, which I would prefer, but I could deal with that.

The problem is the size. A men's extra large isn't just big on me, it's absurdly big. The length is actually fine, and the width in the body isn't too much of a problem, but the volume in the sleeves just drowns me. I could deal with the excess length by rolling them up, but they're so wide that I can barely stuff them into my coat. And the V in the front is so deep that it leaves a big portion of my chest uncovered, which isn't great for warmth.

If I could only adjust it to fit me, this sweater would be closer to a perfect replacement for my cherished old cardigan than anything I've ever seen in a store. But is that even possible? 

According to this site, there are several ways to take in a too-big cardigan. Shrinking it in the wash is the simplest, but that probably wouldn't work with this one, since it's not 100 percent wool. Pinching off the excess fabric and sewing in new seams might work, but I'm not sure my sewing skills are up to it, and I'm afraid of ruining the only sweater I've ever found that's even close to what I'm looking for. I've thought about taking it to my favorite tailor, but I'm not sure if (a) she's even open during the pandemic,  (b) she would be willing to work with a knitted garment, and (c) she would charge more to alter this cardigan than I'd pay for a fancy new one. 

Then again, given how much difficulty I'm having finding anything else suitable, maybe that's still the best option. I would at least know up front that the material and pattern are suitable, and I could have it tailored to fit me exactly. And making something usable out of an existing garment — while using the services of a local business, to boot — would presumably be more sustainable than buying a new one. So maybe I have nothing to lose by at least checking to see if the tailor is open and willing to do the job. Even an altered version of this big cardigan still wouldn't be as perfect as my old one, but it would be better than anything else I've found in over ten years of searching.

Sunday, January 5, 2020

How to (maybe) repair a vinyl window shade

This week, the repair or replace dilemma reared its ugly head once again. This time, the culprit was the vinyl window shade in our bathroom. The only window in the bathroom is right in the tub, where it's regularly exposed to high levels of heat and moisture from the shower, which have apparently caused its vinyl material to pucker and warp slightly. This, in turn, resulted in a couple of small tears along the bottom seam, one of which has grown gradually bigger because I occasionally snagged it while squeegeeing the walls. Last week, after discovering that mildew was proliferating along these torn edges, I finally decided the problem had reached the point that we had to either repair the shade somehow or replace it. But which?

On the one hand, a new shade wouldn't be all that expensive. This one only cost around $10, but it also hadn't held up very well — so spending $10 another one just like it would probably mean resigning ourselves to spending another $10 on a replacement every year or so. Sure, we could easily afford that, but it seemed wasteful, particularly when the only part of the shade that's damaged is the bottom seam. There was still more than enough good material on the roller to cover the window, and it seemed ridiculous to just throw it away.

However, to get our money's worth out of this this still-useful material, we'd have to find some way to mend that tear, and that wasn't as simple a job as it sounded. When we encountered this same problem with our old bedroom window shade, we fixed it by applying a long strip of duct tape along the entire bottom seam, which enabled us to get another year or two of use out of the shade before the roller mechanism went kaput. But that was a blackout shade, so the duct tape applied to the back of the shade didn't actually show on the inside. This one is a translucent "light filtering" shade, so the duct tape would definitely be visible through the material. Plus, duct tape doesn't really hold up that well to moisture, so this would only be a short-term fix at best.

We've also tried fixing this problem on a bathroom shade with our hot glue gun. We cut off the damaged bottom portion of the shade, then put a dowel along the bottom edge to weigh it down, rolled up the vinyl material around it, and used hot glue to create a new seam. That repair held for a little while, but it didn't take long for heat and moisture to
loosen the glue's hold on the vinyl, and we eventually had to scrap the shade entirely and replace it with this one. So that, once again, was at best a short-term solution.

Thinking that there must surely be some kind of adhesive that could hold up in wet conditions, I started searching around online, and I discovered Tear-Aid Vinyl Repair. The manufacturer claims, and reviewers confirm, that this stuff can make a torn inflatable raft seaworthy again, so it seemed it should certainly be able to hold up on a vinyl shade that's only getting splashed with water, not submerged. And it was available at Dick's Sporting Goods, which is within striking distance of other stores where we shop regularly. The only catch: it was $10 for a kit that contained just one large patch (3" by 12"), one medium (1 3/8" square), and one small (7/8"). It would be good for maybe two or three repairs — if it worked at all. Was it worth the investment when we could just spend $10 on a new shade and be done with it?

Applying the guidelines I learned from Jeff Yeager, I decided that the answer was probably yes. For a tear this small, I reasoned, the $10 kit should be good for at least two repairs, which meant that the cost of the repair was only half the cost of the replacement. Spending $10 to replace both this shade and the next one that developed a tear would be cheaper than spending $20 to replace them both, not to mention less wasteful. So during our Saturday round of grocery shopping, we swung by Dick's and picked up a box of the Tear-Aid to attempt the repair.

However, when we opened the box, we realized there was an additional problem. According to the package, the kit was supposed to contain three patches, a 12" "reinforcement filament" for repairing tears on edges (like the one we had), two alcohol prep pads, and a set of instructions. That didn't sound like a very good value for $10, but we hadn't gotten even that much. Our kit contained only the large patch, the small patch, and the instructions — no medium patch, no reinforcement, no alcohol prep pads. It would still be enough to complete this one repair, but it might not be enough for even one more.

Our first instinct was to go back to Dick's and return it. But there were two problems with that: first, we'd already cut the small patch in two (to repair the smaller tear) before realizing the other parts were missing, so technically, we'd already used the kit at this point. And second, if we did go all the way back to Dick's the next day to return the kit, then what? Exchange it for another one that might also be defective? Or go back to the drawing board looking for something else we could use? I did manage to track down another product, Gear Aid Repair Tape, that might work, but it was only available at REI. The nearest store was in Princeton, which meant we'd probably have to wait until Thursday to pick it up. Faced with the choice of making a second trip to return the Tear-Aid, then yet another to pick up the alternative product (if it was available) and having to wait at least a week before we could attempt the repair again, or simply moving forward with the bird in the hand and getting the stupid thing fixed today, Brian decided to treat the $10 we'd spent as a sunk cost and forge ahead.

Even with the product in hand, however, it took us two attempts to actually make the repair. The first time we tried it, even though we'd allowed the shade to dry for a full 24 hours and it felt completely dry to the touch, the minute Brian tried to apply the patch to it, water squeezed out of the seam. He kept wiping it off and then trying again, and each time, water continued to squeeze out. Eventually, the small patch he'd cut (from half of the small one we'd been provided) was completely useless, and he just had to throw it out. So he hung the shade back up and gave it another 24 hours to dry, then tested the seam thoroughly to make sure there was no water left in it before attempting the repair again.

This time, fortunately, it went off without a hitch. First, after wiping the shade down with alcohol, he carefully applied the other half of the small patch to the small tear on the right side. This tear was small enough that even this tiny patch was big enough to wrap around to the back of the shade, sealing it on both sides. He also used scissors to round off the corners on the patch before applying it, so there would be no sharp edges for a squeegee or a fingernail to snag on and pull them loose.

Then, he cut a strip off the large patch that was just big enough to cover the larger tear — on one side, not both. Once again, he rounded off the corners before applying this patch to the front of the shade. Then he cut another one the same size, rounded it off similarly, and applied it to the back. This was less fiddly than trying to wrap the material around, and it seems about as secure. The repair isn't flawless — if you look carefully, you can still see the tear — but as long as it holds up, we won't complain. (We're giving it the rest of the day to dry before getting it wet, though, just to give it as good a chance as possible.)

So did we make the right choice? I guess it's too soon to say. We'll need to see how well this repair holds up, and compare it with how long the new shade took to get damaged in the first place. But one thing I can say for sure is that if I had to try it again, I wouldn't buy Tear-Aid. I'd wait until we could hit an REI and try the Gear Aid tape. It might not work as well, but it gives you nearly twice as much material (20" by 3") for half as much money — and since there's only one roll in the box, you know you're actually getting everything you pay for.

Tuesday, September 24, 2019

Three more Money Crashers articles

Money Crashers is continuing to crank out all those articles of mine it's been sitting on for the past few months. Three more have come out in the past couple of days, all on very different topics.

The first piece deals with a subject you've seen me cover here many times before: repairing your old stuff so you don't have to buy new stuff. One of the main tenets of the ecofrugal lifestyle, which is pretty much meant to be exactly the opposite of the dystopia in Brave New World, is "mending is better than ending," so we try to keep our stuff working as long as possible. We've successfully repaired all kinds of small items, including books with detached covers, ripped jeans, and Roman shades, but we're most vigilant of all with big items that cost us big money to begin with. We're rigorous about maintaining our home, car, bike, computers, and appliances so that we can squeeze as many years of useful life out of them as possible.

In this Money Crashers article, I explore this topic in detail. I explain which items it's most important to maintain if you want to save money in the long run, and how to do it.

6 Things You Should Maintain & Take Care of to Save Money Long-Term

The second article is about a newer topic that's been making news recently: universal basic income, or UBI. This radical new government benefit would simply give a flat payment to every single American adult each month, with no strings attached. Tech billionaires say this will be necessary in the face of the widespread unemployment they say is certain to occur as machines replace humans; politicians  argue that it's better than our current system of government benefits because there are no bureaucratic hoops to jump through, and no social stigma attached to accepting a benefit that everyone else is getting to. But opponents point out that UBI would be enormously expensive and wasteful, giving benefits equally to beggars and billionaires.

In this piece, I delve into the history of UBI, previous experiments with it around the world, the arguments for and against it (and the extent to which they're supported by the data), and the chances it will ever become a reality in the United States. And I examine a couple of alternative forms of aid that could offer many of the benefits of UBI with fewer drawbacks.

What Is Universal Basic Income & Could It Work in the U.S.?

And finally, I'm back on familiar ground with the subject of flooring choices for your home. This article is about the pros and cons of the most popular flooring choices, so it doesn't cover the paper floor technique we used in the downstairs room, but it explores the relative merits of hardwood, engineered wood, bamboo, ceramic tile, laminate, vinyl, linoleum, cork, and carpet. For each one, I cover such considerations as how it looks, how it feels underfoot, ease of installation, durability, cost, and, where appropriate, environmental considerations. (This last item apparently really annoyed one reader, who called the information useless and said, "I would floor my house with skins from baby seals if it looked good and added value to my house." I'm assuming, perhaps optimistically, that the majority of readers will not share this viewpoint.)

9 Best Flooring Options for Your Home & How to Choose on a Budget

Sunday, December 9, 2018

Know when to fix 'em, know when to nix 'em

One of the most basic problems of the ecofrugal life is that nothing lasts forever. No matter how much effort you make to choose things that will last—clothing, shoes, products for your home—they'll still wear out eventually. At some point, you always find yourself facing the same old dilemma: Can I make this last a little bit longer, or is it time to give in and replace it?

Unfortunately, there's no simple rule to answer that question. There are a few general principles that can help you decide, but mostly, you have to tackle the problem on a case-by-case basis. Just in this past week, I've faced this same question three times, and I came up with three different answers: one yes, one no, and one maybe.

Case #1: The worn-out trousers

About two years ago, I reported with pride on how I'd managed to take in the oversized waist on a new pair of pants with a piece of elastic. That repair has held up reasonably well, but unfortunately, the rest of the pants didn't. Within a year, they fell victim to the same ailment that affects all my pants eventually: severe wear in the thigh area, which is a lot harder to patch than a rip at the knee. I attempted to patch them with some grey fabric, and this kept them going for a while, but after another year, the patch itself had developed holes.

At this point, any normal person would have given up on the pants, but I just hated to let go of them right at the beginning of winter when they're the warmest pair I own. So I decided to take one more crack at fixing them by removing the old patches and sewing on new ones. This time I went with black fabric from a pair of fleece-lined leggings, putting the soft and comfy side facing in and the smooth side facing out. I hoped this new patch would be both more durable and less noticeable than the original one. 
I used the same method as before, cutting out two large squares that reached all the way from the crotch seam to the spot where the holes were. This allowed me to stitch them down against the existing seam on two sides, making the seams more secure and a little less noticeable. Then I just whip-stitched them into place around the other two sides. I also went around the edges of the hole on the other side and stitched them down against the patch, so they wouldn't flop around.

Well, I can't say yet how durable this fix will be, but I can say it already looks a lot less obtrusive than the previous set of patches. When I tried them on and showed the patched area to Brian, he said he could barely see it; the only reason he could even tell it was there was because I told him. So I have good reason to hope this repair will give me at least one more winter's worth of wear out of these cozy flannel pants before I have to discard them.


Case #2: The snapped-off toilet brush

You may recall how disappointed I was last year to discover that IKEA had stopped carrying refills for our old toilet brush. This was particularly irksome, because the money-saving and waste-preventing refills were the whole reason we'd bought this fancy toilet brush holder in the first place. We tried to tweak one of IKEA's new replacement heads to fit the handle, but it was too wobbly and eventually snapped off at a the handle joint.

However, since we had a second one of the replacement heads on hand, Brian decided to take another crack at fixing it. He inserted the new head into the handle, then reinforced it with some Sugru polymer adhesive to keep it from wobbling. We expected this to be a short-term fix, but to our surprise, the repaired brush actually held together pretty well, and we actually thought we might be able to make it work at least until the head wore out.

Unfortunately, this week we discovered the limits of this hack. After performing faithfully for about a year, this new brush finally snapped off right at the handle, just like its predecessor. And since we're all out of refills, there's no way to repair it again.

So at this point, our choices are: (1) Go back to IKEA, buy some more of these not-very-suitable refills, and attempt to MacGyver them into place yet again; (2) Go back to IKEA and buy one of their new toilet brush holders, which will work with the new refills, but won't work nearly as well with our bathroom; or (3) Just give up and buy a cheap disposable brush. Of these, I guess option 2 is probably the most likely to work, but I'm not exactly happy about it.

Case #3: The not-so-waterproof boots

About two years ago, I declared with great triumph that I'd finally found the perfect pair of winter boots: a good fit, leather-free, decent-looking, comfortable, warm, and dry. They were a bit expensive at $80, but I figured that was a good deal for a pair of boots that should "see me through the next several winters."

Fast-forward to the start of this winter, and I've discovered that these boots no longer keep out water the way they used to. A week or so ago I wore them outside on a rainy day, and although I did my best to avoid the deepest puddles, by the time I got home both boots were soaked right through—and it took several days for them to dry out fully.

At this point, I could have just dropped another $80 on a new pair, but it hardly seemed worth it if they were only going to last me through two winters. And it was frustrating having to toss them when they were still in basically good condition, with the uppers still intact and even a decent amount of tread left on the soles. As far as I could tell, the part that was letting in the water was the joint between the upper and the molded sole, and it seemed like there ought to be some way to patch that.

So I did a little hunting online and found this page that suggested two ways to deal with this kind of leak in a winter boot: either a urethane sealer or a natural wax-based product called Sno-Seal. The Sno-Seal seemed less hazardous to work with, and we actually happened to have an old tube of it on hand, but it also appeared to be designed specifically for leather boots; a few sites said that it could actually damage a a nylon boot like this one.

The product recommended most often for synthetic boots was called Aquaseal SR, so we headed out in search of a tube. We eventually managed to locate a similar product, Aquaseal FD, at Dick's Sporting Goods, and I headed home to try it out. I cleaned the boots carefully and applied the stuff kind of like caulk, squeezing out a bead along the seam and pressing it in with a gloved finger. So far I've done the insides of both boots; they'll need about 24 hours to cure, and then I'll do the same along the outsides.

So it's too early yet to say how well this fix will work. However, it only cost $8 to try it, and if it enables me to get even one more winter's worth of wear out of these boots, that will be enough to bring their cost down from $40 a year to less than $30. Plus, it will save me from having to go back to the drawing board looking for that elusive pair of truly durable winter boots that will actually fit both my feet and my lifestyle.

Saturday, May 19, 2018

Repair or replace: Our new used microwave

Brian and I are creatures of habit, especially where breakfast is concerned. My unvarying routine in the morning—at least on weekday mornings—is to pop a couple of slices of bread in the toaster oven, mix up some cocoa and sugar with boiling water in a mug, add milk, and put it in the microwave for one minute. Meanwhile, Brian is loading up his bowl with raisin bran, oats, flaxseeds, nuts, and raisins. (This part of the routine is now in danger, as we discovered on our last trip to Aldi that the price of raisin bran has gone up, leaving us with no packaged cereals that can meet our 10-cent-per-ounce cutoff. You may be hearing more about this in a future blog entry.)

Last week, however, this routine was rudely interrupted. When I put my cup of cocoa in the microwave, I heard a muffled "pop" that I couldn't identify. The microwave apparently continued to run—the light stayed on, the turntable turned, and the fan made noise—but when I pulled the cup out, it was still stone cold.

Not having time to tinker with the microwave at that moment, I simply heated up my cocoa in a pot. However, later that day I got an e-mail from Brian that began, "Been doing a little bit of research on the microwave problem." He found that, first of all, "the high voltage capacitor in a microwave makes it extremely hazardous for the amateur service person to tinker with"—which made it just as well that we hadn't attempted to open it up that morning. Second, the Kenmore website identified "multiple components whose failure might have caused the problem." He summed up the problem thus:
So, to service it ourselves, we'd need to
(1) Safely discharge the capacitor
(2) Identify the component or components that failed
(3) Order those items
(4) Wait for the them arrive (which might be a wait of two weeks or more for some parts)
(5) Make the repair and hope nothing is out of alignment and we're not getting microwave leakage.
The only one that I am confident of our being able to do well with our current resources and patience is #3.
He concluded with "I think this may be a problem that I'm willing throw money at."

I concurred and promptly set out to do some research of my own. First, I checked prices for microwave repairs at Home Advisor, which said it was "usually $70/hour plus the price of parts": a total of $100 to $150 on average. Then I checked ConsumerSearch to find out what a new microwave would cost and found that the best-rated "midsize" model, which was comparable to our old microwave, would cost about $150. The new microwave was readily available at Home Depot, while a shop capable of repairing the old one would take more work to track down—and, when (if) found, would almost certainly need to keep the microwave for several days. In other words, repairing would be a lot more inconvenient, and the savings would be $50 at most and possibly nothing at all. And even if we could fix the old microwave, it would still be a 6-year-old microwave, which presumably would have a shorter lifespan than a new one. In my return message to Brian, I concluded, "Much as it goes against my instincts, I think this is a case where replacing clearly makes more sense than repairing."

However, we couldn't just run out to the Home Depot and pick up the new microwave that evening, since we already had plans (our weekly D&D group). So we had to put it off one more day—and over the course of that day, I did a little more research and made a couple more discoveries. First, the microwave that ConsumerSearch recommended was discontinued by the manufacturer. Second, although it was still available online through Home Depot, there was no way easy to check to see whether any individual store had it in stock. Third, the reason it was discontinued appeared to be because it wasn't very reliable. Many of the recent user reviews complained about it breaking down within a few months—and since it was discontinued, presumably it would no longer be covered by a warranty. Even getting parts for it would be difficult.

I did a little more digging to see if I could find another midsize microwave that was similar to the recommended one, but I came up blank. The closest match I could find wasn't covered in ConsumerSearch and was roundly panned by Consumer Reports. And the ones Consumer Reports liked were mostly available in stainless finish only, which wouldn't go with our old-fashioned white-and-wood kitchen. And it was at that point I asked myself: If we can't find a new microwave that's really ideal for our purposes, why spend the money on a new one at all? Why not buy used?

So I searched Craigslist, and I managed to turn up one almost-new GE microwave, roughly the same size as our old one, for $50 in Bridgewater (about an hour away). It took a while to get through to the owner, but that evening we heard back and found it was still available, and we drove up to get it. It was a bit of a comedy of errors getting into the house; he'd attempted to text us and tell us to meet him round back in the garage, not realizing that the number I'd called him from was a landline, so he was down there and couldn't hear the doorbell when we rang. But eventually we managed to get in and complete the transaction.


Our "new" microwave is now settled in quite happily in the kitchen. We're still adjusting to a couple of things about it, like the lack of an interior light, which still makes me think "Uh oh, what's wrong?" every time I open it, and the slightly shorter interior compartment, which makes my usual bowl-and-inverted colander method of popping popcorn slightly more complicated. (I have to put the bowl in first and then the colander on top, rather than adding them both as a unit, and remove them the same way. But on the plus side, I no longer have to worry about the colander being knocked out of place by the popping kernels, because there's no room for it to move.)

But the bottom line is, we now have a microwave that's actually quite a bit newer and in better condition than our old one, and we only paid half of what it would have cost to repair it. And, since we bought secondhand, we were still saving a microwave from the landfill, even if we couldn't save ours. From an ecofrugal perspective, that's a win-win.

It didn't occur to me until this weekend that this is actually a case of history repeating itself. Five years ago, when our old blender suffered a cracked collar (the part the jar screws into) for the third time in a row, we decided to buy a secondhand one off Craigslist for $10. In that case, too, we ended up with a model that was newer and better than our old one for less than we were planning to spend on parts to fix it. (And, in fact, that same secondhand blender is still going strong five years later.)

So next time something around here breaks, unless it looks like something we can quickly and easily fix ourselves, I'm just going straight to Craigslist. It's probably cheaper than either a professional repair or a brand-new replacement, and it's definitely easier.

Sunday, May 13, 2018

Household Hacks: Summer wardrobe edition

Summer is icumen in, it would appear. In the past week or so, we've had a couple of days that got up close to 90 degrees, and I started pulling some of my summer garments out of storage. Unfortunately, in the process, I discovered that a couple of them were worn out, which threw me face to face with that age-old ecofrugal dilemma: repair or replace?

The first problem popped up on the first day I ventured out in sandals. My current summertime solution to the shoe conundrum is a pair of sturdy Columbia sandals in a "big kids" size 5. Because boys' and girls' shoes are both the same size and width, this shoe fits just fine on my wider foot; it's a bit long, perhaps, but the adjustable straps allow me to keep it snug. And as a bonus, kids' shoes are usually a bit cheaper than those designed for adults, so I was able to pick these up for only $30 or so at Famous Footwear.

After being worn nearly every day for the better part of two summers, the soles of these sandals were seriously worn down. In the middle of the ball of the foot, especially, there was a spot where the rubber was nearly worn through. I'd noticed last summer that they were starting to wear and tried to patch them with Sugru (the stuff we used to repair our old toilet brush), but it didn't stay put. So when I first put them on this summer and found I could nearly feel the pavement through them, I thought they were probably done for. Given that I'd worn them regularly through two summers, you could hardly say I hadn't gotten my money's worth out of them, but I was still disgruntled at the thought of having to shop for a new pair. I'd originally bought these at Famous Footwear, but the selection there is ever-changing, and I couldn't be sure of finding them.

So I decided to have one more go at patching them, this time using a product that's more or less designed for the purpose: Shoe Goo. Unfortunately, I didn't think to take a "before" picture of them, but even in this "after" picture of the repair job, you can see the wavy texture of the worn patches. What's not clear from the picture is how well they'll hold up. I've used Shoe Goo on worn shoes before and managed to get another couple of months of wear that way, but it eventually gets dirty and peels off. So it's not clear whether this fix will be enough to keep this pair of shoes going through the summer, but at least it will save me from having to hunt for new ones in a hurry.


I also ran into difficulties the first really warm night of the year, when I switched to my summer sleeping attire—an old tank top and a pair of men's boxers. I've had these for a few years now, and the waistband elastic, as you can see here, is almost completely kaput.


What I'd normally do in this situation is add a drawstring, as I did with these shorts three years ago. However, the way this waistband is designed makes that technique impractical. It's all one solid piece of elastic, so there's nothing to slip the drawstring through.

Now, these are actually cheap enough that buying a new pair would be no big deal. But the idea of tossing out the old ones just irked me. The fabric was all still perfectly good; it was only the elastic that was worn. It seemed like throwing them away just for that would be a blot on my ecofrugal escutcheon.

So I did a little experimenting and eventually found that if I could just wrap them a little tighter in the front and secure them somehow, I should be able to get them to stay put. So I folded over a big flap of fabric in the front, stitched it together, and attached a button...


...and cut a small buttonhole through the waistband opposite.


The finished result isn't exactly elegant, but it should be enough to keep them from falling off, which is all that really matters for night wear.


So with those two quick fixes, I should be more or less set for summertime. I don't know how well either of them will hold up, but even if I end up having to buy new sandals or sleep shorts before the summer is out, at least I'll know I didn't give up without a fight.

Saturday, May 13, 2017

Computer woes

Once again, the repair or replace dilemma has reared its ugly head to trouble the peace of our ecofrugal life. And once again, it's my computer that's to blame.

Over the past few weeks, my little 6-year-old Mac Mini (well, actually, 7 years old, since it was a refurbished 2010 model when we bought it in 2011) has developed a very frustrating habit. In the middle of some seemingly innocuous activity - pasting a bit of text, clicking on a link, or even just scrolling through a document - it will suddenly freeze up and refuse to respond to any commands at all. You can still move the mouse, but it does no good, since any other program you click on will just freeze up as well. Generally, it comes to again after a few minutes, but sometimes it appears to come to, only to go straight back into its seizure the minute you try to do anything. The only thing that's guaranteed to fix the problem is a hard reboot (which sometimes involves shutting the power off at the source, because the computer won't thaw out long enough to let me shut it down properly).

Now, there are all sorts of problems that can cause a Mac to manifest the spinning beach ball of death, including processor overload, memory overload, insufficient hard drive space, and overheating. All of these are fairly simple to fix. But Brian noted that whenever my computer did this, the spinning ball was often accompanied by a high-pitched whining sound, almost too high to hear, emanating from the machine. That was an ominous warning sign that it could be the hard drive at fault - and that's definitely not a quick fix.

According to this IFixIt guide, replacing the hard drive is only a "moderate" difficulty job, but if that's true, I'd hate to see a difficult one. It takes 23 separate steps just to remove the old drive, each of which has to be repeated in reverse to put the new one in. It would also require at least $20 worth of specialized tools we don't currently own, on top of the $60 or so for the new hard drive itself. And that's just the hardware part of the job. Once that was done, we'd have to reinstall the operating system and all the software - a job that took the better part of a weekend to complete last year, because this Mac is so ancient in computer years - and restore all my data files from the backup drive. It would be, to say the least, an Undertaking. (This article at The Verge, by someone who performed a similar operation on a somewhat newer Mac, describes it as a "horrifying" experience.)

We also looked into what it would cost to replace the machine entirely. I had already decided that this machine was going to be my last Mac, even though I've been a loyal Apple user for over 30 years (ever since I got my first Apple IIc as a bat mitzvah gift from my grandfather), precisely because this "horrifying" upgrade process is all too typical of the way Apple does business these days. They seem to go out of their way to make it as hard as possible to upgrade an old machine, because they don't want people to upgrade; they want them to throw it out and buy the latest model instead. This business model is exactly the opposite of ecofrugality, and I'd made up my mind I wasn't going to support it any longer. So I checked the ConsumerSearch report on desktop computers and found that the "best cheap computer" was the Intel NUC, an ultra-compact machine that can be customized to fit your particular specs. Brian found that a kit that would meet my needs would probably cost between $500 and $600 (including an add-on CD-ROM drive, which I use for ripping music CDs).

But we decided perhaps it was best not to get ahead of ourselves. We didn't know for sure that the problem was the hard drive, and we didn't have the necessary tools to figure it out at home. So we took it to one of our local computer repair places, Linx 8, which specializes in Apple repairs. We'd already checked with them and found that if we left it with them, they could run a set of diagnostics on it to pinpoint the problem, and they wouldn't even charge us for it. So we figured we had nothing to lose by trying it. The only question was, if they found it was the hard drive that needed replacing, how much should we be willing to pay to replace it? We already knew that we could, in theory, do it ourselves for around $80, but only at the cost of many hours of hard work and aggravation and a nontrivial risk of screwing the process up. So how much was it worth to us to avoid that?

Brian and I came up with different answers to this question. Brian's thought was that it was definitely worth $150 - twice the cost of doing the repair ourselves - but $200 would be pushing it. I, by contrast, thought that, according to Jeff Yeager's 50 percent rule, we should be willing to pay up to $275 to fix the machine - half the cost of replacing it. But since he was the one who would probably end up doing most of the work if we did it ourselves, I figured it was his decision to make.

So, when he shop called this afternoon to tell us that my Mac did indeed need a new hard drive, and their fee to replace it - including reinstalling the OS, but not any paid software applications - would be $270, I turned to Brian before giving them an answer. And his response came in two parts: a somewhat disgruntled sigh, followed by consent. It was more than he really wanted to pay, but if it came to a choice between paying the fee or spending the whole of next weekend working on my computer, it was preferable to pay up. (He said no, however, to the additional $75 charge for migrating over all my data, including the large music library. We'll have the original hard drive back from them, as well as the backups, so he thinks we should be able to manage that part ourselves.)

So they're working on that as I type (on Brian's work laptop, borrowed for the weekend), and we should be able to pick up my computer tomorrow or Monday. And I, for one, think we made the right choice. It wasn't the cheapest in dollar terms, but I think it strikes the best balance between saving money, avoiding waste, and minimizing stress. If paying an extra $190 can save us an entire weekend spent fussing over my computer - and keep the old one out of the landfill a little longer - I think it's money well spent.

Wednesday, December 28, 2016

Money Crashers: Should I Repair or Replace a Broken Appliance?

One of the basic premises of the ecofrugal life is that it's usually better to repair an item, if you can, than to replace it. Repairing is usually cheaper; it prevents waste; and it saves the energy and other resource costs of making a replacement item. That's an ecofrugal win-win-win.

However, every rule has its exceptions. Sometimes repairing an item isn't possible, or is so difficult as to make it impractical. Sometimes it actually costs more than replacing. Sometimes it's cheaper, but only just, and the additional years of life you'd get out of the repaired item aren't enough to justify the cost. And sometimes keeping your old item can actually cost you money, as in the case of an old appliance that uses vastly more energy than a newer model. In a case like that, replacing would actually be both cheaper and greener in the long run.

Back in 2011, I did a whole series of posts exploring this "Repair or replace?" dilemma. It started with the case of Brian's old bike, which needed a moderately pricey repair to keep it running, and how that compared to my old computer, which I'd chosen to replace when an upgrade failed to get it up to a reasonable working speed. I went on to examine other specific cases—a damaged pair of boots, an old coat in need of alteration—and concluded with a set of general rules I'd found for deciding when repair is a better option than replacement, and vice versa. (This whole series is now marked with the label "repair or replace," so you can view all the posts on one page if you like.)

Recently, I decided to sum up my findings from all those posts with my readers in a single article on Money Crashers. It compares the benefits of repairing and replacing in detail and then outlines a series of questions to help you decide which is the better option in any given case. In brief, the questions are:
  1. How hard is it to repair?
  2. How do the costs compare?
  3. How worn out is it?
  4. Is it costing you money?
  5. Will its value increase?
  6. What's the disposal cost?
  7. Do you love it?
This, in short, is the article I wish I'd had handy for reference back when we first started having trouble with Brian's bike five years ago. If you have anything broken lying around your house and you just can't decide whether it's worth repairing, perhaps this article can make your decision about repairing it a little easier than ours was back then.

Should I Repair or Replace a Broken Appliance? – Here’s How to Decide

Thursday, February 14, 2013

Repair or replace: a new wrinkle

I've discovered a new wrinkle in the "repair or replace" equation: sometimes, the cost of a replacement is actually less than the cost of a repair. Especially when the replacement is purchased secondhand.

Case in point: our blender is about four years old. We've had it about four years, and it worked fine for the first year or so. Then the collar—the plastic part that holds the pitcher on the base—cracked, causing the blender to leak whenever it was used. Being ecofrugal types, our first thought was to repair it, so we fixed the crack with superglue. However, before long the collar cracked again in a different place, so we figured we'd just replace the part. Just to be on the safe side, we ordered two, figuring that if this part is the weakest link in the blender mechanism, we might as well have a spare. And that turned out to be very prescient of us, because the replacement collar cracked after a few months of use. And then the spare one did the same.

At this point, rather than order another round of replacement parts, Brian decided to try again to repair the one we had—this time filling in the entire area over the crack with the epoxy. And that worked, sort of. The collar held together, but fluid still seeped into the crack, so instead of a big leak, we got a little trickle of blackish fluid from the bottom of the jar every time it was lifted off the base. This got old pretty quickly.

So today, I went online looking for the replacement part again. Brian suggested ordering three of them this time, since we seem to go through them so quickly. I was grumbling to myself about having to spend $10 a year just to keep this blender working, and I found myself wondering whether it would be cheaper in the long run to replace it. At first blush, the answer appeared to be no, because the top-rated blender at ConsumerSearch is priced at $200, and for that price we could replace the collar another 40 times. There was a budget model that cost only $65, but when I checked the detailed report on it, I found that it had some durability problems—so we might pay $65 up front and still end up having to buy replacement parts within a year. I found myself feeling nostalgic for my mom's old Oster, which was built like a brick house. It was big, heavy, and loud, but its metal parts took a licking and kept on ticking. And then it hit me: "If what you really want is an old blender, why not look for one?"

I tried searching the "appliances" section on Craigslist, but I didn't get many hits in our area. Then I expanded my search to the entire site and discovered a whole bunch of posts that included one or more blenders lumped in with a bunch of other household items. One seller, within striking distance of our house, was offering three blenders, all priced between $5 and $12. And it took me only a moment to calculate that any one of these would cost less than the $16 plus shipping we were about to spend on replacement parts for our existing blender. We could buy a whole new blender for $10, and even if it lasted only one year, we'd come out ahead.

So, to cut this long story short, we are now the proud owners of a secondhand Black & Decker blender, complete with a spare pitcher, all for a measly ten bucks. According to the seller, it's only a few months old, so we actually got a blender that's several years newer than the one we have now for less than the cost of the parts we'd need to keep the old one running another year. (I was actually a bit disappointed that it wasn't a solidly built model from the seventies with all-metal parts—maybe in a nice avocado green—but I guess people who still own those old troopers are holding on to them.) We've determined that it runs, and it isn't significantly louder or quieter than our old blender—and best of all, the base that holds the pitcher is BIG, spreading the weight of the glass pitcher out over a much larger area than the small, easily-stressed collar on our old model. So that part, at least, should hold up better than its predecessor.

All in all, I'd have to say that in this case, replacing was definitely the more ecofrugal choice. By replacing the old blender, rather than continuing to buy new parts for it, we're reducing waste; by buying the new one secondhand, we're reusing as well; and if we can find anyone on Freecycle willing to take our existing blender as-is, we can keep that one out of the landfill a little longer too.

And yes, this does mean that we celebrated Valentine's Day by going out and buying a cheap blender. Hey, to a tightwad with green sensibilities, that's way more romantic than a dozen pesticide-laden roses—and it will last a lot longer.