Showing posts with label clothing. Show all posts

Sunday, August 10, 2025

Darn, not so tough

See this picture? What you are looking at is something that, in theory, you should never see: a darned Darn Tough sock. To understand how this came about, I'll have to start at the beginning and explain how Brian and I became aficionados of Darn Tough in the first place, and why we aren't any longer. 

For several years, Brian and I were big fans of Smartwool socks. We both relied on them throughout the winter because they were warm, non-itchy, and machine washable. True, after a couple of winters they would start to grow threadbare and eventually develop holes that required darning, but we assumed the same would be true of any brand.

Then, a few years ago, we learned about Darn Tough. This brand also offers washable, itch-free wool socks, and folks in the Reddit Buy It for Life forum consistently claimed theirs were far superior. Some Redditors said they'd been wearing the same pair of Darn Tough socks for five, six, even ten years with no sign of the thinning and holes that had plagued our Smartwool ones. The company even backs up all its socks with a lifetime guarantee: if they don't live up to your expectations, it will replace them, no questions asked.

So, rather than buying Brian more Smartwool socks for Christmas in 2022, I decided to spend a few extra dollars per pair on Darn Tough socks. And for the first couple of years, they seemed to live up entirely to the hype. They were warm, comfortable, and as far as we could tell, super sturdy. We were both so impressed with them that I invested another $30 in a third pair for him last year and was planning to spring for a couple of pairs for myself as soon as my old socks wore out.

And then, last week, while hanging up a load of laundry, I discovered a tiny hole in the foot of one of Brian's two-and-a-half-year-old Darn Tough socks. If it had been any other sock, I'd just have whipped out the old sewing kit and darned it in a minute or two. But in a sock that I'd paid $13.50 for (half of a $27 pair) less than three years ago, and that I'd been assured would last at least five, it seemed like an insult.

Small as the hole was, it shook my confidence in the brand. I began to wonder if it was worth buying any more of them in future, or even keeping them on my list of holiday gift ideas for Brian. Going back to Reddit to look into the matter, I discovered numerous posts suggesting that Darn Tough's quality had been slipping in recent years. One thread from six months ago argued that, while they're good socks, they're not really $30 socks, and the lifetime warranty is simply a "marketing strategy" to get away with selling them at that price. The author linked to a YouTube video testing Darn Tough's wool hiking socks against several less expensive brands, and the reviewer found that their overall performance was "pretty average." Darn Tough was in the top half of the pack, but four less expensive brands did better—and one of the absolute top performers was Costco's Kirkland Signature, which costs only one-eighth as much. Many Redditors responded by defending the brand, but others agreed that it's overrated, and a few piped up to say they prefer the Costco socks.

This answered one question. If we could get socks of equal or better quality for $3.75 a pair, clearly there was no point in spending $30 on Darn Tough anymore. But it left the question of what to do with the old pair. Should we attempt to take advantage of the unconditional warranty and see how good the brand really was about honoring it? Or should we just darn them and be done with it?

After some consideration, Brian suggested we should give the warranty a go. It would be more work and it would mean being without the socks for a few weeks, but he felt like the company ought to be held to account for its lapse in quality. So I went online and filled out the paperwork to do an exchange. The process was quite easy, but the last step pulled me up short: The site informed me that to get a new pair, we'd have to return the old ones at our own expense. So the "free" replacement wouldn't truly be free; it would cost at least $3 for shipping, almost as much as a whole new pair from Costco. Given that we could simply darn them and carry on using them for the cost of only a few cents' worth of thread, it didn't seem worth it.

So our plan now is to treat these Darn Tough socks the same way as all our other socks. We'll keep them in service until they wear out, darning up the holes as long as it's reasonably possible to do so, and when that stops working, send them off to textile recycling. But we see no reason ever to invest $30 in another pair. Instead, we've shelled out $15 for four pairs of the Kirkland socks. We hope they'll prove at least as durable as their predecessors, but even if they start to develop holes after just one year instead of two and a half, they'll still be a better value.

Sunday, July 20, 2025

Ecofrugal episodes, July 2025

Time for another exciting installment of ecofrugal episodes, in which I fill you in on all the little things that have been going well and not so well in our ecofrugal life. This past week or two has had a mix of both, so I'm doing the post in "hits and misses" style.

Hit: Our first trip to Savers

Last weekend, Brian and I went to visit my sister and her family in Boston. One of the things we did there was visit Savers, a for-profit thrift store chain we don't have in our area. (There's a store in the same family, called Thrift Superstore, in Union, but that's a good 40 minutes away.) The store has a good selection and decent prices, but no dressing rooms, so we had to either try things on as best we could in the aisles or take our best guess about the size. Brian got one pair of jeans and a new pair of Ren Faire shoes, since his current set (also thrifted) has proven insufficiently supportive for a long day of walking. I got one fairly cute top and a pair of warm tights for winter. (It's not clear how big a hit that purchase is, since I still don't know if they fit. I couldn't try them on in the store, and after we got them home it was too hot. But for only a couple of bucks, they seemed worth the risk.) 

Since my sister's family also brought along four bags' worth of used clothes to donate, they got four coupons good for 40% off on up to $100 worth of purchases and gave one to us. With that discount, our total cost was $26.87 for the four items. That's not breathtakingly cheap, but it's clearly cheaper than buying new, which isn't always the case at thrift shops nowadays.

Miss: A sustainable-living guide that doesn't

On our way back from Savers, we stopped by a farmers' market. One of the booths there was a used-book stall run by the local public library. I can't pass by a table full of books (especially cheap ones) without at least taking a look, and I always like to support libraries when I can, so I spent $2 on a paperback copy of The Self-Sufficiency Bible, by a Brit named Simon Dawson. The cover promised "100s of Ways to Live More Sustainably - Wherever You Are," so I was hoping there might be at least a handful I didn't already know about.

Unfortunately, like many books on this topic, this one proved to be a mix of things I already do and things that aren't relevant to me. The three chapters on "The Home Dairy," "Livestock," and "Meat Preparation and Basic Butchery" were of no use to us at all. The chapter "Curing and Preserving" wasn't completely irrelevant, because the instructions for preserving meat were interspersed with pointers on pickles, chutneys, sauces, jam, and dried mushrooms and herbs. But most of this was already familiar to us, as was everything in the chapter "The Home Baker." And parts of the chapter "The Kitchen Garden" were clearly aimed at a British audience and didn't apply to us, like the advice that tomatoes and peppers are "likely to disappoint you" if you try to grow them outdoors. 

There were also a few tips that didn't seem to fit the "self-sufficiency" brief. The chapter on "Natural Solutions: Health, Beauty, and the Home" contained numerous recipes for natural cleaners and beauty products made from ingredients that you clearly can't produce yourself and aren't cheap to buy, such as cocoa butter, sandalwood oil, and avocado. His homemade hair conditioner recipe ("beat an egg either with an avocado or a banana") would cost a minimum of $1.16 per application, while my Suave conditioner costs around 9 cents

Also, the few chapters that looked like they'd be most useful, like "Arty Crafty Bits," largely glossed over the details of the things I was keenest to learn about. The section on knitting lists all kinds of things you can make this way, but never actually talks about how to do it; the section on making your own clothes advises you to "buy a good, lightweight machine...and get sewing," as if setting the machine up and threading it and using it required no explanation. And on top of this, the book is peppered with errors, both mechanical ("it's" for "its," "forraging") and factual (saying that rhubarb leaves are unsafe to compost, describing wood as a green energy source).

Despite these drawbacks, I did manage to glean a few useful tidbits from this book. I learned (and confirmed from reliable sources) that it's best to water seedlings before transplanting them so you lose less soil; that you can make an alcoholic "turbo cider" from store-bought juice in a couple of weeks; that you can knit with strips of fabric rather than yarn; that the comfrey plant growing next to our recycling bin can be eaten (in moderation); and that you can preserve mushrooms at home by air-drying or freezing. But having filed away those facts, I don't see any need to keep the book on my shelf for future reference. I'll either donate it to our library book sale or drop it into one of our town's many Little Free Libraries so it can go to someone who may get more use out of it.

Hit: DIY shower indicator buttons

When Brian and I bought new shower control knobs nine years back, they came with little plastic "indicator buttons" to identify the hot, cold, and direction knobs. These weren't truly necessary, since most people know which is which, but they served to cover up the mounting screws. Unfortunately, within a year, these buttons started to fall apart. They wouldn't stay in place because the little teeth that held them in the knobs had come loose and begun to fall out. This looked like an easy fix; we just bought a new set of indicator buttons for about $5 and swapped them out. But within another year or so, these buttons also began to fall apart in exactly the same way. I looked for metal indicator buttons that I thought might be more sturdy than the plastic ones, but I couldn't find any to fit our faucets.

So, with two of our faucet knobs now sitting there naked and the third button hanging on by a thread, I started brainstorming ways to rig up a DIY version of these buttons. I considered metal bottle caps, but we don't tend to buy drinks in glass bottles, and I wasn't sure how I'd get them to fit into the faucets. I also thought about gluing some decorative beads in place, but that would make it impossible to get at the screws. Finally, I concluded that the best fix would be a couple of large metal washers tucked under the screws. This would leave the heads exposed, but it would hide the dingy, mineral-stained surface underneath. And if the washers themselves got dirty, I could easily remove, clean, and replace them.

I found two washers in our collection that were just the right size and painted them with nail polish: red, which I already had, for the hot-water tap and blue, which cost me $4 at the local discount store, for the cold. It was the work of a couple of minutes to remove the screws, thread the washers on, and screw them back in. With these in place, the damaged knobs look much more presentable. And whenever that last button gives up the ghost, I can give the middle knob the same treatment.

Miss: Shaky sunglasses repair 

On sunny days, I wear special sunglasses designed to fit over my regular glasses. They're much cheaper than a pair of prescription shades, and they're easier to put on and take off because I don't need to stash my other glasses. Their weak point, it turns out, is durability. This month, the frames cracked right across the top. Brian thought maybe he could mend them with epoxy, but the difficulty would be figuring out how to clamp them while the glue dried. I decided instead to shell out $2 for some fast-drying superglue from the discount store and try to fix them that way. I laid them out on a sheet of newspaper, put on gloves so I wouldn't glue my fingers together, dabbed on a little glue, and held the joined area in place for about a minute to let it set.

At first, this simple repair seemed to be holding. Then the crack opened back up, but only partway. I glued it again, but after a week, it popped open completely. I got out my tools and glued it one more time, but this time there was a slight mishap; I got a bit of glue on my glove, which then got stuck to the inside of the nose piece. I was able to pull most of the nitrile off, but there's still a little scrap of blue there that will have to be scraped off with a utility knife. And it remains unclear whether this second repair will hold any better than the first. If it doesn't, I'll have to move on to more complicated methods: either adding a splint along with the glue, as suggested at Eyeglass Repair USA, or plastic welding.

Miss: High quotes for heat pumps 

Last month, in the wake of a brutal heat wave and the passage of a bill that will kill home electrification credits at the end of this year, Brian and I took another stab at getting quotes for a home heat pump. Three weeks ago, after talking to two contractors and getting one quote back, I was feeling doubtful. Now, after five consultations and four quotes (the fifth one never got back to me, even after a follow-up call), I'm even more pessimistic. 

The bottom line seems to be that a system that can completely replace our gas boiler will cost well over 30 grand. That doesn't include the $10,000 decarbonization credit that the first contractor mentioned, but that's because none of the other contractors I spoke to believed that this credit actually exists. More than one of them said that PSE&G has been talking about such a program for years, but nothing has ever happened, and there's no evidence that this year will be any different.

Now, if we were willing to settle for a hybrid system—one that would supplement rather than replace the boiler, reducing our gas usage—we could probably do that for between 20 and 25 grand, including the upgrades to our electrical panel. But that's still a lot of money, and the new system would probably cost as much to run as our current one, if not more. So the costs would continue to pile up every year.

What I'm starting to wonder is, if we're only going to reduce, not eliminate, our use of fossil fuel for heating, do we even need to install a whole-house system? Maybe we could just replace our old through-the-wall air conditioning unit with a heat pump that could provide supplemental heating as well as cooling. It looks like we could buy one for around $1,000, and since it would be replacing an existing unit, the installation cost shouldn't be more than another grand; we might even be able to install it ourselves. We'd still need to use the gas boiler, but the heat pump could probably cut our gas use by half, and for less than one-tenth the price of a complete system. It would be like the heating equivalent of our little induction burner: not a full replacement for a gas appliance, but one that can take over most of its duties for a fraction of the price. Am I crazy, or is this the ecofrugal way?

Monday, June 16, 2025

Even more ecofrugal episodes

Nothing happened this week that seemed big enough to warrant an entire blog post on its own, so instead I'm doing another of my ecofrugal episodes posts—a roundup of the small successes and failures in our ecofrugal life. Fortunately, this time the successes outnumber the failures. 

Item #1: A grout makeover  

My birthday request this year was for Brian to replace the grout in our upstairs tub-shower, which had developed stains that no amount of scrubbing could remove. (This photo—taken after the grout had just been cleaned—doesn't really do it justice, but it should give you an inkling of how bad it was.) It wasn't until this month that we finally had a free weekend to tackle the project, and we ran into a couple of setbacks while carrying it out. 

First, after he'd already scraped out as much as he reasonably could of the old grout, Brian discovered that the pre-mixed grout he'd bought to replace it was was actually sanded grout, which isn't recommended for narrow gaps like this. (It would have been nice if the package had said this on the front, rather than in small print on the back.) So we had to make a hasty trip to Home Depot to replace it. We also grabbed an extra tube of caulk, just in case we needed extra. At first, Brian thought this purchase had been a waste of money, since the old tube ended up having enough in it to fill all the joints. But he learned otherwise the next morning, when he discovered that the caulk he'd just applied, which was supposed to set up within two hours, was still liquid. Clearly it was no longer good, so he had to spend part of that morning laboriously removing all the goo and replacing it with fresh caulk from the new tube. 

So this birthday request proved to be more of a hassle than we expected, but it turned out well in the end. Every time I've stepped into the shower this past week, I've been delighted at how fresh and clean the grout looks now. Brian even took the extra step of repainting the grungy-looking trim on the tub window, so the whole enclosure now looks sparkling and new. Once the new grout has had a couple of weeks to cure fully, we're going to follow up by applying a sealant, which will allegedly keep it fresh and stain-free  for the next few years. And even when it wears off, we can just apply a new coat, rather than going through this entire messy job again.

Item #2: Pride pants 

Recently, I noticed that my older pair of blue jeans was starting to wear out in the thigh area. This is a common occurrence for me, but this time the pattern was a bit unusual: instead of spreading across the whole inner thigh area, the threadbare sections were confined to a line right along the inseam. I thought this would be a good spot for a little visible mending, but wasn't sure whether it made more sense to darn these tiny holes individually or try to cover all of them with a patch. 

I went hunting for suggestions online and came across this image: a long row of stitches in different colors of embroidery floss running down the length of the seam. I decided to try a similar idea, but with a rainbow color scheme. The whole worn area was about 12 centimeters long, so I divided it up into sections of roughly 2 centimeters for each color. I started at one end putting in parallel stitches in red embroidery floss, then about 2 centimeters down I tied off the red thread and started on orange, and so on down the spectrum to purple.

I've only done one seam so far, since the wear on the other isn't quite as bad, but eventually I intend to do the other one to match. The stitching is far from perfect, but it's colorful and cute and gives me a little boost of happiness every time I wear these jeans now. And it's just in time for Pride Month!

Item #3: Repair, then replace 

About a year ago, our old toilet seat broke. Rather than buy the cheapest model to replace it, we decided to spring for one with "soft close" hinges. I quite enjoyed this feature, but unfortunately, these slow-closing hinges weren't very durable. A couple of days ago, I noticed that the lid was askew, and when I examined it, I discovered that one of the hinges had snapped clean through. I managed to wiggle it through so that the lid could close fully, if no longer softly, but this clearly wasn't going to be a long-term solution.

Rather than run out to buy a whole new toilet seat, Brian decided to try repairing the hinge with epoxy. He applied the glue to both broken edges, then clamped the lid in the open position overnight to give it plenty of time to set. But sadly, as soon as he unclamped it in the morning and tried lowering the lid, it snapped straight apart again. 

Although this repair wasn't a success, I still think it was worth making the attempt. It didn't cost us anything except a little extra time, and we had no way of knowing it wouldn't work unless we tried it. And now that we know, we feel no guilt about discarding the broken toilet seat and spending $40 on a replacement. (This time around, we spent $10 more for one with metal hinges, which we're assuming will hold up better. Paying the extra $10 now seems like a better deal than spending $30 to replace the whole thing again in another year.)

Item #4: Whipping it good 

Ever since we first started cutting back on dairy products back in 2018, we've been looking for a decent substitute for whipped cream. We tried numerous homemade versions using various combinations of coconut cream, aquafaba, and plant milk, with results ranging from near success (but not quite) to colossal failure. We tried a commercial product called Coco Whip that worked reasonably well in a raspberry fool, but the store where we found it has since stopped carrying it. And we tried one or two commercial plant-based cream substitutes that were so unimpressive I didn't even bother blogging about them.

But on a couple of recent trips to Trader Joe's, we've noticed a product in their dairy case called "Vegan Heavy Whipping Cream Alternative." We couldn't remember if we'd tried this one before, but at only $4 a pint—about the same price as regular cream—we didn't have much to lose by giving it another go. So we grabbed a pint, and last weekend Brian took a crack at using some in a honeyberry fool (a phrase I love having the opportunity to say). And right away, we noticed that this stuff actually was whipping up like real cream. It formed genuine stiff peaks that held their shape and didn't collapse even when we folded in the berry mixture. And if the flavor and mouthfeel weren't exactly identical to real cream, you could hardly tell by the time it was combined with the berries.

We only used about half the pint for this experiment, so we're going to try tinkering with it further, seeing if it can make a plant-based ice cream that works better than our iced coconut cream (which didn't turn out so well the second time we tried it). If it works for that too, we'll probably stop messing around with DIY versions and make this our go-to substitute for any recipe that calls for cream—possibly even our anniversary cake.

Item #5: Extension cord life extension

One of the items we picked up at last year's yard sales (or, to be exact, from the piles of discards after the sales) was an electric hedge trimmer. It's just a light-duty plug-in model, but since our property only has one hedge and we only trim it a couple of times a year, it's been perfectly adequate for our needs. But last Friday, Brian discovered its biggest drawback: make one false move with it and you cut right through your extension cord. To add insult to injury, he had noticed that the cord was in harm's way and was just attempting to move it out of the way when it happened. 

Naturally, he was quite annoyed that this one brief slip had, as he thought, totally destroyed an extension cord that would cost around $17 to replace. But then he discovered that it's actually possible to cut off the damaged portion and attach a replacement connector, which only costs about $3. You just end up with a slightly shorter cord—in this case, 47 feet instead of 50, which is still plenty for our small yard. Less cost, less waste, and less frustration about having damaged the old one. (Of course, if this keeps happening, the cord will gradually get shorter each time until it's too short to be of much use. But I suspect after this incident, he'll take extra care to keep the cord out of danger in future.)

Sunday, February 23, 2025

Two clothing repair challenges

It turns out my clever plan to reinforce the thighs of my corduroy pants with a honeycomb stitch really wasn't all that clever. It took me at least two hours to stitch both sides of the pants, and within three months, they were falling apart again. Not only had the threadbare area expanded well beyond the borders of the original darn, but the threads in the darned area itself had worn through and broken off in several places. This left nothing to protect the fabric underneath, which had started to develop actual holes. They were still small, but clearly re-darning the area wasn't going to do much to keep them from growing. If I wanted to save the pants, I was going to need a new fix.

Since darning hadn't worked, I decided to move on to an entirely different technique: patching. I didn't have any fabric remotely similar to the original grey corduroy, so I decided to go for a complete contrast instead. Down in my scrap bin, I had a fairly good-sized bolt of colorful striped fabric in good condition that we'd picked up at a yard sale or somewhere. I cut two pieces of this large enough to cover the threadbare areas on both thighs, right over top of the honeycomb stitching. That saved me the bother of picking it all out (and possibly weakening the fabric in the process). 

I left a little extra space around the edges of each patch so that I could hem them. I folded over the raw edge and sewed it down using a back stitch. They came out a little bit lumpy, but more structurally sound than just a chopped-off piece of fabric. 

Then, using my usual whip-stitch technique, I sewed the two patches in place. My first attempt was a little messy, as I didn't pin the fabric down first; I just followed the line of the seam in the pants. That worked fine along that one edge, but it didn't secure the entire patch well enough to keep it smooth and flat, so the fabric underneath ended up a little puckered. I couldn't bring myself to pick out the seams and do it over, but I did make a point of carefully pinning the second patch before stitching it so that it would come out neater.

All told, this repair took me a couple of hours, about the same as the first one. But I'm hoping it will hold up longer and maybe justify the amount of effort I put into it.

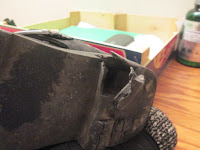
Sadly, I don't think there's any equally simple fix for the wardrobe item that most recently fell apart on me: my two-year-old black ankle boots. They already had cracks in the sole that Shoe Goo had proved unable to fix, making them too leaky to wear in the rain. But when I wore them out on a walk today, one corner of the heel simply disintegrated, leading me to suspect that I won't be able to wear them even in dry weather for much longer. 

You can't replace the heels on a cheap pair of boots like this, and at this point, there's so little left of the sole that there wouldn't really be anything to attach it to anyhow. The only question is whether I can come up with some sort of hack that will allow me to get another couple of months of use out of the boots—long enough to get me through the multiple rounds of trial and error it will no doubt take me to find a replacement.

Monday, January 20, 2025

Thrift Week 2025, Day 4: Clothing

When you picture a rich person, how are they dressed? Designer labels from head to toe? According to the Washington Post (gift link), Town & Country magazine, and the Style Theory channel on YouTube, that's a bit wide of the mark. There certainly are well-to-do folks who dress that way, but the really rich tend to go for "quiet luxury." Their clothing doesn't bear any obvious brand labels; in the words of O. Henry, it "properly proclaim[s] its value by substance alone and not by meretricious ornamentation." You'd have to look at it very closely to notice the details that make it so expensive: the luxe fabrics, the impeccable stitching, and crucially, the flawless fit. They often have garments altered, made to measure, or even custom made to fit them exactly.

So how do you get this look for less? The Style Theory video suggests starting with off-the-rack garments from mid-tier brands like Banana Republic or J. Crew, then getting them tailored for "an additional $20 or so" to give you that custom-fit look. But several comments on that video argue for my preferred approach: starting out with thrifted garments. In the first place, secondhand clothes from those same medium-priced brands will cost less than new ones; in the second place, they'll most likely be better made, as all but the highest of high-end clothing lines have cut back on quality in recent years to churn out clothing faster and more cheaply. You can take those secondhand clothes to the tailor and end up with a custom-fitted garment for the same price as you'd have paid for a lower-quality new garment straight off the rack. (This is also a handy strategy for those of us who have trouble getting a decent fit in new clothing. Rather than hunting all over for that elusive pair of pants that fits over the hips without gapping at the waist, we can just buy one that fits in the seat and have it taken in to close the gap.)


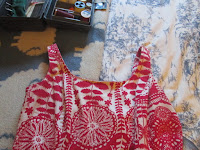
Now, while this thrift-shop-plus-tailoring approach costs a lot less than buying high-end brands to start with, that doesn't mean it's cheap. As I recently discovered, high-quality secondhand garments can actually cost significantly more than new ones from cheaper brands (though they may give you more quality for your dollar). Also, depending on what you want done, tailoring can cost quite a lot more than the $20 benchmark quoted in the Style Theory video. I was originally planning to have my Treat for Today be taking an item to the tailor: a red sundress I'd bought for $19 on eBay that was too big in the shoulders. I'd managed to make it wearable by pinning up the straps and loosely basting them into place, but the excess fabric made an awkward lump that I had to hide under a jacket. I figured for around $30 more, I could have the straps professionally adjusted and get myself a perfectly fitted dress for under $50 total. But when I got the dress to the tailor shop, they informed me that this simple alteration would actually cost $50 all by itself. (I also inquired about the cost of adding pockets to the dress, and that would have raised the price tag to $100.)

At that price, I wasn't sure this alteration would really qualify as an affordable luxury. So, before springing for it, I brought the dress back home and did a little investigation to see how hard it would be to shorten the straps myself. When I found a YouTube video showing a method that didn't require a sewing machine and looked well within my modest abilities as a seamstress, I decided to take the plunge. 

First, I turned the dress inside out, put it on, pinned the straps up to the right length, and stitched them in place. Then, I added an extra step not shown in the video: I turned the dress right side out again and tried it on to make absolutely sure I had the shoulders adjusted correctly. I knew once I took the next step—cutting the fabric—there would be no going back, so I followed the old carpenter's rule: measure twice, cut once.

Then I took the dress back off and, with some trepidation, made the fateful cut. I stitched the fragments of fabric down as shown in the video, then did the same on the other side. And when I turned it back right-side out and put it on again, lo and behold, it fit! With my rudimentary sewing skills, about a quarter's worth of thread, and about half an hour of work, I'd managed to make a perfectly respectable job of an alteration that would have cost $50 to have done professionally. My work may not look quite as neat as the tailor's would have, but you'd have to look quite closely at the straps to notice it, and how likely is anyone to do that?

So this is my actual Treat for Today: an elegant summer dress that fits me perfectly and only cost me $19 plus half an hour of work. In fact, I'm so encouraged by this success that I might just take a crack at adding those pockets myself, too. But that looks like a job that requires the use of the sewing machine, so I'll probably want to practice my machine skills a bit first. (And yes, I realize the dress looks a bit silly worn with a winter hat and long johns, but give me a break, it's January.)

Sunday, December 1, 2024

Is thrifting really thrifty?

For the past eight years, my aunt and I have had an arrangement about holiday gifts: When she comes to visit over Thanksgiving weekend, we hit the local thrift shops together and buy each other's presents there. This year, I invited my youngest nibling to join in the exchange as well. I had perused their wish list on Gift Hero (our more socially responsible alternative to the Amazon Wishlist) and noticed that a lot of their picks were clothing items, so I suggested we look for them the ecofrugal way.

Well, this was a semi-success. As usual, I couldn't find anything I particularly liked at the thrift stores, so my aunt wasn't able to get a gift for me there. But both she and my nibling found items for themselves: a cute little fuzzy jacket and a colorful striped sweater, respectively. And Brian, who joined us on the trip, also found a nice green sweater for himself. That's the good news. The bad news is that the three items together cost $87. 

Mind you, I'm not objecting to what I paid for my relatives' gifts; there are definitely other items on our gift list that cost about the same (though there are also some that cost less). But it seems a trifle high for secondhand clothing. Consider that last year, Brian and I spent only $52 at Goodwill for six pieces (two pairs of shorts, one pair of jeans, one pair of sneakers, one pullover, and one turtleneck)—an average of $8.67 per garment. These three items averaged $29 per garment—more than three times as much.

This leads me to an uncomfortable but inescapable conclusion: thrifting isn't always a thrifty choice. That's not to say it never is; at a store like Goodwill, where most garments are under $10, you'll certainly pay less than you would buying fast fashion, and you'll probably be able to find better-made garments too (though it may take a bit of Goodwill hunting to find them). But at consignment shops like Greene Street, you're likely to pay more than you would shopping the Black Friday sales at Target or Old Navy.

Of course, secondhand shopping still has other advantages over fast fashion. It doesn't require the massive amounts of water, energy, and other resources that go into new garments, and it doesn't produce the massive amounts of waste and emissions that come out of the process. It's unquestionably the more eco-friendly choice. But it's not the ecofrugal no-brainer I thought it was. Instead, it's one of those awkward cases in which the best choice for society and the best choice for your bottom line are often in conflict, and you have to figure out which matters more to you.

Thrifting can still be an ecofrugal choice if you stick to the nonprofit stores, such as Goodwill and local church basement shops. But unfortunately, there aren't very many of those around here, and the ones we do have are a bit of a mess. Our one local thrift shop at the Reformed Church is small, cluttered, and hardly ever open; the nearest Goodwill store, while bigger, is poorly organized, making it hard to unearth the few pearls hidden in the massive dunghill. So if we want to visit a thrift store with real bargains, we have to go some distance out of our way. We still go once in a while, but we can't drop in on a regular basis to find the good stuff before it's snatched up.

Consequently, we tend to have our best luck visiting thrift shops away from home. When we go to visit my in-laws for Christmas, we make a point of stopping by at least one of the three Goodwill stores in their area, all of which are much better than ours. And when we saw my sister's family for Thanksgiving this past weekend, they invited us to come visit them in Boston next year and check out a chain called Savers, which they visit regularly. It's a for-profit chain, but apparently it's a big enough one to boast a substantial selection of decent stuff at reasonable prices. We can usually find enough during these out-of-town thrift-shop visits to fill the gaps in our wardrobe and tide us over until next year. It's not ideal, but if we want to shop ecofrugally, it's our best option.

Sunday, October 13, 2024

A stitch in time

When Brian's jeans wear out, it's usually the knees that go first. This is a fairly easy area to repair: I simply sew on one of my pocket patches, salvaged from an older pair of jeans. This simple fix enables him to get another year or two of use out of them before they wear out completely.

With my own pants, however, it's a different story. The area most likely to get holes is the inside of the thighs, a much harder spot to repair. The best method I've come up with is to sew a patch over the inside, but it usually doesn't take too long before I wear through the patch as well. (Just this week, a patch I put in my black jeans last spring blew out completely, forcing me to consign the entire pair to the rag bin.)

Clearly, it would be much better if I could find some way to prevent, rather than repair, holes in this area. So when I noticed that my grey corduroys had developed two bald patches on the inner thighs where all the ribs had worn off, I wondered, could I reinforce the fabric there before holes developed? Would the same honeycomb darning technique I'd used on my old wool socks work over this much larger area?

I didn't know the answer, but I figured I didn't have much to lose by trying. If I did nothing, the pants surely wouldn't last the winter, so even if my attempt was a complete failure, I wouldn't be taking much off their lifetime. I went through my stash of embroidery floss, selected a nice bright turquoise that I thought would contrast well with the grey, and proceeded to stitch. 

Not surprisingly, repairing this large worn area was a much bigger job than darning the socks had been. The painted rock I use as a darning egg was much smaller than the area I needed to patch, so I slipped a hardcover book inside the leg of the pants and tucked the fabric under that. I threaded my needle with the longest length of floss I could manage, but it still was only enough to complete three rows of stitches, covering only a fraction of the bald patch. I had to thread it several more times before I was done, using up nearly an entire skein of floss.

I realized at this point that I'd made a tactical error in choosing the turquoise floss. I knew the assortment I'd bought at Michael's contained two skeins of every color, but apparently this was an extra I'd picked up somewhere else, and I didn't have an exact match for it. To do the other side, I had to choose another skein of a slightly different blue. I'll just have to hope that no one ever sees both repaired sides at once and notices the mismatch.

All told, the whole process took a couple of hours, spread out over two or three days. To most people, that may seem like an awfully big investment of time to save a pair of pants that cost me less than $10 at a thrift shop. But considering how hard it is for me to find new pants that fit, if this prolongs the cords' lifespan by at least a year, it will save me many frustrating hours of shopping to replace them. And if it doesn't, I'll know not to bother with it next time.

Sunday, May 12, 2024

A pin-on pocket

Last year, a much-loved skirt that I'd worn for nearly 20 years finally wore out beyond my ability to repair. The fabric simply wore clean through, and because the skirt had a complicated, multicolor pattern, there was no way I could patch it that wouldn't look stupid. So, reluctantly, I began searching for a replacement. Eventually, I settled on a patchwork wrap skirt from The Little Bazaar, an online retailer that works with "small manufacturers from cottage or very small industry" to produce garments it describes as "ethnic and trendy look, Bohemian and hippie soul." Rather than buy it right away, I added it to my Gift Hero wish list, and sure enough, in January I received it as a birthday present.

In most ways, this new skirt is a pretty good substitute for its predecessor. The color palette isn't identical, so it doesn't work with all the same tops, but it can pair with many others that didn't match the old one. And since it's a wraparound, it will always fit, even if I lose or gain a few pounds. But there's one crucial feature it lacks: pockets.

Now, I don't rely on pockets for every part of my everyday carry. Like most women, I carry a purse that holds most of my stuff: wallet, keys, phone, sunglasses, a mini umbrella, and assorted other sundries such as my collapsible drinking cup and straw. But with all that stuff in the bag, it takes a bit of time to reach in and fish out anything I need. So I like to have at least one pocket in every outfit for things that I might need to grab quickly, such as a handkerchief. And with this skirt, I wouldn't have one. I could add a pocket to the outfit by pairing the skirt with a sweater or jacket, but that wouldn't be practical during the hottest days of summer.

So I started wondering if I could somehow add a pocket to this skirt. I was able to find lots of online tutorials about how to do this, but most of them rely on the same two basic methods, neither of which would really work with this skirt. The first involves opening up the side seam of the skirt to sew in a pocket—not an option, since this wraparound has no side seams. And the second, sewing patch pockets to the front, requires you to have fabric that matches the skirt—also not feasible with this variegated patchwork pattern. I considered trying to sew on a patch pocket in a coordinating solid color, but with my limited sewing skills, I was afraid I might mess up the skirt if I added anything visible to the outside.

My next idea was to construct a set of tie-on pockets. According to clothing historians, pockets that are actually sewn into garments are a relatively recent development: from the 17th through the 19th centuries, pockets were separate garments that could be worn either over or under a person's other clothing. This idea was appealing, since I'd be able to wear the standalone pocket with other clothes as well. But since the skirt itself is a wrap-and-tie style, I feared that having an additional garment tied around my waist over top of it would be awkward. 

What would really be ideal, I thought, was a pocket I could either tuck under the wrapped-over edge of the skirt or pin to the waist tie over top of it. Even with my rudimentary sewing skills, I figured I ought to be able to make something like that with the right materials. But what could I use?

Most of the remnants in the scrap bin were plain, utilitarian fabric, such as old blue jeans, that wouldn't fit with the skirt. But I managed to unearth one piece that looked like it would might work: a shoulder pad salvaged from an old shirt. Not only was it a colorful, patterned fabric in keeping with the skirt, it was already neatly machine-hemmed, so I wouldn't have to worry about my hand-sewn seams looking wonky.

Once I'd found this, converting it into a pocket was pretty straightforward. I used my trusty seam ripper to undo the seam along the straight top edge of the shoulder pad and pulled out the padding. Then I folded over the raw edge of the fabric and stitched it down. I then safety-pinned the resulting half-circle of fabric to the waist tie of the skirt, creating a little pocket at waist level. If I find the pocket works well in this position, I can try stitching it down more permanently. If it doesn't, I can simply unpin it and move it to a new location.

This new, temporary pocket isn't exactly roomy, but it's large enough for a handkerchief or any other small item I might need to slip into it. And it fits in fairly nicely with the "ethnic and trendy look" of the skirt. With its addition, I think this skirt will be as practical as it is charming.

Sunday, April 21, 2024

What we're doing for Earth Day

This year, Earth Day overlaps with the start of Passover—which means, ironically, that we're going to spend it being a little less ecofrugal than usual. Normally we wouldn't drive anywhere on a Monday; Brian would either bike to work or work from home. But tomorrow, we'll have to drive to get to my parents' house for the Seder, and since my family isn't kosher, that meal will include both meat and dairy (a free-range chicken for dinner and ice cream with fruit compote for dessert). And our menu for the following week will also include more meat and dairy than usual, since many of the Passover-friendly recipes we know include either one or the other. 

Fortunately, Brian and I are making up for that by increasing our efforts in the lead-up to Earth Day itself. Over the past week or so, our earth-friendly activities have included:

  1. Trying a new vegan restaurant. Last weekend, we went to a show with some friends in the nearby town of Metuchen, and they suggested meeting for dinner beforehand. I did a little investigation online to find a vegetarian-friendly restaurant in Metuchen and discovered one called Red's Leaf Cafe where the menu is 100 percent vegan. The place is quite small, with just a handful of tables, but everything we ordered—the shared oyster mushroom appetizer, Brian's sesame seitan, my orange lion's mane mushrooms over coconut rice—was very tasty. Unfortunately, it was also pretty pricey; the bill for our party of four, including tip, came to $160. So I don't think we'll want to visit there on a regular basis, but if we have guests we want to impress, it could be worth another trip.
  2. My monthly Citizens' Climate Lobby (CCL) meeting. Most months, this group holds its monthly meeting on Tuesday night, with only a few people meeting in person and the rest joining via Zoom. This month, for a change, it met at a Unitarian church in Somerville on Saturday afternoon. (Brian helped make my trip up there more eco-friendly by driving me there and spending the time while I was at my meeting running errands in town.) My favorite part of the meeting was watching the monthly presentation from CCL's national organization, which featured an interesting speaker: Ernesto Alcantar of Potential Energy, the self-described "marketing team for planet Earth." His presentation focused on eight principles for having productive conversations about climate with people who don't live in our climate-activist bubble. His tips include "talking like a human" (avoiding jargon like "carbon footprint" and even "greenhouse gas"), avoiding partisanship, and focusing on "humans, not concepts."
  3. More visible mending. After my success fixing the holes in Brian's socks with Scotch darning, I decided to try a new technique called honeycomb darning for reinforcing some worn areas that didn't have holes yet. This method involves putting in a series of blanket stitches running all around the edge of the worn spot, then looping through those stitches to add another row of stitches farther in, and repeating the process until you get to the middle. This video on YouTube does a good job of explaining the process, including what to do with the dangling "tail threads" at the end. One thing it doesn't show is what to do if, like me, you misjudge how much thread you need and end up running out before you've finished the job. I had to guess how to work in a new piece of thread to pick up where the first one ran out. But I later found a second video on the same subject that does show what to do, and its method is pretty much the same as mine, so apparently I guessed right.
  4. Joining a stream cleanup. Several members of our CCL chapter took part in the Raritan Headwaters 34th Annual Stream Cleanup yesterday. (Since this blog is technically social media, I'll throw in the tags @raritanheadwaters and #RHAstreamcleanup here.) The area we were assigned to was Spruce Run Recreation Area in Clinton, which is actually along a reservoir rather than a stream. Our team of seven didn't go into or near the water itself; instead we donned yellow vests and combed the verge along a half-mile stretch of road near the park entrance. By far the most common type of trash we found was cigarette butts—over 150 of them—followed by plastic bottles and wrappers. (Little mini liquor bottles and cigarette butts were particularly likely to be found together.) The most unusual item we found was a piece of hardware that no one in our group, or in the larger group running the event, could identify. It's a...well, some sort of knob bolted to some sort of hinge, sort of? If you can figure out what it's for, please let me know.
  5. Secondhand shopping. The stream cleanup happened to fall on the same day as the town-wide yard sales in Metuchen, so we couldn't spend the entire day strolling around and browsing sales as we normally would. But after coming home and having some lunch, we headed up to Metuchen to get in a couple of hours of yard-saling in the afternoon. Between the huge rummage sale at the First Presbyterian Church and a few other sales we visited in that same neighborhood, we managed to pick up three items of interest—a Fairport Convention CD, a peacock-blue T-shirt for me, and a Ngaio Marsh mystery—for $2.50 total. (Unfortunately, we then spent twice that amount at a local cafe on a cup of coffee for me, since I was practically falling asleep on my feet after our early morning and busy day.) Not a very impressive haul, but I followed up on it just now by ordering us a secondhand garlic press on eBay to replace the one that just fell apart as Brian was cooking dinner. (Since this one has a one-piece "rocker" design, with no moving parts, we know it won't break like its predecessor. And The Spruce Eats says it can mince ginger, too.)

Add all that in to our everyday earth-friendly activities, such as eating meatless meals, hanging our laundry, and Brian's regular bicycle commute, and I'd say we're not doing too badly.

Sunday, April 14, 2024

These darned socks

Brian and I don't tend to spend a lot of money on clothing. Even our "investment pieces," like my fall coat and Brian's one good suit, typically come from thrift shops. But one item we don't cheap out on is winter socks. We both splurge on $22-per-pair Smartwool socks, which keep our feet cozy and warm without itching, and then wear them until they literally fall to pieces. I've always done my best to extend their lifespan by stitching up small holes as they formed, but eventually the holes would get too big to close up this way. At that point, our pricey socks would be fit only for the rag bin.

Once or twice, I attempted to salvage the socks by darning them. The only way I knew of to do this was the traditional weaving technique: make long stitches across the hole horizontally, then follow up with vertical stitches that weave in and out of the horizontal ones. Unfortunately, this never worked very well. If I put the horizontal stitches far apart, the weave was too loose, and if I put them close together, it was too hard to weave in between them. And in either case, it always came out lumpy.

That's why I was intrigued to learn about a visible mending technique called Scotch darning. With this method, you put in only one row of stitches at a time, as if you were knitting rather than weaving. Each row of stitches is secured to the row above it and is secured at either end to the good fabric outside the hole. (It's a bit hard to explain in words, but this YouTube video illustrates it quite clearly.) With this method, there's no worry about how to space the long stitches and no fiddling with weaving in and out between them. And if you make your thread too short and it runs out midway through the process, that's okay; you can just  start a new row and keep going, securing it to the one you just finished.

So I decided to give this method a try with one of Brian's Smartwool socks that had reached the limits of my normal darning abilities. I started out using some fine grey yarn that I'd had sitting around for years, but it kept breaking, so I switched to a heavier blue yarn that I'd received as part of a learn-to-knit kit. (All my attempts to make sense of the instructions in the knitting book had so far come to naught, so I figured there wasn't much sense in saving the yarn for a project I'd probably never manage to complete.)

It was a bit difficult to thread a needle—even my biggest "sailcloth" needle—with this thick yarn, but once I managed that, the actual stitching process went fairly smoothly. I quickly got the hang of the pattern: under the top row, under the bottom row, over the thread, pull it tight, and repeat. As one of the comments on the YouTube video observed, it was almost meditative. After I got the entire hole stitched up, I had Brian try on the sock, and while he could feel the difference between the darned area and the rest of the fabric, he said it wasn't uncomfortable. So I carried on, stitching up holes and worn areas in three more socks.

I ran into only two problems as I worked my way through this lot. First, the yarn kept getting twisted up as I tied it into loops, and I had to stop periodically and let it unwind itself. Second, I had trouble gauging how much yarn I needed to cover a hole completely. On my first attempt, I ran out of yarn and had to sister in a new length of yarn halfway down. The next time, I deliberately cut my yarn much longer than I thought I needed—far longer than the length of my arm, so that I had to stop after every stitch and spend a minute pulling the long strand through with both hands. This proved to be far more than I needed, leaving me with over a foot left over once the hole was completely covered. So I cut it off and used the extra yarn to get started on the next hole, only to find that it was once again too short and I had to re-thread the needle halfway through. I worked my way through four socks without ever really figuring out how much was the right amount.

Although this Scotch darning technique was a smooth enough process once I got going, it wasn't a quick one. I didn't time it, but I'm sure I spent at least an hour and probably over two hours getting through all four socks. It might have gone faster if I'd been using a finer yarn that was easier to get through the needle or if I'd known what amount to use, so that I wouldn't have to keep re-threading it in the middle of a hole. But even if I were doing it perfectly, it would still require a fairly significant investment of time. (Even the experienced sewer in the YouTube video takes nine and a half minutes to stitch up one medium-sized hole.) 

Given the time involved, this probably wouldn't be worth doing for cheap everyday socks. But taking an hour to repair a $22 pair of Smartwool socks is like earning a $22 hourly wage, and that beats New Jersey's minimum wage by nearly $7 an hour. Plus, it keeps them out of the landfill. And there's a certain satisfaction in sticking it to The Man by fixing my own darned socks (ha ha) instead of shelling out for a new pair like a good little consumer.

Sunday, March 31, 2024

Further experiments with visible mending

After my first successful visible mending experiment last month, I decided to get a bit more ambitious. I went to Michael's and invested five bucks in 36 skeins of embroidery floss in assorted bright colors, allowing me to add more techniques—darning, embroidery, and sashiko—to my mending repertoire. 

The first repair I attempted with the new thread was darning another threadbare patch on one of Brian's jeans pockets. I already knew the basic idea—make long stitches going in one direction across the hole, then make perpendicular stitches that weave in and out through the first set—but I also watched a couple of videos about it online and did my best to copy their technique. Unfortunately, I didn't quite get the hang of it right away. I ended up placing the vertical stitches too close together, making it difficult to weave through them when going horizontally. As a result, the darned area came out a bit uneven and lumpy. Brian said he liked it anyway, but I'm not as happy with it as I was with my previous patching repair. 

So for my next repair, I decided to move away from darning and try a hybrid technique: a patch on the inside of the garment, secured in place with decorative stitching. The garment in question was my old pair of black jeans that had worn out in the thigh area. I'd already patched it once before, but the area around the patch had now worn out, leaving little sections of skin exposed. I thought at this point there was nothing to do but downgrade them to "grubby" pants for doing dirty jobs around the house and yard. But since I had nothing to lose at this point, I figured I might as well attempt a visible mend on these as well. 

First, I removed the old patches and tidied up the edges of the holes with scissors. Then I went back to that same old striped flannel shirt I'd used for patching Brian's pants and cut out a couple of pieces from the sleeve, large enough to cover the new, larger holes. I sewed those colorful patches to the inside of the pants using my usual whip-stitch technique. Then I turned the jeans right-side-out, selected a dark blue embroidery thread that coordinated with the fabric, and began top-stitching the patch to the intact parts of the jeans. 

I started out attempting to make a neat, decorative running stitch, as shown in this NPR article, but it came out too wonky-looking. My stitches were uneven in length and my lines had a tendency to wobble. So I picked all that out and started over using the seed stitch technique shown in this video, which is supposed to look random and chaotic. This came much more naturally to me. It was actually kind of fun pushing the needle in at a random spot, then taking off in a random direction from there, making stitches of varying length and even doubling back as needed to cover bare patches. It took quite a while, but eventually I ended up with a unique-looking repair that I wouldn't be embarrassed to flash a glimpse of to strangers while walking down the street. 

But while the patch-and-embroider technique worked well for these large holes, it didn't seem like it would be much use for the small holes in Brian's jeans pockets. For one thing, there's no good way to sew a patch to the inside of the jeans pocket without removing it. So for his last damaged pocket, I went back to exterior patching. I still had one more pocket flap on that old trusty flannel shirt that I could have used, but instead I decided to try repurposing an old, colorful fabric mask leftover from the early days of the pandemic. (I didn't think we'd be needing it again, since even if a new wave of COVID should strike, we now have some of the much more effective N95 masks to use instead.)

After cutting off the ear loops, I experimented with different placements for the patch that wouldn't require cutting it. (Having a piece of fabric that was already neatly hemmed on all four sides, I didn't want to mess with it.) I considered placing it vertically up the length of the pocket and tucking the end inside, but I feared the doubled-over fabric might be too bulky and interfere with the use of the pocket. So instead I just stitched it across the entire width of the pocket, overlapping it on both sides. Only after I had it in place did I realize I'd actually sewn it on upside down, with the folds of the mask pointing up instead of down. But since it didn't have to function as a mask, that didn't really seem to matter. I just tacked the flaps down with a set of loose stitches so they wouldn't flop around.

Unfortunately, after all these successes came a not-unexpected setback. The original pair of pants that started me off on this visible-mending kick, which already had patches on both knees as well as the back pocket, developed a visibly threadbare patch on the thigh. I didn't think adding a pocket patch in this area would work very well, and I feared that the patch-and-embroider technique I'd used on my own jeans would be a little too messy for such a visible spot. But I also couldn't bear the idea of seeing these jeans retired when I'd just managed to get them patched so nicely.

Hunting around for a way to mend the threadbare patch, I found myself turning yet again to that old striped flannel shirt. When cutting up the sleeve to make the patches for my jeans, I'd saved the cuff—a nice, long strip of fabric, ready-hemmed on all sides. What if I removed the cuff button on one end, stitched up the buttonhole, and sewed this long piece across the entire width of the jeans leg? It sounded kind of nutty, but Brian okayed the idea, so I gave it a go. 

The result isn't perfect. Even though I carefully positioned the patch and pinned it in place before stitching, it still somehow managed to come out a bit askew. But Brian doesn't mind it. In fact, he seems rather tickled with his new Franken-pants with their motley assortment of patches. And I'm quite pleased that he's willing to be a walking showcase for my visible mending efforts.