Unfortunately, we couldn't simply rig up another simple box like the first one, because we couldn't get hold of the materials. Or, to be more exact, we could have found some, but we couldn't have gotten them home. Our new car, a Honda Fit, can hold practically anything, but it turns out that full-sized shipping pallets are the one thing you just can't squeeze in through either the rear doors or the back hatch. Maybe if we had removed absolutely everything else, we could have managed one, but picking them up wherever we happened to spot them just wasn't feasible.
So, instead, over the course of last year, Brian scavenged several smaller pallets, mostly from the curbside, which the car could more easily accommodate. Then this month, over the long Fourth of July weekend, he started sorting through these and the pile of still-usable two-by-fours left over from our old garden bed frames, trying to work out how best to put them all together into a new bin roughly the same size as our old one. Of the various pallets he'd brought home, he identified four that he thought were sturdy enough to use—but unfortunately, they were all of different shapes and sizes, so simply nailing them together into a box wasn't going to be an option.
However, after a little measuring, he discovered that the four usable pallets all had one dimension in common: each of them was exactly 40 inches long on either its long or short side. So he decided that this would be the height of the the new bin, and he'd use the two-by-fours to eke out the odd-sized pallets to create sides of equal length. Figuring out just how to fit the the pallets together was a little bit tricky; their smaller size would make the bin narrower than our old one, so access to the pile would be a little bit restricted. However, after a little fiddling, Brian finally contrived a design that would allow one whole corner of the bin to swing open, creating a nice wide opening for turning the pile or scooping out the finished compost.
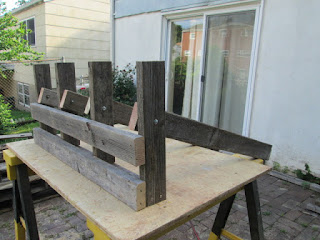
The hinged extension, however, was much more complicated. He started by building a frame of two-by-fours with one long side and four shorter crosspieces, sort of like an extended letter E.
Then he added on several longer pieces connected to the crosspieces with 3.5-inch carriage bolts, each with a washer and a nut on it, so that they could swivel. This made a sort of giant wooden hinge, which would allow the corner of the new bin to swing open.
Then, he started reinforcing both sides of this hinge with some more long pieces. Attached parallel to each other, about an inch apart, these created an open, slatted structure similar to the pallets we'd already used. He used just two pieces for the short side of the hinge....
...and about six for the longer side. He couldn't add crosspieces all the way to the edge, because that would have prevented it from swinging open...
...so instead he reinforced it with two long pieces on the inside.
Once this odd swinging door was complete, he was able to attach it to the fixed, three-sided structure he'd made with the pallets. The shorter end of the hinge was clamped to the long side of the bin and screwed into place, extending the pallet to make an even longer fixed side.
The longer side of the hinge, which now formed the front of the bin, could swing open freely.
Then, to complete the short side of the bin, Brian took one more of the small pallets and clamped it to this new swinging door at a 90-degree angle.
Screwing this last piece into place was probably the most awkward part of the job, as he actually had to climb inside the bin and crouch down to attach the screws at the right angle.
Here you can see how it all finally fits together. The three fixed sides of the bin are at the left, and on the right is the door assembly...
...which swings open to give access to the bin. In this picture, it can only open partway, as it's blocked by the pile of compost that had to be emptied out of the old bin. However, with the compost transferred back inside the bin where it belongs, it can swing open nearly to full extension, giving us a nice, wide opening.
The one thing he still isn't sure about is how to keep this swinging door closed. Right now, the bin is only about half full, but as it fills up, the pressure of the contents will likely push the sides outward and force the door open if it's not secured somehow. For now, he's just got a bungee cord latched around the slats; if that proves too awkward to use, we'll have to come up with some more permanent sort of closure.
Here's a final shot of the completed bin from above, with the contents back inside. As you can see, it stands out several inches from the side stoop, because we had to leave enough of a gap to accommodate a drainage pipe that runs through the back of the stoop. Eventually, Brian plans to add a little platform to the back to cover this gap so that waste scraps can't fall in between the bin and the stoop by accident. But for now, it's perfectly usable.
Maybe it's not exactly elegant, but to our eyes, this hodge-podge design seems oddly appropriate for its function. Every time we pass by it, we think, "Now that's a compost bin."


No comments:
Post a Comment