Sunday, April 30, 2023

Gardeners' Holidays 2023: First Picking

The Gardeners' Holiday that falls at the start of May is always a bit of a catch-as-catch-can. For the first few years, it was a celebration of our asparagus harvest, but lately the asparagus hasn't been reliable enough for us to count on having enough of it for a meal by this point. So instead, I've used this holiday to mark various other gardening activities, such as putting in our spring crops, our honeyberry bushes, and our new flowerbed.

This year's May Gardeners' Holiday is a little different. It's not about anything we planted; it's about something we harvested without planting it. Specifically, dandelions.

Most people think of the dandelion as just a useless weed, but it's also a vegetable. In fact, just about every part of it is edible. You can boil the roots or roast and grind them to brew into tea. You can batter-fry the blossoms or brew them into wine. And you can use the nutritious greens in a wide variety of ways: steamed, boiled, sauteed, raw in a salad, ground in a pesto, or blended in a smoothie.

So, when Brian pulled out a whole mess of dandelions while weeding the garden beds, he decided he might as well put them to good use. Rather than just toss them in the compost, he brought them in, washed them, wrapped them in a clean dishtowel, and stashed them in the fridge. (Side note: this is the best way we've found for keeping lettuce or any kind of greens fresh. Clean them thoroughly, soak them in water to plump them up, then wrap them in a cloth towel and store them in a zip-top bag. The towel absorbs excess moisture, so the greens don't rot as quickly. Most sources say to use paper towels for this, but we find a cloth one works just as well.) 

Then, of course, he had to figure out what to do with them. For years, our go-to method of cooking dandelion greens was one we pulled out of a cookbook called Mountain Cookin': wilt them slightly in a hot skillet, then toss them with a dressing of hot bacon grease, vinegar, and a touch of sugar and salt. This combination of flavors (salty, sour, umami, and a little bit sweet) balances out the bitterness of the greens and makes them quite palatable. But now that we've almost entirely given up meat, this method was no longer an option. Of course, we could have used a plain vinegar dressing without the bacon, but we strongly suspected they wouldn't taste nearly as good this way. 

So instead, Brian experimented with several different methods of concealing the greens in different dishes, the same way he's learned to do with eggplant. First he tried chopping some up and adding them to a batch of savory corn cakes, a recipe from Mollie Katzen's Vegetable Heaven that he's tinkered with considerably over the years. He'd done this before with frozen spinach and found that the greens more or less melted into the background, and it worked pretty much the same way with the dandelion greens. 

Next, he tried stirring some into a batch of chili. This was also reasonably successful. The texture of the greens stood out a little more, but their bitter flavor wasn't really noticeable with all the other flavors in Brian's chili. With onion, green pepper, tomato, eggplant, red kidney beans, black beans, garlic powder, nutritional yeast, a touch of lime, and a whopping three tablespoons of chili powder all vying for attention, the greens were barely detectable.

His third attempt, however, was not a success. Since we had baby bella mushrooms and leeks in the fridge, he improvised a mushroom-leek soup that would probably have been quite tasty on its own, with nutritional yeast, bay leaf, and thyme to boost the flavor and silken tofu to give it a heartier texture. But then he decided to throw in some of the dandelion greens as well, and that turned out to be a mistake. The flavors in this soup were milder and more subtle than those in the other two recipes, and the bitterness of the dandelion greens became the dominant note. Brian didn't mind it as much as I did, but neither of us really enjoyed it.

Based on this experience, I'd say the secret to eating dandelion greens is to combine them with other flavors that can stand up to them and not get pushed around. If you just pick a leaf off a dandelion and chew it up, you will find it bitter and somewhat tough, and you most likely will not enjoy the experience. But in a recipe with lots of other strong-tasting ingredients, that same bitter green becomes at least unobtrusive and, at best, even pleasant. In cooking as in life, a touch of bitterness adds a welcome complexity to the flavor, but too much of it spoils the entire dish.

Sunday, April 23, 2023

Our new strawberry bed

When I made the last-minute decision to throw some strawberries in with this year's garden seed order, my plan was to sow the seeds directly in the sloped area of our back yard. I figured if they managed to take root, we could gradually plant more each year until they'd replaced all the grass in that area, and then we wouldn't have to mow it anymore. And if they didn't, oh well, we'd only be out two bucks.

But Brian had a different idea. Our secondary asparagus patch in the back yard wasn't faring too well; the new asparagus crowns we'd planted four years ago in the secondary asparagus bed, next to the rhubarb, had never sent up more than a few spindly tendrils. Last fall, Brian suspected it was entirely dead, and he ended up digging out half of the bed and planting our garlic crop there, next to the rhubarb. So he thought perhaps the remainder of that bed, on the end, would be the best place for the strawberries. The plants wouldn't have any weeds to compete with, and we'd be able to cover them and protect them from predators, increasing our chances of actually getting to eat at least some of the berries.

In the end, we did a little bit of both. We started about half the seeds indoors, using a greenhouse kit someone had given us. As they grew, Brian transplanted the biggest and healthiest-looking ones out of their little greenhouse cells into small pots that gave them a bit more room to spread out. And the remainder of the seeds got planted directly into the ground in that sloped area, where they can fight it out with the grass and weeds.

A complication in Brian's plan came up when the remaining asparagus plants in the proposed strawberry bed poked up a couple of tentative little shoots this month. Rather than kill these plucky survivors, he decided to dig them up and transfer them to our primary asparagus bed on the south side of the house. It hadn't been performing any too well either, not giving us more than a pound or so a year, so he figured it could use all the help it would get. So he crammed the two surviving asparagus crowns into that bed, along with three new ones we'd picked up at Ocean State Job Lot. We don't know yet how well they'll do in their new home, but they definitely have more of a chance there than they did in the back.

With that area cleared, it was time to put the strawberries in the ground. The packet said they'd do best in soil that was "rich and loose with good drainage." Our heavy clay soil meets only one of those criteria, so we amended it beforehand by mixing in most of a bag of composted manure (tested ahead of time to make sure it wasn't "killer compost") and about a quart of sand (left over from our patio project years ago). I just dumped the bag of compost out in the center of the bed, broke up the big clods with gloved hands, and spread it out across the area. Then I added the sand and raked it in.

The space we had to plant in was about 30 inches wide and six feet long. We had a dozen large, healthy seedlings that Brian definitely wanted to fit into it, plus about an equal number of scrawnier ones that we could add if there was any extra room. The packet said to plant clusters of seeds 12 inches apart in rows 24 inches apart, which clearly wouldn't work in this limited space. Instead, we squeezed the 12 plants in using a staggered arrangement that gave each one about a foot of space around it. Brian planted the ones along the back row, which I couldn't easily reach with my short little arms, and I did the rest. Then I fetched the watering can and gave them all a drink to get them off to a good start.

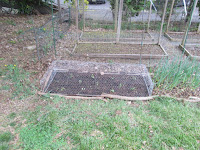
The final step was to build some sort of cage for pest protection. Since this bed isn't within any sort of fenced-in area, Brian wanted to make sure the plants had cover right from the get-go. So after I'd gone inside to get cleaned up, he stayed out there for another hour or so, fashioning a box out of chicken wire and bamboo stakes. According to the seed packet, the plants will grow to a height of 8 to 10 inches, so he made it about a foot tall to give them a little extra clearance. That way no part of the plants will poke out and allow groundhogs or deer to chomp on it.

Now all that remains is to keep the berries watered and weeded and see how they do. Since this variety (Red and Yellow Wonder Blend), doesn't produce runners, the bed shouldn't need to be thinned out every spring. However, the packet says they will only produce well for two years and recommends adding new plants every year for good production. But we'll wait and see how they perform this first year before deciding whether it's worth the trouble of starting and planting out more in the years to come.

Sunday, April 16, 2023

Fan fix

The weather this past week has been unseasonably—even unreasonably—hot. I'm used to April temperatures in the sixties, seventies, even into the low eighties, but in the middle of the week it hit 89. (Global warming strikes again.) So I decided it was high time to get out my trusty desk fan. 

This yard-sale find has kept me cool for more than ten summers, but it's become a bit temperamental over the years. For the past couple of summers, it hasn't always started up right away after being switched on. More and more often, I had to give it a good thump to get it started. This was only a minor annoyance, so for a couple of years I just put up with it. But this year, I decided it couldn't hurt to open it up and see if I could fix the problem. When I couldn't find anything obviously wrong with it, I decided to give it a good cleaning and see if that helped. And rather than just wipe it down with a rag, I took Brian up on his suggestion to take it downstairs and try blasting out all its crevices with a strong jet from his air compressor.

In one way, this technique was quite effective. It dislodged a fair amount of dust and lint, and when we took the fan back upstairs and plugged it in, it started up right away. Unfortunately, it also made a loud rattling sound as it ran. This was a problem it hadn't had before; it had been slow to start, but once you got it going, it ran smoothly and quietly. So apparently, all we'd managed to do was replace a slightly annoying problem with a new one that was even more annoying.

At this point, Brian suggested that maybe the sensible thing to do would be to get a new fan. It had only cost us a buck or so to begin with, and it had served me for over ten years. And he'd already repaired it once, replacing the clip that used to hold it in place on the desk with a stand made from scrap wood. We'd surely gotten our money's worth from it at this point, and a new one wouldn't cost more than $10 or so. But my ecofrugal instincts rebelled. The old fan was still technically working; it was just a bit noisy. And since all we'd done to it was clean it, surely it couldn't have suffered that much damage. It ought to be possible to figure out what was causing the problem and undo it.

I watched the fan as it ran, and I figured out that the noise was coming from the blade assembly. When the fan started up, the rotor shifted forward a bit from its resting position, and apparently this was enough to push it out of its normal, quiet groove. We experimented and found that if we tilted the fan or pushed something against the center of the rotor blade to nudge it back into place, it quieted down. The problem was, as soon as we let go, it shifted back into its noisier position. So, in theory, if we could add something to the fan grille that would lightly press against the blade as it turned, it would keep it from shifting forward without stopping it from turning altogether. But what?

I spent the next half hour or so testing out various options. First I tried a wine cork, but it was a bit too long and wouldn't allow the grill to close. I tried shaving down the end with a rasp, but it took so long that I finally abandoned the idea. I tried mocking something up with a wad of cotton and some tape, but I had trouble getting it to stick. A cat toy in the shape of a spring seemed like it should be perfect, since it would automatically compress to the appropriate length, but the end of the spring rubbing against the blade assembly made even more noise than the rotor itself. After each failed attempt, Brian kept reiterating that, really, there was no shame in just replacing the fan, but I was too stubborn to quit. And here's what I eventually hit on.

That little purple thing stuck to the inside of the fan grill is an earplug. I attached it to the exact center of the grill with a dab of hot glue, then added a couple more dots of glue on either side to help hold it in place. It's just long enough to make contact with the blade, and the squishy foam material presses against it gently without impeding its rotation. With this damper in place, the fan is perhaps a bit louder than it used to be, but it's no longer loud enough to be disruptive. And if the earplug falls off or wears out somehow, I can always replace it with a new one.

So here's the big question: Was it really worth putting all this effort into fixing a $1 yard-sale fan? Or would I have been better off listening to Brian and getting a new one?

Well, the whole process—cleaning the fan, then tinkering around with it until I found a fix that worked—took around 45 minutes. The materials cost about 30 cents (25 for the earplug and another nickel or so for the glue and all the clear tape I used while testing various solutions). Buying the cheapest new desk fan at Target, by contrast, would cost about $8 ($8.55 with tax) and take around 10 minutes, assuming we were able to combine this errand with others in that same area. By taking 35 minutes to save $8.25, I effectively earned an hourly wage of $14.14—a lot less than I normally make, but still more than minimum wage. And since I was between work assignments at the time, it's not like I was losing any money by working on this little DIY project instead of my official job.

And that's assuming we would have had a chance to pick up the fan while running other errands. If we'd needed to make a separate trip to get it, the numbers would look even better. The round trip would take about 40 minutes and cost an additional $1.30 or so in gas, meaning I spent only 5 extra minutes to save $9.55—equivalent to an hourly wage of $114.60. Plus, of course, I kept the old fan out of the landfill and saved all the petroleum and energy that would have gone into the manufacture of the new one, as well as the fuel required to get it from the factory to the store to our house. And besides, it was fun.

I'll concede that putting this much work into repairing a fan I paid a buck for more than ten years ago isn't normal behavior. But as I've asked before, who wants to settle for normal?

Sunday, April 9, 2023

Recipe of the Month: Passover breakfast quinoa

The question of what foods are and are not permissible for Passover is a highly contentious one. The one rule everyone agrees on is that five specific grains—wheat, rye, oats, barley, and spelt—are off-limits. These five grains (collectively known as chametz) can all absorb yeast spores from the air to form bread, and are therefore forbidden during the Feast of Unleavened Bread. And most Sephardic (Spanish) Jews leave it at that, avoiding these five grains during Passover and nothing else. 

But Ashkenazi (Eastern European) Jews, such as my ancestors, traditionally take it a step further. They also eschew other grains and beans, known as kitniyot or kitniyos, on the grounds that they're easily confused for chametz. And this rule, in turn, has led to disagreement among rabbis and other authorities over what counts as kitniyot. One particular point of contention is foods that weren't known in Europe at the time the rules were made, such as corn, peanuts, and quinoa (which is technically a seed but looks like a grain). Most authorities allow some of these foods but not others, getting into incredibly detailed and specific arguments—another Jewish tradition—to justify their positions.

For as long as I can remember, my family's practice has been a sort of middle ground. In our house, all forms of grains were banned during Passover, but beans (particularly peanuts and peanut butter) were okay. And since quinoa is not technically a grain, this makes it perfectly acceptable as Passover food. Discovering quinoa expanded our Passover dinner menu considerably, providing a welcome change of pace from eight solid days of matzo and potatoes. But it only recently occurred to me that it could serve equally well as a breakfast food.

For years, I ate the same breakfast every morning during the eight days of Passover: matzo brei, a French-toast-like concoction of matzos and eggs. Much as I love this dish, I found as I grew older that my digestive tract just couldn't handle that amount of matzo anymore. (Its unfortunate side effects are a staple of humorous Passover videos on YouTube, such as this one and this one.) The first alternative I hit on was a grain-free hot cereal made from potato starch, but it was kind of pricey and not that filling. So one morning, I looked at the bowl of leftover quinoa in the fridge and thought, well, why not? I tried some topped with leftover fruit compote, and I enjoyed it enough to get through the rest of the holiday on it.

This year, we didn't have any fruit compote, so Brian prepared me a special batch of breakfast quinoa with the fruit cooked right in. And since the resulting dish was vegan and contained plenty of fruit, I decided it would be perfectly appropriate as my Recipe of the Month for April. Brian's recipe calls for a pressure cooker, but it you don't have one, you can cook it on the stove or in the microwave.

PASSOVER BREAKFAST QUINOA

In the pot of your pressure cooker, bring to a boil:

  • 1 1/2 cups + 2 Tbsp. water
  • 1 medium apple, chopped
  • 1/2 tsp. cinnamon

Simmer 5 minutes, then add:

  • 1/4 cup raisins
  • 1 cup dry quinoa

Cover and bring up to pressure. Once it starts hissing, cook for 1 1/2 minutes, then turn off heat and let the pressure release. 

Let it sit, covered, for 10-15 minutes, then add:

  • 1/4 cup walnuts, toasted and chopped

Serve with milk and sugar to taste. Makes 3-4 servings.

This Passover-friendly recipe is both tasty and satisfying. It sticks to my ribs much better than either the potato cereal or my trusty old matzo brei. And it provides some much-needed fiber to counter the dreaded "matzo belly." I expect it to remain my go-to Passover breakfast not just this year, but for all the years to come.

Sunday, April 2, 2023

The Dress Retro challenge

 Last September, I posted about the Take the JUMP challenge created by a UK-based group to help people "protect our earth and live life with joy." That post focused on the reason I wasn't taking it: because one of the "six shifts" the challenge required was giving up your car, and for me—and most other Americans—that simply wasn't feasible. But in the months since, I've been thinking more about one of the other five "shifts" involved in the challenge: "Dress Retro." This means getting most of your clothes secondhand and pledging to buy no more than three new items of clothing in any one year. When I first analyzed the challenge, I assumed that for us, this particular shift would be difficult but not impossible. But yesterday, I realized it might actually be a lot more doable than I assumed. In fact, depending on how you calculate, I might be doing it already.

I made this discovery while taking a study about online shopping. It asked about what kinds of items I'd bought online in the past year, so I started going through email receipts to check. And to my surprise, I found that a very limited number of those online purchases were wearable items:

  • One secondhand sundress from eBay.
  • One pair of blue jeans from Everlane.
  • One bra and one package of undies from Hanes.
  • One much-needed pair of winter boots from Woman Within. (I had actually bought quite a few more pairs of boots and shoes over the course of the year, but all the others got returned because they didn't fit. This was the only pair that I kept.)
There were also a couple of items bought as gifts: a Critical Role t-shirt for a nephew and two pairs of Darn Tough socks for Brian. But I assumed those wouldn't count toward the three-item limit imposed by the Dress Retro shift.

The thing is, when I consulted the rules, I found that most of the other items wouldn't count either. The limit "doesn’t include socks, underwear or shoes," presumably because these items are impractical to buy secondhand. And secondhand pieces, like my sundress, get a free pass as well. So according to the rules of the challenge, the only new garment I bought online last year was one pair of jeans. 

Okay, but what about items bought in stores? I went through my records for the past year and found that nearly all the in-store clothing purchases I'd made were also exempt under the rules. Some were secondhand (like my new fall coat); others were footwear, underwear, or socks. The only items that could be counted were:

  • One dress I bought from a vendor at the farmers' market, which I almost immediately got rid of. (The vendor wouldn't allow me to try it on, even over my other clothes, since she said she wouldn't be able to sell it if it had been worn. I took a gamble on it anyway, but when I got it home I found that it was absolutely unwearable. Lesson learned.)
  • One $4 shirt from Ocean State Job Lot. (I didn't need it, and I felt a little bad about buying what was obviously a fast fashion item. But it was just so cute—and so cheap.)
  • One pair of sleep shorts from Walmart. (This was something I definitely did need, since my much-repaired old pair was no longer wearable. And I'd had no luck finding any secondhand.)

These three items plus the new pair of jeans put me just over the three-item limit. However, you could argue that the sleep shorts should really qualify as underwear, since they're comparable to boxer shorts and definitely not suitable for wearing outside the house. If you allow that reasoning, then I actually was within the limit last year. But even if you don't, I came pretty close to meeting this goal without even trying. So if I actually make a conscious effort this year, I should be able to do it in a walk.

Thus, I hereby announce that I am officially taking the Dress Retro challenge for 2023. I have not purchased any new clothing (barring my new pair of boots, which is allowed) in the first three months of this year, and I intend to buy no more than three new pieces in the nine months remaining. To be honest, I rather suspect I'll be able to get by with no more than one new garment if I really put my mind to it, but I'll set the bar low for now. If I clear it easily, I can always raise it next year.