Sunday, April 7, 2019

Recipe of the Month: Spicy(ish) Tofu and Eggplant

In the month or so since Brian figured out how to make Sesame Tofu, we've already had it several times. Obviously, we like this recipe a lot, but there's one problem with it: since our new version uses only half a pound of tofu at a time, it leaves us with an extra half-pound of tofu to use up. Unfortunately, we don't have that many recipes in our standard repertoire that call for tofu. There's this Thai Stir-Fry we tried last summer, but it calls for fresh green beans, which aren't in season right now. So that pretty much leaves only regular stir-fry or pad Thai to choose from, and having either of those several times in a month would get pretty old.

Thumbing through our cookbooks in search of some new alternatives, I came across one in The Clueless Vegetarian that I had bookmarked years ago, but never actually tried. It was called Spicy Tofu and Eggplant, and it called for a pound of tofu, one medium eggplant, and two tablespoons of Chinese chili paste. (The recipe says you should "feel free" to cut down on this ingredient, as it's very spicy as written; since I am a total spice wimp, I figured we'd probably cut it down to around one teaspoon.) I though two of the skinny Chinese eggplants we normally buy at H-Mart would be equivalent to one regular eggplant, so we could easily make a half recipe of this whenever we needed to use up some extra tofu. All the other ingredients (soy sauce, brown sugar, sherry, sesame oil, cornstarch, vegetable oil, fresh ginger, garlic, and scallions) were things we routinely keep on hand.

All, that is, except one: the chili paste. When I chose the recipe, I thought I remembered having a jar of this in the back of the fridge, but Brian reminded me that we'd actually discarded it last time we cleaned out the fridge, which was actually quite a while back. He argued that the Panang curry paste we had in the fridge would make a perfectly good substitute, but I argued that it's not the same flavor at all; a Panang tofu and eggplant curry might indeed be tasty, but it really wouldn't be the same dish the author had in mind. The cookbook suggested substituting "a dash of hot pepper sauce" for each tablespoon of chili paste, but that wasn't much help, since we don't keep that on hand either. (Did I mention I'm a spice wimp?)

So we ended up putting off making this dish until we could pick up something that would serve for the chili paste. On our next trip to Trader Joe's, we spotted a bottle of something labeled "sweet chili sauce" for only a buck fifty, and we decided the ingredients in that (water, sugar, red chili, tapioca starch, garlic, acetic acid, and salt) sounded close enough to a Chinese chili paste to make a reasonable, if milder, equivalent. After tasting it, in fact, Brian said it was so mild he thought we could probably make the recipe as written, with the full two tablespoons.

So, last night, Brian prepared a half batch of this (though he used two small Chinese eggplants instead of one). I don't want to transcribe the whole recipe here, but basically, you cube and drain the tofu; cube and steam the eggplant; mix up a sauce from the brown sugar, sherry, sesame oil, cornstarch, and water; get your wok hot, and saute all the ingredients (first the ginger and garlic, then the chili paste, and then everything else) until they're heated through; and serve it over rice. So once all the prep was done, the actual cooking went quite quickly.

The result was tasty, though our substitution of the chili sauce for chili paste made it quite a bit milder than intended. Wimpy as I am, even I thought it could have used a touch more heat. So next time, we might add just a wee pinch of cayenne to bring the flavor up a little. We could probably also leave out the brown sugar, since the chili sauce is fairly sweet on its own.

But even if it wasn't hot, it wasn't lacking in flavor, and the combination of textures was nice. Neither of us was so excited by this dish that we wanted to make it again as soon as possible, but we both enjoyed it enough to consider it a reasonable addition to our tofu repertoire.

Money Crashers: The Gender Wage Gap

Last year, I wrote a piece for Money Crashers on how men and women deal with money. It discusses how men and women differ in shopping, saving, and investing habits, how they deal with debt, and their hopes and fears about money. One topic I didn't cover in this article, though, was the differences in earning between women and men. I originally intended to, but the more I looked into the subject, the more clear it became that this was a major can of worms that really needed an article all to itself.

And here that article is: The Gender Wage Gap – Do Men Really Earn More Than Women? It addresses such questions as:
  • How big is the gender wage gap, really? (The answer depends on what you're measuring: data across all workers, full-time workers only, or men and women in the same field. But I can give you one spoiler: The commonly cited statistic that "women earn 70 cents for each dollar men earn" isn't right by any of these measures.)
  • How does the gap vary based on factors like age, race, and location?
  • How has it changed over time?
  • What's behind it? Is it mostly differences in the career paths men and women choose, the hours they work, time taken off for family responsibilities, or outright sexism? (Answer: A little of all those things.)
  • What effects does this gap have, not just for women, but for families that depend on their income?
  • How does it affect the economy as a whole?
  • And finally, what - if anything - can be done about it? (Answer: "Equal pay for equal work" isn't a solution. It will require much more complex changes to the structure of the workplace and society as a whole. But this isn't impossible; in fact, in some places, it's already happening.)
I found this article really interesting to work on. I hope you'll find it equally interesting to read.

Sunday, March 31, 2019

DIY skin and hair care

One thing I find frustrating about trying to live an ecofrugal life is finding personal care products that meet my standards. If price were all I cared about, I could wash my face with any mild cleanser and get pretty good results. But since I also want the products I use to be nontoxic and cruelty-free, I have to read the label on every product looking for ones without parabens and animal testing. The few products on the shelf that fit those criteria can cost ten bucks or more for a bottle—and more annoying still, they often come not in bottles but in tubes. Not only are these non-recyclable, it's pretty much impossible to squeeze all the product out of the tube before discarding it, so you have to toss as much as half an ounce—maybe sixty cents' worth—of your pricey product.

At one point last year, I got frustrated enough over this that I decided to try making my own face wash. I went hunting online for some recipes that weren't too complicated to make and didn't call for any ingredients that were too expensive or hard to find, and I eventually hit on one at Live Simply with only three ingredients: four parts honey, one part olive oil, and four parts aloe vera gel, which I happened to have on hand already because I'd tried it (unsuccessfully) as a hair product. All I had to do was mix the ingredients together and find a container to put them in. I used the bottle from my previous face wash (actually an organic baby wash that I'd been able to pick up cheap because it was discontinued) and applied it with a little manual face scrubber from Sephora.

And lo and behold, it actually worked. In fact, this simple combination of ingredients did a better job of keeping my skin clean and soft than any pricey product I'd shelled out for in the past. The annoying acne-like bumps that had sent me to two different dermatologists over a five-year period, and which still hadn't really gone away even when I started diligently applying two different topical treatments for rosacea morning and evening, vanished almost completely. And each half-cup batch was costing me only 76 cents. All with no animal testing (the honey is an animal product, but the bees don't suffer) and no weird ingredients. I'd found the perfect ecofrugal skin product!

I was so happy with the way this turned out that I thought I'd see if I could manage to pull off the same trick with hair care. I've tried all sorts of products in my hair—cheap shampoos, expensive shampoos, cheap conditioners, expensive conditioners, leave-in conditioners, pomades, hot oil treatments, and various DIY alternatives—and never found a hair care regimen that I was completely happy with. For the past few years, I'd been getting more or less acceptable results by skipping shampoo completely and relying on OGX Coconut Curls conditioner as a co-wash, conditioner, and leave-in all in one, but it wasn't completely ideal; I had to apply quite a lot of it post-shower to tame the frizz, and it left a lot of build-up on my scalp. So I started hunting for some DIY conditioner recipes that might do the trick better, using the same criteria I'd applied for the face wash: a simple recipe with no pricey or hard-to-find ingredients.

Well, this turned out to be kind of a tall order. When I searched for "homemade conditioner," most sources recommended an apple cider vinegar rinse, which I'd already tried with no success whatever, and which obviously wouldn't work as a styling product. When I tried "DIY leave-in conditioner," most sources suggested just taking "your favorite conditioner" and mixing it with water (and maybe a little olive oil) in a spray bottle. Not a bad idea, but not helpful if what you're looking for is an alternative to "your favorite conditioner." An "easy" recipe from Oh, The Things We'll Make! called for an emulsifier called BTMS that you can't just buy at the drugstore, and that I wasn't about to order a whole bunch of just to test out a conditioner recipe that might not even work for me. And a collection of 10 Homemade Hair Conditioners Using Ingredients From Your Kitchen featured only deep-conditioning treatments that you leave on for several minutes and rinse—nothing that could double as a co-wash or a leave-in.

Eventually, I came across this page with 14 Homemade Leave-In Conditioner Recipes specifically for natural curls, of which one—the "Honey Butter Balm"—looked simple enough to be worth a try. It called for only four ingredients, two of which (coconut oil and honey) I already had. I thought I could safely leave out the few drops of lavender oil, which seemed to be just for scent, so all I needed to buy was some pure shea butter. After a bit of searching, I found a 6-ounce container of this at Sally Beauty for about seven bucks—not too bad if I could get six batches of conditioner out of it.

Mixing up the ingredients proved more difficult than I expected. The shea butter was very thick and hard to scoop out of the jar, and it took quite a lot of heating and stirring to get it to combine with the coconut oil and honey. And when I finally got it all mixed and put it in a little tub and chilled it to re-solidify it, as the recipe suggested, the honey dropped out of the suspension and formed a thin layer on the bottom of the container. So I had to stir it in by hand before I could use it.

Sadly, after all that trouble, this did not prove to be the ultimate conditioning solution I'd been looking for. The mixture was still very thick, and while you might think this would just mean a little goes a long way, getting it to go a long way wasn't so easy. By means of rubbing it between my hands and mixing it with water, I finally managed to get my damp hair coated in the stuff, and I actually did feel like it produced pretty enviable curls—but the next day, my hair was limp and bedraggled, completely weighed down by this heavy mixture. Worse still, my regular co-washing routine didn't seem to be enough to get this goop out of my hair again. I had to resort to my husband's shampoo, which I normally shun because it's far too drying, and I still wasn't convinced I'd managed to get my hair quite clean again.

I'm still wondering if there's some way I might be able to put this stuff to use. Maybe if I use only a teeny tiny bit of it, I might be able to get those fabulous curls I enjoyed on my first day without the bad side effects—but how to spread such a teeny tiny bit across my hair is, I will confess, a mystery. So for now, it's back to my old commercial conditioner.

However, I'm not giving up entirely on the idea of finding a DIY solution. This collection of 10 Best Homemade Conditioners For Curly Hair, for instance, includes a three-ingredient conditioner—lemon juice, olive oil, and coconut milk—that could conceivably be worth a try. When I tried straight coconut milk as a leave-in, the results were disappointing, leaving my hair limp and greasy, but it's possible the lemon juice could mitigate that. And if that doesn't work, there's always this flaxseed gel from Naturally Curly. We have all the ingredients for both of these, so even if they don't work, they won't cost too much to try.

Money Crashers: 15 Healthy Food Substitutions to Save Money in Your Home Recipes

In my most recent Recipe of the Month post, I noted that Brian had made a few alterations to the recipe "as usual," such as using plain white rice in place of arborio rice and red onion for shallot. We quite often make simple substitutions like this when we don't happen to have all the ingredients a recipe calls for, and we don't want to run out and buy them because (a) it's too much bother, (b) they're too expensive, and/or (c) we're not sure we'd use them again. We've also been known to swap out ingredients (such as  veggie stock in place of chicken stock) to make a recipe vegetarian, or to make it vegan or gluten-free if we want to feed it to a friend who's on one of these special diets.

Substitutions like this save us time, save us money, and make our cooking healthier. And in my latest Money Crashers article, I've written about how they can do the same for you. I explain all the various reasons you might want to replace an ingredient in a recipe, then offer handy substitutions for 15 common ingredients. You'll find such time-honored replacements as cocoa plus oil for baking chocolate, or milk plus vinegar for buttermilk, as well as newer-fangled ones like aquafaba (bean water) or chia seeds in place of eggs.

15 Healthy Food Substitutions to Save Money in Your Home Recipes

Saturday, March 23, 2019

Gardeners' Holidays 2019: First Sowing

This year, for a change, we did not have snow on the alleged first day of spring. In fact, it was quite pleasant out, though not really warm enough to ditch our winter coats altogether. So this weekend, we were able to get started in earnest on our garden.

We've started all our seedlings at this point. The parsley and leeks are pretty tall already, and the tomato and pepper plants are just starting to poke their wee leaves out of the dirt. (The scallions you see in the front of the picture weren't started from seed; they're the chopped off ends of some scallions we bought at the store that Brian put in a cup of water to regenerate. When the weather's warm enough, they'll go in the ground with the ones we're growing from seed.) The first crop to get planted directly in the ground, the snap peas, wasn't technically scheduled to go in until Tuesday, but with the weather warming up, we thought it would do no harm to get them started a couple of days early.

Before we could put the seeds in, however, we had to prepare the bed for planting, pulling out all the junk from last year and all the weeds that got a head start on our crops. And before we could do that, I had to figure out exactly which bed to prepare, because I hadn't actually gotten around yet to laying out the plots for this year's garden.

Fortunately, my new crop rotation method made this process much easier than it has been in the past. I simply rotated all the beds one place counterclockwise, moving the heavy-feeding tomatoes into the place occupied last year by the nitrogen-fixing peas, while the peas went into the slot where the cucumbers used to be, and so on. Then I also flipped the beds horizontally, so the pepper and zucchini plants wouldn't be at the same end this year as last year, minimizing the risk of disease. Actually, even after rotating and flipping, one of the pepper plants ended up in a spot that also held a pepper plant last year, so this method isn't perfect—but it's much faster than my old approach of treating all the different crops like jigsaw puzzle pieces and trying to fit them into the optimal configuration.

So, having determined that the peas were to go in the right front bed this year, we got to work getting them in the ground. Brian went out and cleared the bed while I was still fiddling with the layout, and then I went out and actually poked the peas into the dirt. We gave the seeds some water, but no fertilizer, since we were a little too pressed for time today to deal with opening up our big compost bin and shoveling out the finished stuff. But we can always add a top-dressing of it later.

We did, however, take one extra precaution to protect our peas as they grow. The last couple of years, we've had some problems with losing our peas to ambitious birds that yank them right out of the soil, either before or right after they've sent up their first shoots. So, to deter them, Brian covered up the spot where the seeds are planted with some row covers he made last year to protect our bean plants from some mysterious critter that kept chomping on them. They're just big arches of chicken wire with bamboo stakes at the bottom to stiffen them, and he was just able to squeeze the two of them into place along the back of the bed where the peas are planted. I imagine this wouldn't stop a really determined bird, but I figure it's kind of like putting The Club on your car when you park it; it makes your car enough extra work to steal that maybe the thieves will pass it over in favor of easier pickings.

Also, as you can see in this picture, Brian didn't clear absolutely everything out of the bed before the peas went in. Those two little blotches of green are a couple of tufts of last year's winter lettuce crop that appear to have successfully overwintered, so unless we get a hard freeze, we should be able to enjoy a couple of early salads this spring. We'll just have to make sure to eat it all up by May 8, when we'll need those spots in the garden to plant beans in. But with luck, by that time we'll have some of this year's spring lettuce crop ready to eat.

We're also keeping a close eye on our plum trees. The branches have buds on them, but so far, the tips of the blossoms aren't visible. As soon as they appear, we'll know it's time to spring into action with our new sprayer and see if we can manage to ward off the brown rot that's destroyed most of our crop the last two years running. Even if it works, we're not out of the woods yet, since we'll still have those thieving squirrels to contend with. But at least we'll have a fighting chance of getting some plums for ourselves.

So what with peas in the ground, seedlings in the southwest window, plum trees and cherry bushes just starting to bud, rhubarb plants just starting to reemerge, and a couple of teeny heads of lettuce peeping out of the ground, I'd say our gardening year is off to a good start. Of course, I'm not about to start counting our tomatoes before they're hatched. But so far, at least, everything looks promising.

Sunday, March 17, 2019

Recipe of the Month: Asparagus-Mushroom Risotto


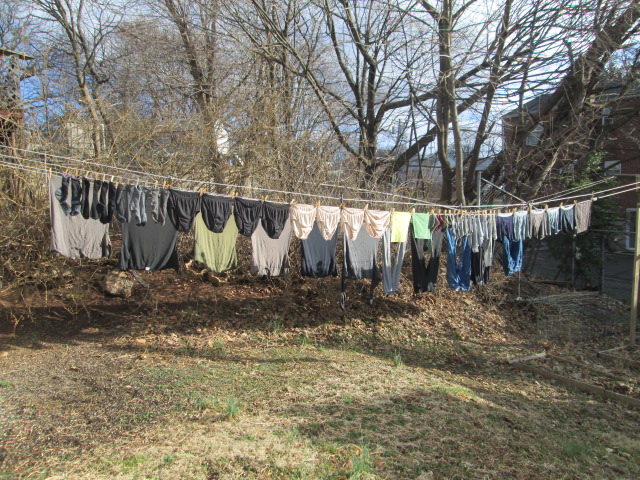
According to the calendar (and the weather report, which is predicting snow flurries later today), spring isn't officially here yet. But signs of it are everywhere. Yesterday, for the first time this year, I was able to hang out a load of laundry...


...and pick a bunch of wildflowers (even if they're supposedly weeds) for the vase in the kitchen.


And on a recent trip to Aldi, we spotted asparagus on sale for just $1.49 a pound. Normally, I like to enjoy each food in its proper season, but I just couldn't pass up a bargain like that. Maybe if I'd felt confident that our asparagus patch would provide us with a good supply of the green stuff in just a month or two, I'd have held out for that, but its performance last year was so disappointing that I can't be sure we'll even get a single meal's worth out of it this year.

After we got it home, Brian started hunting online for asparagus recipes, and he hit on one at Life's Ambrosia for asparagus and mushroom risotto. This was kind of similar to another dish we'd already made several times, the polenta with mushrooms and asparagus from Better Homes and Gardens' Easy Vegetarian Dinners, so he knew this flavor combo worked for us. And since we'd also happened to pick up some mushrooms on sale on that same trip to Aldi, we had nearly everything we needed.

As usual, Brian made a few alterations to the recipe. First, he halved it, so we could save half of our pound of asparagus for later. We didn't have any arborio rice, so he decided to try it with plain old long-grain white rice, and he substituted a quarter-cup of chopped red onion for half a shallot. In addition to the cup and a half of plain sliced button mushrooms, he added a quarter-cup of dried shiitake mushrooms, soaking them in warm water until they softened and then dicing them. (This is what he usually does for the polenta recipe, which calls for a mixture of exotic mushrooms that we're not generally prepared to splurge on.) And rather than waste the cup of water the mushrooms were soaked in, he substituted it for half the vegetable broth the recipe called for. So his version of the recipe ended up looking like this:
Asparagus-Mushroom Risotto

1 tablespoon olive oil, divided
½ pound asparagus, snapped into 1-to-2- inch pieces
1 ½ cups sliced mushrooms
¼ cup dried shiitake mushrooms, soaked in warm water until soft, then diced
1 cup water in which the shiitake mushrooms were soaked
1 cup vegetable broth
1/4 teaspoon salt
pinch black pepper
1/2 tablespoon (vegan) butter
1/4 c. red onion, finely chopped
1/2 cup rice (arborio preferred)
1/2 cup dry sherry (or white wine)
  1. In a pan or Dutch oven, heat a half tablespoon of olive oil over medium heat. Add mushrooms and saute until they begin to release moisture, then add asparagus and saute until the stems turn bright green. Remove vegetables to a bowl and keep warm.
  2. In a separate saucepan, heat broth over medium heat with the mushroom water. Keep hot while preparing risotto.
  3. In the same vessel used to cook the mushrooms and asparagus, heat butter and remaining olive oil over medium heat. Once butter melts, stir in onion and cook just until softened. Stir in rice just until it is coated in the butter. Do not brown. Pour in sherry and cook until it is absorbed. Add the hot broth mixture gradually to the rice, one ladle-full at a time, until all of the liquid has been absorbed. 
  4. It may be necessary to heat up additional water to add if the broth mixture is not sufficient make the rice soft and creamy. Add salt and pepper to taste.
  5. Stir in asparagus and mushrooms. Serve immediately.
This experiment was reasonably successful. Making risotto is a bit of a lengthy process under the best of circumstances, and Brian found that the long-grain rice took up even more liquid than the recipe said the arborio rice would (hence the addition of step 4 in the recipe above). All in all, it took about half an hour to cook. But by the time it was done, it had more or less achieved the tender, creamy texture risotto is supposed to have. And between the asparagus, mushrooms, red onion, and sherry, it was loaded with umami.


I suggested that perhaps if we make this dish again, he could try it in the pressure cooker. I've heard this is a great tool for making risotto, because the liquid can't boil off, so it all soaks into the rice like it's supposed to. The rice takes less time to cook, and it's a lot less work, because you don't have to stand there over it constantly ladling more liquid on.

So maybe next time, we could do the rice according to this recipe at Hip Pressure Cooking. We might even spring for some real arborio or short-grain rice to make sure it comes out properly. With this change, the recipe should only take about twenty minutes to make, so it will be a light, savory, and quick meal for spring.

Friday, March 15, 2019

Money Crashers: 9 Passive Income Stream Ideas

One of the things I like about working for Money Crashers is that every month I earn a traffic bonus based on how many views my articles have received. This is for all the articles of mine that are up on the site, not just the ones I've written in the past month or even the past year. It's not a huge amount, but it's the equivalent of at least a full day's pay that I get every month for work I've already done and been paid for once.

This is an example of passive income - something many financial experts describe as the key to wealth. Basically, passive income is any earnings that come into your pocket automatically, without your having to work for them every month. In most cases, you have to do some work initially to get them, like I had to work writing all those articles for Money Crashers—but once that work is done, the money just keeps rolling in. And the more passive income streams you have, the more money you can take in each month regardless of how much work you do.

I talked about one form of passive income, earnings from investments, in my article on financial independence. However, there are lots of other ways to generate passive income. You can collect rent for properties you own, royalties for books and other works you've created, or ad revenue from a blog or podcast (one of the most popular sources these days. I've never managed to make any money off this one, because my readership is just too small, and increasing it would most likely mean writing about things that are interesting to a wider audience—and of no interest to me.)

In my latest Money Crashers article, I talk about the benefits of a passive income stream, and about nine possible ways to create one. Some take a lot of work up front, like writing a successful book; others are so easy pretty much anyone can do them, like earning credit card rewards. More work up front typically yields a bigger payoff—but even a little trickle of passive income is better than none at all.

9 Passive Income Stream Ideas & Opportunities to Make Money