Thursday, June 27, 2013

The Patio Project, Phase Two: Materials

Although the biggest component in a paver patio—the pavers themselves—has already been supplied by Freecycle, there's still quite a lot of material that needs to go into the ground before the pavers can be installed. According to our handy guide, those pavers will need to go on top of four inches of gravel topped with one inch of sand, and to keep pesky weeds out, there should be a layer of landscape fabric under all that. Now, landscape fabric we could just pick up at the Home Depot, and they do sell gravel and sand there as well—but only in 50-pound bags, and we'd need around 34 of them for the sand alone. At $2.50 apiece. So it quickly became apparent that buying by the bag wasn't really going to be either practical or economical.

So last week, I started searching for a place in our area that sells gravel and sand in bulk. And I quickly ran up against my first snag: I had no idea what kind of business to look for. There was no listing in the Yellow Pages under "gravel," and when I looked under "stone" I kept finding places that sold stone countertops. So finally I just put our address into Google, told it to "search nearby," and typed in "gravel." That gave me several names to get started with. Most of the listings included websites, too, but when I tried to visit them, I ran into my second snag. Two of the listed websites didn't work at all; others had little or no information about what products the business actually carried. Fortunately, I did find one, the Belle Mead Co-Op, that not only had a complete product list but included price information as well. So with the help of that site, I was able to come up with a baseline estimate of about $210—including delivery—for all the stuff we wanted to buy. That was the price that the other businesses on my list would have to try to beat.

Getting estimates from these other businesses wasn't as easy as I'd hoped, either. At the first one I tried, I got a machine and left a message, and no one ever called me back. At the second one, a guy told me how much they charged per ton for sand and gravel, but he shied away from giving me an actual estimate, saying he wanted to wait for the guy who was in charge of that department to come back because he didn't want to give me information that might be wrong. Since that business also had an e-mail address, I tried sending a message to request a quote, but once again, no reply. And the third one I called said they didn't sell sand.

Well, at this point, the Belle Mead Co-Op was starting to look pretty good to me. I sent them an e-mail to make sure they could deliver to our area, and they responded—promptly, no less—to say it would be no problem. But before taking the plunge and ordering from them, I took a quick look at the FAQ on their site and discovered snag number three: the site said it was "not recommended" to "combine bulk products in the same dump delivery," such as gravel and sand, because they would mix together when dumped. That meant that we'd have to get two separate shipments, each with the $85 delivery charge. So my original estimate was now bumped up to around $300.

Slightly sticker-shocked by this revelation, I decided to make a more concerted effort to get quotes from more nearby places in the hopes that they could deliver for less. At the first place, I got the machine again, and I didn't bother leaving a second message, since I doubted it would get a response of the first one hadn't. At the second, I managed to reach the guy in charge of the gravel department, who ran some calculations and told me that he thought we would actually need more than a ton of sand for the top layer, even though every calculator I'd tried elsewhere said it should be a bit less. So he gave me an estimate that included 1.5 tons of sand and two delivery charges (of $80 each, despite the fact that this place was only half as far away from us as the Co-Op). Total cost: about $283.

Well, that was less than what I expected to pay at the Co-Op, but honestly, I wasn't that thrilled at the prospect of dealing with these guys. Based on my interactions with them, they just didn't strike me as all that reliable. I also dug up one more local business off the list and, after being cut off the first time I called, managed to get an estimate from them. They were actually the closest of all to us, yet they were charging a $100 delivery fee per truck, which bumped their total cost up to $313. The fact that this was higher than the Co-Op's estimate was what finally made my mind up that the Co-Op's price was reasonable, and it was worth an extra $15 or so to go with the business that seemed most trustworthy. They'd been up-front about their prices, listing everything right on the web; they'd answered all my questions promptly; they just seemed like a better place to do business with.

Turns out my instincts were right on. When I called them up to place the order, the guy on the phone jotted down all my information and then offered a suggestion: why not get "stone dust" instead of sand? Stone dust, apparently, is a mixture of coarse and fine stone tailings, and contractors usually prefer it to sand because it's cheaper and easier to work with. The idea was that we could sort the stuff by the shovelful and add the coarser bits to the gravel base, then use the fine dust for the top layer. To make up for the fact that the stone dust contains both coarse and fine bits, we could increase the volume of stone dust slightly, and decrease the volume of gravel. And if we used stone dust, we wouldn't need two separate deliveries, since it wouldn't matter if it mixed with the gravel; we'd just sort it as we shoveled anyway. I was so thrilled to have just saved $85 that when he offered to sell us the landscape fabric as well, I said yes without even bothering to see if it was cheaper at Home Depot; I was happy to throw a little extra business their way and have one less thing to pick up ourselves.

So, in total, I ended up buying 3 tons of road stone, 1.5 tons of stone dust, 1 hundred-foot roll of landscape fabric, and a pack of staples for holding it down, for $278.68, including delivery—less than I'd have paid at any of the local places even without the landscape fabric thrown in. And when I hung up the phone, I felt more justified than ever in my view that, when dealing with any kind of service—even if the service is just having something delivered—you'll get the best value by dealing with a business you trust. And often, as it turns out, you'll actually pay the lowest price that way, as well.

Wednesday, June 26, 2013

The Patio Project, Phase One: Demolition

It has been more than three years now since we hauled home nearly a thousand concrete pavers that we found on Freecycle with the intention of building a patio. We stacked all the pavers in a corner of our yard by the shed, and there they've sat, untouched, ever since. Some of them literally have moss growing on them. So this year, I made up my mind that we were going to quit procrastinating, set aside a block of time, and actually get this thing done. P-Day—or to be more exact, P-Week—is scheduled for July 1 through July 5, and we are both taking the whole week off from work to make sure we have enough time to finish the job, whether the weather cooperates or not.

To prepare for this project, I did a little research and found this handy step-by-step guide to building a paver patio from Lowe's. According to this guide, the first step in the process, once you've bought all your materials and marked out the area, is to dig out the foundation. It recommends digging the entire area 7 inches deep to allow for 4 inches of gravel, 1 inch of sand, and the thickness of the pavers themselves. However, before we can start this process, we need to add one additional step: removing the concrete pad that's filling up one corner of our future patio site.

So, once again, I consulted the Great Oracle (otherwise known as the Internet) and dug up an article from the Family Handyman about how to demolish concrete. This article recommended taking a whack at it (or several whacks) with a sledgehammer before deciding whether or not to rent a jackhammer for the job. So we borrowed a sledgehammer from a friend, and last Sunday, Brian headed out there to pound on the concrete with it. And pound. And pound. And after several sessions of pounding (interspersed with long breaks for rest and hydration), succeed in chipping away only a small corner of the concrete pad.

Fortunately, this was the point at which our next-door neighbor, watching this process over the fence, took pity on him and asked, "Would you like to borrow a jackhammer?"

Yes. Yes he would.

Much as we both prefer to use our own muscle power when we can, there's no denying that sometimes there's nothing like a power tool to get the job done. While several hours of repeated attempts with the sledge had produced little more than a few cracks, just an hour or two with the jackhammer was enough to reduce the solid slab of concrete to a heap of rubble. Several large chunks still remained that needed to be worked loose with a pry bar, but it was actually possible to see dirt at the bottom of the hole. (And our awesome neighbor refused to accept any sort of payment for the loan of the jackhammer, even when we offered homemade pie.)

Unfortunately, we still haven't really worked out how to handle the second phase of the demolition, which is getting rid of the old concrete. The smaller chunks can be mixed in with the gravel base of the new patio, but the big ones will have to be either put to some sort of creative reuse or hauled off somehow. Apparently, you can't just throw this stuff in the trash (even if you could get it into a trash bucket without making it too heavy to lift); it has to be recycled, and unlike your newspapers and soda bottles, it doesn't just get picked up at the curb. You have to haul it yourself to the nearest reclamation center, which, as far as I can tell, is about eight miles away. And that's assuming that (a) the center still accepts concrete, which isn't mentioned on its website, and (b) an East Brunswick recycling center will take waste generated in Highland Park.

For now, all the concrete is just getting piled up in a far corner of our yard, where we'll eventually sort out the large chunks from the small and try to figure out what to do with them. Brian wants to hold on to them for a while in hopes that we'll come up with some way to reuse them. Personally, I cherish the hope that if I list the stuff on Freecycle, someone will come and haul it away for us. So far it's worked for almost everything else.

Saturday, June 22, 2013

Gardeners' holidays: Salad Days

I've decided to dub the summer solstice on my gardeners' calendar "Salad Days," because our garden is currently at the peak of its lettuce production. Just take a look at these beauties. The little curly ones are Tom Thumb Bibb lettuce, and the larger ones are a new variety I tried this year called Winter Density. It was billed as a cross beween a green leaf lettuce and a romaine, and it's not supposed to bolt in hot weather the way other lettuces do. Actually, I now realize that I could have made this my Veggie of the Month, since it's a variety I haven't tried before (although then I wouldn't have had the chance to sample that yummy Gaya melon).

Unfortunately, it turns out that although the Winter Density lettuce is very healthy and productive in our garden, I don't actually care for it all that much. It has a lot of that distinctive bitter flavor that I dislike in romaine, while I was hoping it might be closer to the mild flavor of green leaf lettuce, which I do like. So although it's growing well, I probably won't bother with it next year. In the meantime, I'm using it up by mixing it in with the tender Boston-type lettuce, which I do like, so that the flavor is less bothersome.

Our snow peas are also hitting their stride, as you can see here. Unfortunately, since some of the plants were late to come up (actually, the original seeds didn't come up at all, so we quickly sowed some more), we haven't been able to harvest enough peas at once to make a stand-alone veggie side dish out of them. So instead, we've been picking eight or ten at a time and using them as ingredients in other dishes, like stir fries and Pad Thai. Brian has even taken to cutting up a few at a time and mixing them into our salads. So we celebrated Salad Days last night with a couple of bowls of mixed greens, snow peas, sun-dried tomatoes, and sunflower seeds as an accompaniment to our potato kugel and applesauce.

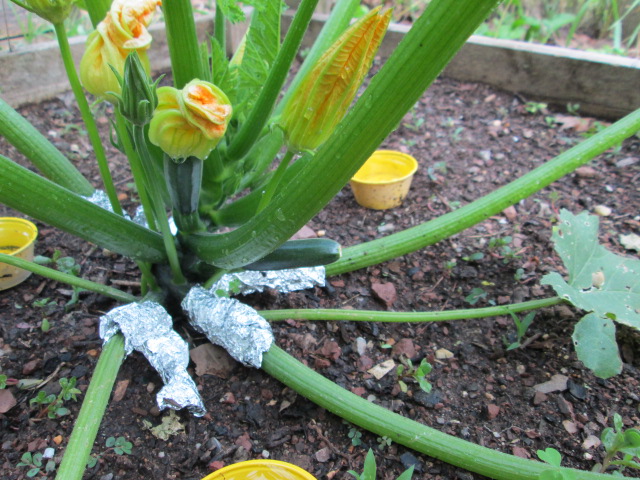
And in addition to what we're harvesting right now, we can look ahead to more good things on the horizon. Our Sun Gold tomato plants, which are generally the earliest to produce, have already developed tiny green tomatoes, the first of which should ripen by early July. And one of our two zucchini plants has already produces two wee little squashlings, just barely visible in the photo, which will probably be ready to pick within a week. (So far, my yellow cup traps haven't actually captured any vine borer moths, but we can still hope that the foil collars on the stems will keep them off the plants.) So for us, the next holiday in the gardening calendar—August 1, which was traditionally Lammas, or "loaf mass," to celebrate the first harvest of grain—will instead be Squash Mass, or perhaps even Tomato Mass.

Sunday, June 16, 2013

Collared greens

No, that's not a typo: it's a description of my zucchini plants out in the garden, which are currently wearing aluminum-foil collars around their biggest stems. This is an attempt to "foil" the attacks of the dreaded squash vine borer, which, as you may recall, infested both our zucchini plants last year. While I was able to salvage one of the two plants, at least for a while, by cutting into the stem and digging out the grubs with a knife, the other suffered an untimely death. So this year I decided on a preemptive strike, in an effort to keep the little varmints from attacking our plants in the first place.

The foil collar technique is one my dad uses on his plants, but some other gardeners on Gardenweb say their results with it have been disappointing. Thus, I'm using it as part of a two-pronged strategy that also includes yellow cup traps. I can't remember where I first read about this method, but this blog explains how it works: set out yellow cups (or bowls, or any other container) filled with water around the plants. The adult moths are attracted to the color (which is the same as the color of the squash blossoms) and will, if all goes well, fall into the cups and drown. We had a bunch of little sample cups left over from our trips to the H Mart, where they give out tasty free samples on weekends; we usually take the cups home to recycle, but I stashed some of them with our gardening supplies, thinking they might come in handy. So we gave them a quick coat of spray primer and then one of yellow spray paint, and we've set several of them out around the plants, where we hope they will capture any terrorist moths bent on squash destruction. I'd like to add regular spraying with insecticidal soap as part of our anti-borer regimen, but we're all out of it at the moment, so until I can get some more, I'll have to hope the combination of cups and collars can keep these pests at bay.

Friday, June 14, 2013

Popcornomics

As I noted way back in 2010, my favorite snack is popcorn. I have a bowl of it nearly every afternoon, and I've come up with a method for making it (buy in a jar, then pop it in the microwave in a covered bowl) that's both cost- and time-efficient. But lately I've become disgruntled with the results I've been getting with the cheapo brand of popcorn I've been buying at the supermarket (Cousin Willie's). It costs only $1.25 per pound, but it seems to leave an awful lot of kernels unpopped. After popping 1/4 cup of corn, I often seem to be left with as much as 1 or 2 tablespoons of unpopped kernels at the bottom—a quarter to a half of what I started with—that just ends up going straight into the compost bin. (I've tried to put the unpopped kernels back in the microwave for a second go-round, but only a few of them pop, and they usually come out tough and undersized.)

What made this even more frustrating was that last winter at Aldi, I bought a couple of bags of their store-brand popcorn and found that it was both cheaper and better than Cousin Willie's. It left fewer duds at the bottom, and the popped kernels were bigger and fluffier. However, I've never been able to find the stuff at Aldi since then, despite checking at several different stores. It looks like they've just stopped carrying it.

So on my most recent trip to the grocery store, I decided to try springing for a slightly more expensive popcorn. Instead of Cousin Willie's, I went for Jolly Time, which was labeled as a "high popping hybrid." I measured out my usual quarter-cup into the popper, and the difference was clear right away. With Cousin Willie's, the popping would slow to a rate of several seconds between pops after about four minutes; leave it in any longer, and it was liable to burn. The Jolly Time, by contrast, kept merrily on popping for another 45 seconds, and when I pulled the bowl out, it was full to the brim. The individual popped kernels weren't quite as big, but they were still tasty, and I was left with only a dozen duds at the bottom of the bowl.

So my initial thought was that from now on I'd splurge on the good popcorn, since it's worth paying an extra 60 cents a pound for better results. But a second later, it occurred to me that this isn't really splurging; the more expensive popcorn is actually a better value. If I buy Cousin Willie's for $1.25 a pound and half of it doesn't pop, then I'm paying the equivalent of $2.50 a pound for the kernels that actually pop. With the Jolly Time, by contrast, I pay $1.87 a pound, but at least 90 percent of it pops, so I'm paying only $2.08 per pound of poppable corn.

This led me to wonder how many other examples I could find of saving money by paying more up front. Here are a few that came immediately to mind:
  • Buying CFL or LED bulbs rather than incandescents.
  • Paying extra for an energy-efficient appliance rather than buying the cheapest one available.
  • Buying a good pair of shoes that will last several years, rather than a cheap pair of shoes every year. (Sadly, this only works if you have already tried the pricey shoes and know they will last, since a higher price tag by itself is no guarantee of quality.)
  • Paying more for a computer that can be upgraded as needed (with extra memory, faster processor, etc.) rather than choosing a cheap bare-bones model with fewer slots.
That's all the examples I could think of off the top of my head. Anyone got some others to share?

Thursday, June 13, 2013

The shoe conundrum: summer edition

As I may have mentioned at some points, one of my hobbies is filling out consumer surveys online. I get points for taking them, which I can turn in for cash or gift cards, but mostly I do it in the hope that my opinions will actually have some influence. And while most of the surveys I get sent tend to focus on topics that I don't actually care about all that much, such as airlines or frozen foods, this morning I happened to get one on a subject I do feel strongly about: shoe shopping.

Unfortunately, the reasons I have such strong opinions about shoe shopping didn't seem to be the same reasons the survey's creator had in mind. I answered a lot of questions about how important it is to me for shoes to be fashionable (not at all) or to "express my personality" (nice in theory, but way down on my list of priorities). I never really had a chance to explain just what it is that I really need most from a pair of shoes, as I explained in this entry back in January: a comfortable fit, non-leather construction, and reasonable value. If I could find a store that consistently offered well-made, leather-free shoes in my size, I'd never go anywhere else—but so far as I can tell, no such store exists.

So, in its absence, I've been forced to resort to a variety of stratagems for hunting down shoes that fit. For instance, as summer approached, I found myself faced with the problem of attempting to replace my worn-out Teva sandals. Fortunately, since Teva is a well-known brand, I figured I could simply find another pair in the same size from the same maker, and it would be sure to fit me comfortably. (Teva makes most of its women's shoes only in whole sizes and standard width, but I'd already discovered that a youth size 4 would fit me reasonably well—even offering a bit of arch support, which most sandals lack.)

However, since Teva isn't exactly a budget brand, I figured I'd save a bit more money by looking for a pair in good condition on eBay. After a couple of unsuccessful bids on pairs in the "sport" style, I finally secured a pair of "Tirra" sandals, which cost me only $12 including shipping and looked pretty cute to boot. The problem was, when they finally arrived, I quickly discovered that these sandals aren't built on the same footbed as my old ones. So while they are the right size, they have no discernable arch support. It only took one walk to the store in them to convince me that wearing them every day throughout the summer was not going to work.

At this point, I could have just written these off and resumed my search for a pair like my old ones, paying more careful attention to the design of the footbed. But I still had hope that it might be possible to make the new ones wearable. A standard molded insole, designed to tuck into a shoe, obviously wouldn't work with sandals—but what about some sort of cushion that could stick onto the shoe surface, right where the arch of the foot should be? Did anything like that exist?

A quick search proved that the answer was yes. Amazon.com had several different kinds, ranging in price from $1.66 a pair to $16.41 for a three-pack (for those who have three feet, presumably). Since I couldn't be sure how well they'd work until I'd tried them, I decided to minimize my risk by going with the cheap ones. The only downside of that is that they ship from Hong Kong—so Amazon is saying I shouldn't expect them until sometime between July 9 and July 25. But I figure I can manage to make my old pair last until then.

If this works, I'm planning to order several more pairs, in the hope that it will extend the range of footwear available to me. I might even be able to get away with wearing those cheap little canvas slip-ons again.

Wednesday, June 12, 2013

Fruit of the Month: Gaya melon

Late spring is kind of a dry season for fruit. Fresh veggies are plentiful; our garden is producing lots of lettuce and snow peas, and we're still harvesting the odd spear of asparagus. But most fruits—blueberries, peaches, cherries—don't really become abundant until later in the summer, and last year's crop of apples and pears is long depleted by now. When I finally made it down to the opening day of our local farmers' market last Friday, the only fruit I found on offer was $6-a-carton strawberries.

So, when my supply of fresh fruit ran out yesterday, I made a trip out to the HMart to see if I could find anything appetizing. And that's where I ran across this little specimen: Gaya melon. I'd never heard of it before, but as you can tell from the picture, it's roughly coconut-sized, with a pale-green rind speckled with darker green. Inside, the flesh is whitish, with a soft, seed-filled center.

A site called The Produce Guide describes the flavor of a Gaya melon as "a gentle mix of banana and pear," but to me it tasted more or less like honeydew, only with a less dense texture. It's very soft and sweet toward the center, growing crisper and slightly tart toward the rind. It's extremely refreshing on a hot day. My plan was to eat only a quarter of it to start with, but instead I found myself gobbling down the second quarter immediately after finishing the first.

The Produce Guide notes that Gaya melon makes "a good background fruit for a fruit salad with raspberries and blueberries," but I doubt I'll be able to put this one to any such use, since as I noted, the raspberries and blueberries won't be ripe around here for another month or so. Of course, if I had waited for the Gaya itself to be in season locally, rather than buying one shipped up from Florida or somewhere, I probably could get all three at the same time—and maybe I will, if I can find all three ingredients for less than a couple of limbs. But for now, I think the rest of this Gaya melon is going to go the same way as the first half, and quite speedily. And once it's gone, I'll definitely be keeping my eye out for more of the same—especially if I can find any grown locally.