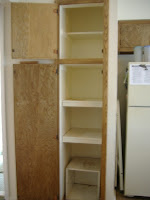
One thing I've wanted ever since we first bought this house, four years back, is more pantry space. Although we have a lot more space now overall than we used to have at our old apartment, one thing I was very sorry to give up was a huge, sunny pantry that ran the full width of the kitchen, with floor-to-ceiling shelves that made our entire assortment of food visible at a glance. Our current kitchen, though better in most respects, offers only a narrow, deep closet with four shelves for food storage. We installed a small wooden cube at the bottom to make a fifth shelf, which helped a bit, but the biggest problem with it is that the stuff toward the back isn't easily accessible. You can't see what you have (one of the reasons we found it necessary to create our "canventory" to keep track) and even if you know what's back there, you may have to pull out several intervening items to get to it.
The best way we could think of to solve this problem without embarking on a major kitchen remodel was to install sliding shelves in the pantry. These would both give us more square footage (since we could easily squeeze in a sixth shelf in the available space) and make all the space more usable. And now, after four years and a number of other projects, we've finally decided it's time to go for it.
Since our pantry apparently isn't a standard depth, Brian originally intended to make custom-built shelves that would use every square inch of the available space. However, when he looked into the cost of the hardware that would be required, he discovered that building the shelves from scratch would cost as much as or more than buying them ready-made. So we decided to sacrifice an inch or so off each shelf in exchange for the convenience of having them arrive ready-built, as well as the knowledge that they'd all be a uniform size. There are many sites on the Web selling these, but a little research revealed that they all offer pretty much identical models, so we decided on the standard sliding shelf from KitchenShelves.com, which offered the best price. They arrived yesterday, neatly packed in two large boxes, and now all we have to do is stain them, finish them, and—the tricky part—install them.
The reason the last part is tricky is that in order to install them, we have to dismantle the original pantry. First we need to remove the doors and the cabinet frame, ideally without damaging it, since we'll want to put it back at the end. Then we need to rip out the old shelves, which probably won't come loose without a struggle and will end up taking some portion of the wall with them. And after that, depending on where the studs turn out to be, we will most likely have to build a plywood box to fill the whole pantry space so that we will have a secure base to attach the shelf hardware to. (This is not unlike a project Karl did in the first season—in fact, possibly the series premiere—of Wasted Spaces.)
So this is how we expect to spend most of this holiday weekend (and possibly some additional weekends to come). In the meantime, our food is living in temporary digs on bricks-and-boards shelving in the spare room. As the project progresses, I'll keep you posted on the (we hope not too) gory details and the big reveal at the end of our (we hope) spacious, finished pantry.
Saturday, September 3, 2011
Subscribe to:
Post Comments (Atom)


1 comment:
Found this link while searching Google, thanks
Post a Comment