Sunday, February 23, 2025

Two clothing repair challenges

It turns out my clever plan to reinforce the thighs of my corduroy pants with a honeycomb stitch really wasn't all that clever. It took me at least two hours to stitch both sides of the pants, and within three months, they were falling apart again. Not only had the threadbare area expanded well beyond the borders of the original darn, but the threads in the darned area itself had worn through and broken off in several places. This left nothing to protect the fabric underneath, which had started to develop actual holes. They were still small, but clearly re-darning the area wasn't going to do much to keep them from growing. If I wanted to save the pants, I was going to need a new fix.

Since darning hadn't worked, I decided to move on to an entirely different technique: patching. I didn't have any fabric remotely similar to the original grey corduroy, so I decided to go for a complete contrast instead. Down in my scrap bin, I had a fairly good-sized bolt of colorful striped fabric in good condition that we'd picked up at a yard sale or somewhere. I cut two pieces of this large enough to cover the threadbare areas on both thighs, right over top of the honeycomb stitching. That saved me the bother of picking it all out (and possibly weakening the fabric in the process). 

I left a little extra space around the edges of each patch so that I could hem them. I folded over the raw edge and sewed it down using a back stitch. They came out a little bit lumpy, but more structurally sound than just a chopped-off piece of fabric. 

Then, using my usual whip-stitch technique, I sewed the two patches in place. My first attempt was a little messy, as I didn't pin the fabric down first; I just followed the line of the seam in the pants. That worked fine along that one edge, but it didn't secure the entire patch well enough to keep it smooth and flat, so the fabric underneath ended up a little puckered. I couldn't bring myself to pick out the seams and do it over, but I did make a point of carefully pinning the second patch before stitching it so that it would come out neater.

All told, this repair took me a couple of hours, about the same as the first one. But I'm hoping it will hold up longer and maybe justify the amount of effort I put into it.

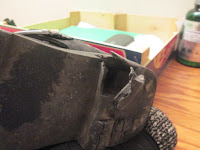
Sadly, I don't think there's any equally simple fix for the wardrobe item that most recently fell apart on me: my two-year-old black ankle boots. They already had cracks in the sole that Shoe Goo had proved unable to fix, making them too leaky to wear in the rain. But when I wore them out on a walk today, one corner of the heel simply disintegrated, leading me to suspect that I won't be able to wear them even in dry weather for much longer. 

You can't replace the heels on a cheap pair of boots like this, and at this point, there's so little left of the sole that there wouldn't really be anything to attach it to anyhow. The only question is whether I can come up with some sort of hack that will allow me to get another couple of months of use out of the boots—long enough to get me through the multiple rounds of trial and error it will no doubt take me to find a replacement.

Saturday, February 15, 2025

Recipe of the Month: Kung Pao Tofu (with bonus dessert)

I've had other things to post about the past couple of weeks, so this is my first opportunity to tell you about our new Recipe of the Month: Kung Pao Tofu with Roasted Cauliflower. Brian found this recipe on a site called Eating Bird Food while hunting for new ways to use a cheap cauliflower we'd scored toward the end of January. As usual, he made a few small changes to the recipe:

  • Scaling it down from four servings to three
  • Substituting canola oil for avocado oil
  • Leaving out the fresh cilantro, which we didn't have (and I don't care for anyway)
  • Replacing the hot chili sauce, which we also didn't have, by adding a dried hot chili to the marinade instead—and then, for fear that change would make it too fiery, dialing back the crushed red pepper to just a pinch for the two-thirds recipe

As it turned out, he needn't have worried about the heat level; the dish was mild enough that even my delicate taste buds could easily have handled more. In fact, I'd say it was bordering on bland, despite the ample amounts of onion, garlic, and ginger in it. It just seemed like it could have used a little bit more of pretty much everything. Texture-wise, the cauliflower worked better than the tofu, which seemed a little too soft and squishy for the dish. It might have worked better with some Soy Curls, which have a firmer texture closer to chicken. But given how unmemorable we both found it, it's probably not worth making a second attempt.

But that wasn't the only new vegan recipe we tried this month. Last night, as a special Valentine's Day treat, he prepared the Salted Dark Chocolate Tart from Gimme Some Oven. This rich little dessert has a gluten-free chocolate-almond meal crust filled with a dairy-free chocolate ganache made with coconut milk. It's supposed to be served with flaked sea salt on top, but Brian decided to make that part optional. Since the recipe says it makes 8 to 12 servings, Brian cut it down to one-quarter of its size for the two of us.

This dish was much more successful than the tofu. The crust was a bit crumbly and didn't come out of the pan neatly, but the ganache was creamy and delicious. Brian had his with a sprinkling of salt and found that enhanced it still more, but I chose to top mine with a generous portion of coconut whipped cream instead. This actually made it a bit less decadent, tempering the richness of the filling by stretching it out over a larger volume. We ate about half of it up while watching the last bits of Campaign Three of Critical Role, leaving us with two more small portions to enjoy tonight.

So, unlike the kung pao tofu, this dessert looks like a keeper. We might fiddle with the recipe a bit to see if we can keep the crust from sticking, but we can be sure the results will be good enough to justify the effort.

Sunday, February 9, 2025

A completed birthday project (and one to come)

Last January, I asked Brian for my most ambitious DIY birthday gift ever: cleaning up our unfinished workshop/laundry room/storage room. I wanted to get rid of all the unnecessary stuff, neatly organize the stuff that remained, and most importantly, cover up the bare insulation that currently served as the wall surface. I knew at the time I asked that this was a big project that might take up to half a year to finish. But as it turns out, that was a serious underestimate. 

It took us a couple of months just to get around to the first stage of the project. In March, we went through all the stuff in the room and identified several things we didn't need: a junker bike we'd picked up off the curb, loads of other bike parts, my unused guitar case, a hanging-file box, a big box full of brown glass bottles that we'd picked up for free at a yard sale and used only a few of, a box of wooden blocks, and a packing tape dispenser. We donated all the bike stuff to the New Brunswick Bike Exchange and disposed of the rest without difficulty on Freecycle. 

After that, we couldn't get started on covering the walls until we'd bought the necessary lumber. But since it came in large sheets and our little Honda couldn't possibly hold more than one, this step required renting a truck. We finally got around to doing that in June, when we were able to use the same truck to pick up a new patio set from Craigslist (along with the lumber for Brian's planter project). The year was more than half over before we actually got the boards cut to size and up onto the walls (first flipping around the batts of insulation so that the moisture barrier was properly positioned on the outside, facing toward the heated space). And it took us all the way until my next birthday—and just a little bit longer—to complete the job of tidying and reorganizing the stuff that remained.

But tidy it we did, and I'm ready at last to unveil the final result. First, as a reminder of what we were up against, here's the "before" picture of the room as it looked when I asked for this present a year ago. 

And here's the "after," as seen from roughly the same angle.

The lighting is still terrible for photography, but everything else is so much better. The two remaining bikes are both neatly hung from the ceiling, the boxes are all neatly stowed on the shelves, the work table has been cleared off, and all the tools have been arranged so that they're visible and easy to access.

Here it is from another angle: the before...

...and the after. In this shot, you can see the neat reorganization of the shelves, the workbench (which has a usable surface for the first time in years) and, most of all, the scrap wood pile. It's now all neatly tucked into the back corner, arranged by size, rather than spilling out onto the floor.

Let's come in for a couple of close-ups. Here's one of the wall nearest the door, with its nice new wood covering. In addition to hiding away the insulation, the OSB wood panels make a suitable spot for hanging things. We put up a little hook to hold our clothespin bag (my old purse) and hung up the extra sections of our shoe rack to provide convenient, accessible storage for safety gear and extension cords. This also had the advantage of getting them out of their storage box so we could throw it away, freeing up more shelf space.


And here's a look at our reorganized tool storage. We already had that pegboard and most of the hooks; it was just a matter of arranging them optimally to display most of our tools. The few that don't fit are either tucked in a toolbox or neatly laid out on the cabinet below. (We did buy a few extra tool hooks, but they cost less than $15 total.)

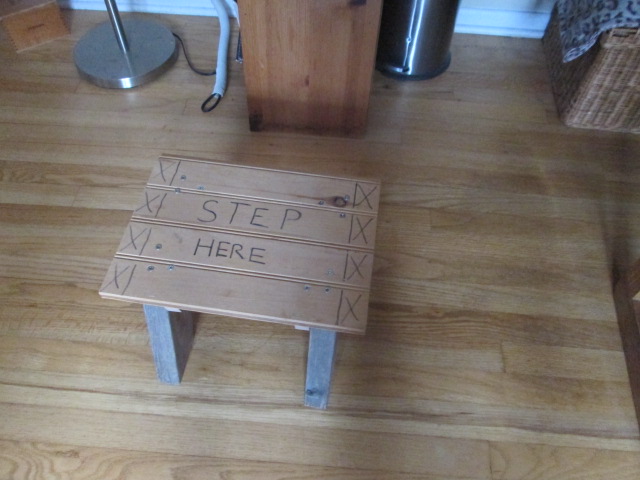
The one problem with this new layout is that I can't quite reach the top row of tools on the board. But Brian addressed that with one more DIY piece, completed just today: a little step stool made out of scrap lumber. (He realized after completing it that the supports were placed too far in, so he added markings to indicate where I could step on it without tipping it over. But he'll probably take it apart and reassemble it at some point.)

Here's one last area that I didn't manage to get a good "before" picture of: the floating shelf over the utility sink. Previously, this shelf was a piece of MDF that was seriously bowed under the weight of all the various detergents and cleaning tools piled on it. Now it's a smaller piece of leftover plywood that neatly holds a pared-down assortment of cleaning supplies we'll actually use.

So how much did the project cost in total? Well, it depends on how you count. We spent $244.56 on lumber at Home Depot, but about half of that was for the planter project, so that's only about $125 for the walls. Add the $15 or so we spent on tool-hanging hardware, and that's around $140 worth of supplies. But if you include the $102 we spent on the U-Haul to get all that lumber home, that brings the total cost to around $242—still less than the cost of the closet doors that were my 2016 birthday present, but not by much. And in terms of time and elbow grease, this project was probably at least as demanding.

After this complicated project, I'm hoping my birthday request for this year will be a lot easier to fulfill. Over the years, the grout in our shower has become increasingly stained, despite my best efforts to keep it clean. Also, bits of it have fallen out, leaving deeper gaps between the tiles, which makes the stains even harder to remove. So, for this year, I've asked to redo all the grout, then seal it so that it will stay put and stay clean. We've done this job once before, so we know we can handle it, but last time we neglected the sealing step. I'm hoping that with a good sealant, we can keep the grout clean and intact for at least a few years, and when it starts to wear off, we can just reapply the sealant instead of having to replace all the grout. I've already invested in a bottle of Aqua-X Grout Sealer, which got good reviews from several professional review sites (including this professional tiler). Now all we need is a tub of grout and—always the tricky part—a free weekend to apply it.

Sunday, February 2, 2025

Gardeners' Holidays 2025: Seedfest

Our gardening year starts with a Gardeners' Holiday I've referred to by a variety of names: Festival of Seeds, Pruning Day, Seed-Starting Day, Indoor Growing Day, or simply Renewal. The specific focus varies from year to year, but it's basically about getting ready for the gardening season to come. It's too early to harvest, too early to plant, but not too early to plan and prepare. And this year, our preparations are focusing on a crop that's not usually on the schedule: pawpaws.

We first learned about pawpaws from a landscaper we hired in 2012 who recommended them as an easy fruit tree to grow in clay soil. At the time, we were hesitant to follow up on this advice because neither of us had ever tasted pawpaw and we didn't know if we'd like it. That changed in 2018, when Brian learned of a pawpaw patch near his workplace and started scavenging some fallen fruit there. (Since it's on private land, he scrupulously avoids picking fruit off the trees, but he assumes the fallen ones are unwanted and therefore fair game.) He found them appealing enough to save the seeds and start a few seedlings, which he planted in a back corner of the garden the following spring. Six years later, two of those seedlings have grown into small but sturdy saplings that, according to Fruit Tree Hub, could start producing fruit as soon as this year. 

Technically, two pawpaw trees is enough for fruit set, but Brian has decided he would like to have a couple more if possible—even he has to wait another 5 to 7 years for them to grow up. He saved the seeds from some pawpaws he gleaned last September, and last month he started saving soymilk cartons to plant them in. Yesterday he went out and dug a big chunk of still-frozen soil out of the garden, distributed it among nine of the cartons, and dropped one seed in each. He's still got three more cartons that he plans to fill and plant as well.

Now, if you're doing the math, you'll realize that if all of these seeds come up, that will make 12 new pawpaw seedlings. And if you're looking at the picture above of the corner where our two pawpaws are now, it will probably occur to you, as it did to me, that we do not have room for nearly that many new ones. However, there's no guarantee the seeds will sprout, so Brian's plan is to start plenty in hopes of getting two seedlings healthy enough to plant. If he ends up with extras, he'll try giving them away to friends, coworkers, or strangers on the local Buy Nothing group. But he's not counting his pawpaws before they're hatched.

As for the rest of our 2025 garden plans, they're progressing at a more leisurely pace. We've received our seed order from Fedco (all except the new Pirat lettuce, which is on back order), and Brian has started soaking some parsley seeds so he can put them into seed-starting tubes tomorrow. I've already laid out the plan for next year's beds in my garden spreadsheet, which only took about 15 minutes with my simplified rotate-and-flip method. We still need to prune our plum trees, as well as buying and applying a load of leaf compost to amend the compacted soil in the garden beds (and fill up the gap Brian left by digging out so much soil for the pawpaws). But those jobs can wait until the weather warms up, or at least peeks its head above the freezing point. So we've got another week or so of snuggled-in-for-winter mode before it comes time to start diving into the gardening season in earnest.

Sunday, January 26, 2025

What's holding back plant-based protein?

I recently discovered The Tyee, an independent Canadian news site with a leftward bent. Flipping through to see what sorts of stories it covered, I happened on one about a "revolutionary" new plant-based protein made from mycelium, the root-like fibers that connect networks of fungi underground. The company profiled in the piece, Maia Farms, claims it can cultivate and harvest its mycelium protein in just seven days, as compared to 18 months to grow a calf to adult size and slaughter it for beef. Its process produces 84 percent lower carbon emissions per "unit of production" than chicken, which in turn has only about 12% of the carbon footprint of beef. The founder of Maia Farms calls his product "arguably the most efficient form of agriculture that will ever exist" and says it could be a "global solution" to the problem of meeting the protein needs of a growing population. All of which, obviously, sounds fantastic. 

But I was not impressed. Why not? Because I've heard this same story so many times before from so many other producers of plant-based protein—all of which have, so far, completely failed to make a significant dent in humanity's meat consumption. 

In 2023, for instance, the Climate Coach column in the Washington Post ran a story (free gift link for non-subscribers here) about Plantible, a California startup producing a protein called rubisco from fast-growing duckweed. The article touted rubisco as a versatile protein that can easily step in to do the job of eggs, meat, or butter. It also noted how easy the duckweed is to grow, producing "36 metric dry tons per hectare — roughly 10 times more than soy." It sounded like it should be utterly revolutionary. Yet in the 19 months since that article came out, I have not seen Plantible's Rubi Protein, nor any product that contains it, in any store. Obviously, it takes time for a new product to scale up, but based on Plantible's website, I can't find any evidence that its product is available anywhere at all.

If these plant-based proteins are so revolutionary, so efficient, so sustainable, then why aren't they everywhere? The Climate Coach article implies that the main barrier to wider adoption is taste: plant-based proteins, it says, "fall short of the savory appeal of eggs, dairy and meat." But I don't buy that argument. Brian, a longtime fan of beef, says burgers and bratwursts from Impossible are, to him, indistinguishable from the real thing. That is, until you look at the price tag. On Target's website, a bag of six Impossible Burgers (in their new red packaging, designed to appeal more to carnivores) costs $13.59, or $9.06 per pound. A 3-pound bag of store-brand beef burgers costs $13.99, or $4.66 per pound—roughly half as much. At those prices, what reason would anyone who isn't a vegetarian already have to switch?

I can only see two ways that plant-based proteins will ever become more popular than the animal products they're meant to replace. Either they'll have to get a lot cheaper, or the animal-based products will have to get a lot more expensive. And there's some chance that economies of scale will, in fact, drive down the cost of plant proteins. A 2021 analysis from the Good Food Institute (GFI) shows that, while plant-based meats and cheeses were about 40 percent more expensive in 2020 than corresponding animal products, plant-based products in "more developed categories," such as plant milk and butter, had a much smaller price premium of 7 to 11 percent. So maybe, once mycelium and rubisco proteins have been around as long as soy milk, they'll be more affordable. But they won't be doing much to halt the growth of food-driven carbon emissions in the meantime.

But there's also the second possibility: a spike, or even a sustained rise, in the price of animal proteins. We're starting to see it right now with eggs, which have jumped in price to an average of $4 per dozen from $2.50 just a year ago. That inflated price is still considerably cheaper than Just Egg, but it's significantly more than scrambled tofu. One large egg weighs about 2 ounces, so a two-egg scramble would be about 4 ounces' worth and cost 67 cents. Last time we bought tofu, we paid only $1.29 per pound, so a scramble made with 4 ounces of tofu would cost only around 32 cents. Even if you throw in a pinch of turmeric for color and a pinch of black salt (kala namak) to give it an eggy flavor, it won't cost more than about 34 cents—roughly half the price of real eggs.

Honestly, I'm thinking the next time we make a recipe that includes scrambled eggs, like our staple weeknight meal of roasted Brussels sprouts with eggs and potatoes, we should just scramble up a corresponding volume of tofu instead. At both half the price and half the carbon footprint, it's an ecofrugal no-brainer. The only downside is that the leftover tofu in the package won't keep as long as eggs in their individual shells, so we'll need to make sure to use the rest of it up within a few days so it won't go to waste. But with the number of recipes we know that use tofu, that shouldn't be difficult. And it will allow us to save our precious eggs for the jobs that only they can do properly, like holding matzo balls and rice casserole together.

[Edit, 2/26/26: I've just learned why I've heard nothing about Plantible's products in the three years since they were announced. Turns out they've spent all that time waiting for approval from the FDA to use their Rubi Protein in food. Now that they have that approval and a working factory that can make Rubi Protein at scale, we might—maybe, possibly?—see it on shelves in the next year or two. Or three. Or...not.]

Thursday, January 23, 2025

Thrift Week 2025, Day 7: Giving

So far this Thrift Week, I've only looked at the money that the wealthy spend on themselves. But they also spend a non-trivial portion of their income on others. According to the latest Consumer Expenditures Survey, Americans earning over $200,000 per year devote more money to "cash contributions" than those with lower incomes—both in absolute dollar terms and as a percentage of their income. But the gap isn't as big as you might expect. The top income group devotes an average of 3.7% of its budget to charitable donations, as compared to 3.1% for Americans overall. Even the poorest Americans, those earning under $15,000 per year, manage to give away 1.5% of that.

If happiness economists are to be believed, wealthy Americans are making a sound investment when they give to charity, and probably missing a trick by not devoting a bigger share of their spending to this purpose. Multiple studies have shown that spending money on others gives people a bigger happiness boost than spending it on themselves. Wealthy people, who presumably have all the necessities of life already, stand to get more satisfaction out of their money by giving it away than by spending it on luxuries. And for those who aren't rich, giving money away is one of the easiest ways to feel like you are. Just the gesture of giving something, even if it's only a dollar to a sidewalk beggar, reminds you that you're better off than a lot of other people in the world. 

Even if your budget is so tight that you can't manage to squeeze that extra dollar out of it, there are other ways to indulge in what Louisa May Alcott called "the luxury of charity." You can: 

  • Shop through charity portals that donate a small percentage of your purchase.
  • Use a credit card that does the same thing.
  • Raise money for a cause on GoFundMe.
  • Donate food, clothing, or other household goods.
  • Donate your time by volunteering.
  • Donate blood (an especially valuable way to give right now if you live in New Jersey or New York, where blood banks are currently experiencing severe shortages).

Thus, I'm closing out this Thrift Week with a Treat for Today that's a treat both for me and for others: a donation to support SciShow, one of my favorite educational channels on YouTube. Hank Green, one of the channel's hosts (and, in my opinion, a total hottie), recently posted on Bluesky that to make accurate content, they rely on donations from one out of every 10,000 people who watches. So, to reward that special one percent of one percent, they are offering a deal: for a donation of $25, you get a postcard autographed by all the show's hosts containing art, facts, and a QR code linking to "one of four exclusive videos from me discussing my favorite frog facts." And for a donation of $60, you get all four postcards with all four frog videos. Such a deal!

Sure, that $60 is significantly more than I've spent on any of my previous birthday treats. But last year I donated $54 and got only one postcard, and all it had on it was a thank-you message with Hank's signature. So four whole postcards complete with frog videos for a mere $60 seems like a good value to me.

Oh, and I made an appointment to give blood next Tuesday. So even when Thrift Week is over, I can continue to treat myself—both with the warm glow of giving and with free cookies.

Wednesday, January 22, 2025

Thrift Week 2025, Day 6: Fragrance

Back on Day 3, I named Dom Perignon as a classic example of a luxury good, costing about $330 for a 750-mL bottle. But on a milliliter-for-milliliter basis, that stuff doesn't hold a candle to high-end fragrance. A 2023 article in (once again) Town & Country magazine lists a dozen perfumes that cost hundreds or even thousands of dollars per ounce. The most expensive scent on the list, Haute Luxe by Roja Dove, costs $3,500 for a 3.4-ounce (97-mL) bottle. That's $36 per milliliter—82 times as much as France's most iconic bubbly.

According to T&C, these pricey perfumes are "worth every cent." While the editors concede that "your signature scent doesn't need to cost an arm and a leg," they also claim that an "ultra-luxury fragrance" offers benefits a more "attainable" one can't, such as:

  • The "finest ingredients in the world" that went into it.
  • The skills of the "master perfumer" who created it.
  • The design and "natural materials" of the the bottle.
  • A "one-of-a-kind scent" that most people won't have.

All that sounds impressive, but really, a fragrance only has to do one thing: make you smell good. If it doesn't do that, then the luxurious ingredients, the fancy bottle, and the efforts of the master perfumer are simply wasted. And, conversely, if you can get a much cheaper scent that smells just as good to you, then the lack of fancy ingredients and "craftsmanship" matters not one whit. The proof of the perfume is in the sniffing.

So, if you want to "find your signature scent" without spending a bundle on it, where do you look? Well, you could disregard T&C's guide in favor of this one from Cosmopolitan, which recommends the best "affordable fragrances that smell luxe." But its definition of "affordable" is up to $70, which is still a bit much to risk on a scent you don't actually know you'll like. So if you want a chance to try before you buy, you could pick up a few test vials from Microperfumes, which sells tiny samples (just 0.75 mL) of different fragrances for as little as $3 apiece. Or, if you already know what fragrance you like but you don't like the price tag, you can search for a knockoff version at a site like Perfume Parlor. With a quick search there, I found a duplicate of that $36-per-milliliter Haute Luxe that costs only 56 cents per milliliter (with a 2-mL test vial available for just $4). 

Or, if you want a truly "one of a kind scent" that no one else is wearing, you can do what I do and make your own. My signature scent is a blend of three essential oils—sandalwood, vanilla, and cinnamon—mixed with a carrier oil in a little roller bottle. Last summer, the tiny bottles of essential oil that I bought back in 2020 finally started to run low, so I restocked with some bigger bottles from an online supplier: 2 ounces of sandalwood for $4, 1 ounce of vanilla for $6, and half an ounce of cinnamon that looked like an unbeatable value at just $1. Unfortunately, when I cracked it open, I realized why it was so cheap: it had a weird, acrid smell that was nothing at all like cinnamon. Thus, for the past few months, I've been making my perfume with just sandalwood and vanilla—all about those base notes, with no middle or top.

So, as my Treat for Today, I ventured out in the brisk January air to go to the local Rite Aid and drop $9 plus tax on a new bottle of cinnamon essential oil. (As Rite Aid is going through a bankruptcy right now, its shelves are looking a little picked over, but fortunately this particular essential oil is still well stocked.) It's a 1-ounce bottle, so at the rate I use it, I'll still have half of it left when my new bottles of vanilla and sandalwood oil run out. (At that point, I'll have to decide if I want to replace the sandalwood oil, which I've recently learned comes from a rare and over-harvested plant, with something more sustainable—like, ironically, a synthetic fragrance oil.)