
Five years back, I shared a series of ecofrugal household hacks for the bathroom. These included cleaning techniques and simple repairs for various items in the house's smallest room, such as the toilet flapper and toothbrush holder. All of them cost little or no money and required no nasty toxic chemicals, and many of them made use of materials that would normally go to waste.
In the years since, I've come up with several new tips and tricks for the loo along the same lines. I've already shared some of these, but I figured I might as well gather them all in one place for convenience. Thus, I proudly present Household Hacks for the Bathroom, Volume 2.
Hack #1: Reduce toothbrush waste
For years, Brian and I were loyal users of the Fuchs Ecotek toothbrush, with its a snap-out replaceable head. Using these allowed us to reuse the same toothbrush handles (which don't really wear out) for years on end, replacing and discarding only the smaller heads. When I discovered in 2020 that the Ecotek was no longer available, I went on a deep dive to figure out what would be the most ecofrugal replacement for it.

Hack #2: Store your razor in a cup of oil
On the subject of reducing waste, one item in the bathroom that had always frustrated me was my cartridge razor. It wasn't so much the amount of waste it produced, since I could make one cartridge last quite a while; it was the cost of the replacement cartridges and the fact that the handles themselves inevitably broke after a while. So, last year, I bit the bullet and got a safety razor. This was much cheaper to use, but I still didn't get as close a shave as I wanted with it, and I kept nicking myself. So I eventually invested in a pricier Twig razor, which takes single-edged blades.

Hack #3: Replace your plastic shower poof with a washable one
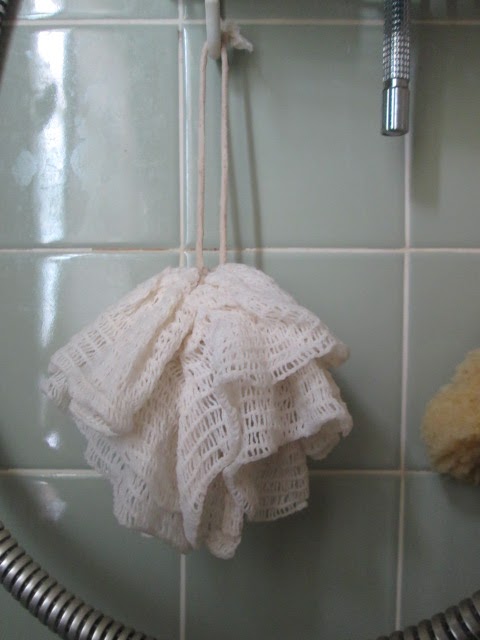
I've tried various more eco-friendly alternatives, but none of them was quite satisfactory. A washcloth didn't produce a good lather and didn't extend my reach enough for me to reach all parts of my back with it. A natural loofah was too abrasive. And a sea sponge from Bed Bath & Beyond cost 15 bucks and disintegrated after a few months of use.
My latest plastic alternative, and the one I suspect I'm going to stick with, is a washable bath puff made from cotton. (The exact one I bought on Etsy is no longer available, but here's a similar one.) It doesn't lather up quite as well as my old plastic one, but it looks sturdier, exfoliates nicely, and can be washed if it starts to mildew.
Hack #4: Make a bath compost pail from a coffee can
This is actually two hacks in one. The first is the idea of keeping a small compost pail in the bathroom to hold biodegradable waste: cat and human hair, spilled cat litter, cotton swabs (the kind with a cardboard core), and the scraps of newspaper used for cleaning the bathroom mirror. This makes it easy to compost all that stuff without having to carry it out to the bin while still dripping wet from the shower.

However, I had started buying coffee in cans at the supermarket, so my new bin is a small coffee can with a scrap of old wrapping paper taped around it. One problem with this design is that the metal rim on the bottom leaves rust stains on the vanity, but I circumvented that by saving the plastic top from a second coffee can and adding that to the bottom.
The first can I used for this purpose was all metal, but it eventually succumbed to rust. So I switched to a coffee can from Lidl, which is made mostly of cardboard with only a small rim of metal at the top and bottom. These cardboard cans gradually break down from exposure to moisture, but that's no problem: when one gets too worn out to use, there's always another can to replace it with.
Hack #5: Make a soap dish insert from garlic sleeves
Along with its built-in toothbrush holder, our bathroom has a built-in soap dish. This is handy, except that any bar of soap that gets used frequently throughout the day will never get a chance to dry out between uses. As a result, it gets all slimy and gross, and it disintegrates quickly.

This DIY soap dish insert keeps the soap dry for essentially no cost. It does accumulate soap scum and dirt
over time, but it's easy to clean up with a quick rinse under the faucet.
Hack #6: Store surplus meds in a drawer

Eventually, it occurred to me that there was one bit of storage space in the bathroom we weren't using fully: a small drawer under the sink on the left-hand side. There was nothing in it but a flashlight, and there was enough room for that to squeeze in with the other items in the right-hand drawer, such as Brian's beard trimmer.
So now this drawer is given over entirely to surplus meds, and we can see all of them at a glance. We still occasionally run out of room in there, but we can usually stick an extra bottle in the medicine chest if we have to.
Hack #7: Use clips to squeeze the air out of a tube dispenser
This is the hack I've come up with most recently, and consequently the one I'm most pleased about. I've recently started using a couple of products that come in a particularly annoying kind of package: a flexible plastic tube. This isn't like a toothpaste tube that you can squeeze the air out of; it automatically reinflates as soon as you let go of it. And you can't just roll up the tube to push the product forward like you can with a toothpaste tube, because it automatically unrolls as it reinflates. Consequently, it gets harder and harder over time to get any product out of the tube. When you squeeze it, you generally get nothing but air. To get anything else, you have to press hard with both hands, whereupon you squeeze out a huge glob of the product that goes all over the place and not where you want it. So most of it just ends up going to waste.
There are various products on the market designed to fix this problem, ranging in price from around $3 to as much as $40. But to buy one of these, I'd probably have to order it online, and the shipping cost would raise the price to at least $8. I figured there had to be a cheaper DIY solution.


Thanks to these simple tools — neither of which cost me a cent — I should be able to get all the contents out of both these pesky tubes. And in future, I'll try to avoid buying any product in this kind of idiotic packaging.


No comments:
Post a Comment